Tuesday, June 19, 2012

Zertifiable. Yes!


Introducing the 
Zutter Certified Instructor 
Program!!!!


Our design and product experts have developed this course based on years of teaching Zutter products, tools, and techniques to customers both in-person and online. You will receive instruction on all Zutter tools and products, as well as marketing tips and materials, plus we'll create several projects in the course that can be used to develop your own unique Zutter class offerings. 


In addition, Certified Instructors will receive a certificate in class, be offered discounts on supplies and tools for teaching, be listed on the Bind-It-All blog, be referred to retailers requesting classes, and receive on-going support from our Education Coordinator and Regional Certification Instructors. At the end of the course, you will earn your certificate by demonstrating the techniques learned during the course practicum. 


We're launching this program at CHA in Chicago this summer with very limited seating. We want your certification as an instructor to be a unique and special qualification you can offer your retail stores and customers so with that in mind, we are limiting the number of certifications that will be presented. 


The course will be held at the Donald E. Stevens Convention Center in Rosemont, IL on July 15, 2012. 


To request an application, please email your resume, a brief summary about your teaching experience, blog link, name, and address to zuttercert@gmail.com. 


Applications will be reviewed and approved as received, on a first-come, first-served basis. A fee schedule will be sent to you with your application. Travel arrangement and hotel accommodations are not provided. Please direct all questions to zuttercert@gmail.com.


We are very excited to be able to offer this opportunity for instructors and designers and look forward to seeing you in Rosemont!

Thank you!!!!!!!!

Monday, June 18, 2012

Love Letters and 10 Years

Hello friends, Heather here with a fun project I am so excited to share with you using a set of 5x7 acrylic covers  for a special keepsake book I created in celebration of 10 years of marriage with my handsome hubby. I have to start by saying I absolutely love using acrylic in my books. I will add an acrylic cover or page in whenever I can because I love the extra weight it gives and there is something fun about the translucence of the acrylic.


In honor of my anniversary, I was inspired to take a trip down memory lane, finding old pictures and notes that we have written over the years. I realized that I had yet to make a book that documented just our relationship and this was the perfect opportunity. I wanted to keep this book simple, yet still have the personal touches I love, like hidden pockets for love notes, and extra tags to journal on. Hope you enjoy my mini and the step by step instructions so that you can make one of your own.

Start out by punching 8 holes in the acrylic covers. Leave the
 protective film on the covers until you have finished punching to protect
from scratches or cracking.


Continue to punch 8 holes on all of the interior pages
Use 3/4" Black O-Wire to bind the book. Since the book is 1/2" thick
and I added the additional tags and pockets, 3/4" O-Wire is a great
size to allow the pages to turn freely.

Here is the front cover, a picture from our wedding on top
(yes, I am the one smashing cake on him while he was being very sweet,
I could have sworn he was going to do it!)
and a more recent picture underneath. The pictures are attatched on
the 1st page, and I added a die cut and bling to the acryclic

A flashback picture from my Homecoming Dance when
I was a junior in high school
Another fun pocket inside of the paper bag to add notes and old pictures


Supplies:

Best,
Heather

          http://www.whimzeecreations.blogspot.com/


Sunday, June 17, 2012

Espresso, Café Latte, or Macchiato?

My favorite is a Marble Mocha Macchiato, light syrup and light whip!  However, I’ll never turn down a good cup of coffee and I like to try different ones, though I prefer a darker roast.   At home, my favorite is Starbucks Café Verona, but when I’m on a budget, Maxwell House Italian Roast will do just fine! 

When I saw the coffee line papers by Canvas Corp, I knew I was going to be making a mini album about my love of coffee with these.  And what better way to create a tiny mini than use a little stash of coffee sleeves I’ve been saving?

I traced my coffee sleeves, cut out the papers, and covered my coffee sleeves.
The tags were created using Coffee Defined paper cut up in pieces and then embellished with lots of stash embellies.  This whole thing came together so well since everything was kraft color based and neutral.  
I then went ahead and punched my holes using my Bind-It-All before embellishing.  This is a really important part of creating mini albums and ensures that your embellishments do not get in the way when punching and binding.  After embellishing my sleeves, I bound this mini with the 1.25" O-wires since it was such a chunky little mini.  

I really pulled out a lot of older embellishments and had a little happy party drinking coffee and embellishing my album.  I love the tied burlap on the wires along with my JAVA type charms. Oh, and the back felt piece was a Pink Paislee embellishment that I altered with a coffee circle from the paper collection.  Now, I'm going to go journal about my favorite coffee drinks, friends, places, and travels. So, what is your favorite cup of Joe? 

PS.  HAVE A FABULOUS FATHER'S DAY TO ALL FATHERS!

Until next time,

Saturday, June 16, 2012

Clip-Board Wood.......Just Fabulous!


Hey there.........Michelle Gutierrez here to show you the mini album I made using the 6"x6" Clip-Board Wood  cover, Heidi Swapp , and Bind It All V2.0.


When I first saw this Sugar Chic line from Heidi Swapp, I knew immediately that it would be a perfect girlie album. The freedom to create an album using this awesome line makes me so happy. Mini albums have been my favorite thing to make and gift for many years now. Along with my Bind It All V2 and 6"x6" clip-board I set off to do just that.


When using the clip-board and because of the thickness, you will need to apply a whole lot of pressure to get the cut through. I had decided to center the album in the middle for my Bind It All and cut only 6 holes for my O-rings.


 On the inside of my mini album I used chipboard and cut it to 5 3/4x5 3/4 to fit inside the 6x6 album. I loved all the embellishments that came with the Heidi Swapp line and I was able to find these cute Zebra gemstone to make perfectly.


Products Used -
  • Zutter Bind-It-All V 2.0
  • Zutter O-Wires in Silver 1"
  • Zutter Clip-Board Wood 6"x6" 
  • Sugar Chic - Heidi Swapp paper, embellishments, and stickers
  • Ribbon - May Arts, & Fabric Barn
  • Heart - Cricut, Plantin cartridge
  • Deckle Scissors
  • Ranger - Stickles
  • Colorbox Ink - Mixed Media, Black
  • Lettering stickers - Authentique 
  • Zebra gemstones - The Paper Studio
I hope you come back soon to see all the awesome stuff our design team will be showcasing.

Friday, June 15, 2012

One Cup or Two?


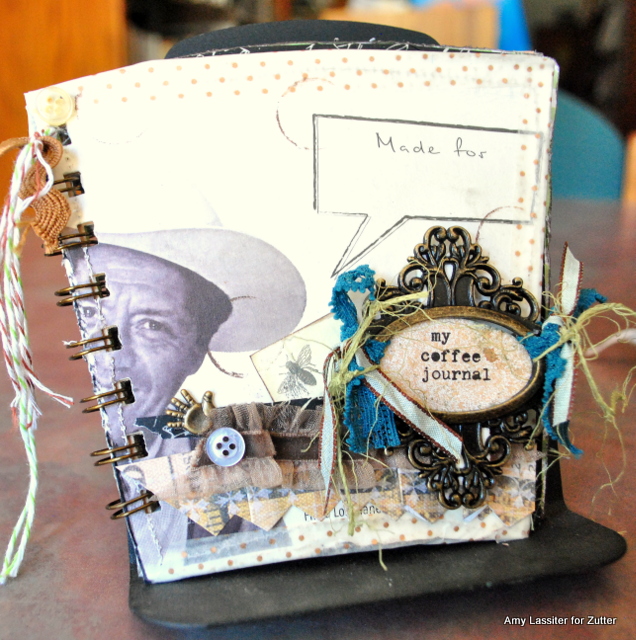
It's Amy here today to share yet another coffee centric set of mini books! I love coffee, but if you've seen my previous posts, you know that's no secret. This time (and I think this is the last of my coffee centric ideas) these mini's were created around the coffee cup album concept by Wilna Furstenberg. I'd had her instructions on my computer's desktop for way over a year. It was so cute, but I was just too daunted by the taping, gluing, and detailed binding of the album. Enter the Bind-It-All, and my fears disappeared! I basically followed all of the instructions, but it was made super easy by just binding the book with 3/4 inch brass o wires. Easy peasy, AND, I made it my own special way (without worrying it would fall apart with my sad taping skills!)


Because I had saved two cups in different sizes, from a trip to my favorite local, organic, very hip coffee house (where I actually worked as a barista about 13 years ago, before getting married) with my sweet 12 year old daughter; I created two minis with covers in different styles. I think these would be super to stick into my purse with a pen and accessories, and I could quickly whip them out, and journal about an enjoyable day, and in Smash style, I could add a cocktail sized napkin, receipt, etc.
 For this larger sized (12 oz) coffee cup mini (cutting and creating instructions are simple, just remove the bottom of the cup by punching it out, and roll out the tops of the cup. I ironed it after unrolling, to smooth it out, and then finished the edges with washi tape), I went with a more vintage, yet quirky look.


 The inside pages are made from scraps I had in my bin, and also coffee bags I had saved, that had fun graphics. All I did was trace the covers of the cup, and cut out. The edges are sewn for stability, and several of them also have washi taped edges.
I thought the cup with the coffee bean farmer on it, and the "made for" speech bubble was so interesting,. and it made for a fun back cover, when set off with a polka dot washi tape. :) 


For the smaller of the two cups (this one was for an affogato, where 2 espresso shots were poured over hand dipped, local ice cream...be still my heart) I went with a grungier, artsier look. I misted circles around the cup's tree in the middle, using a handmade stencil, and then placed stamped circles around those. I liked the geometric look it created. The "made with <3 for_______" was on the cup. I thought that was sweet.


 I'm pretty excited to take these to this coffee shop, and show them what one (or two!) of their cups can do! I'm also excited that I didn't have to throw this cup into the trash, but instead it will become a little journal that holds notes about my "me time" in the coffee shop!

Thank you SO much for joining me today, and I hope you have a wonderful day!


The Fabulous Zutter Products I used:


Thursday, June 14, 2012

For the man in your life

Father's Day is fast approaching and what better way to tell him how awesome he is than in a mini album?  I have a wonderful husband but he is an amazing Dad, always playing with the kids, being there for them, coaching and giving them everything they could possibly need.


To create a more manly mini album I used the 7" x 7" Corrugated Board by Donna Salazar.  I love how grungy they look once you rip them apart and paint them.  I used the Bella Blvd. paper and the journaling cards were perfect for this album.  I worked the size and colors of the album around them.


I kept the embellishments to a minimum to keep it more masculine and just added some words to each of the photos.


I left a spot on the back page for my kids to add a little note for their Dad.  I think it's important to capture their thoughts and memeries as well.


Thanks for stopping by today.  I hope the men in your life have a wonderful Father's Day.

Wednesday, June 13, 2012

Beach & Twine Your Are So Fine!

Good morning Bind-It-All friends,
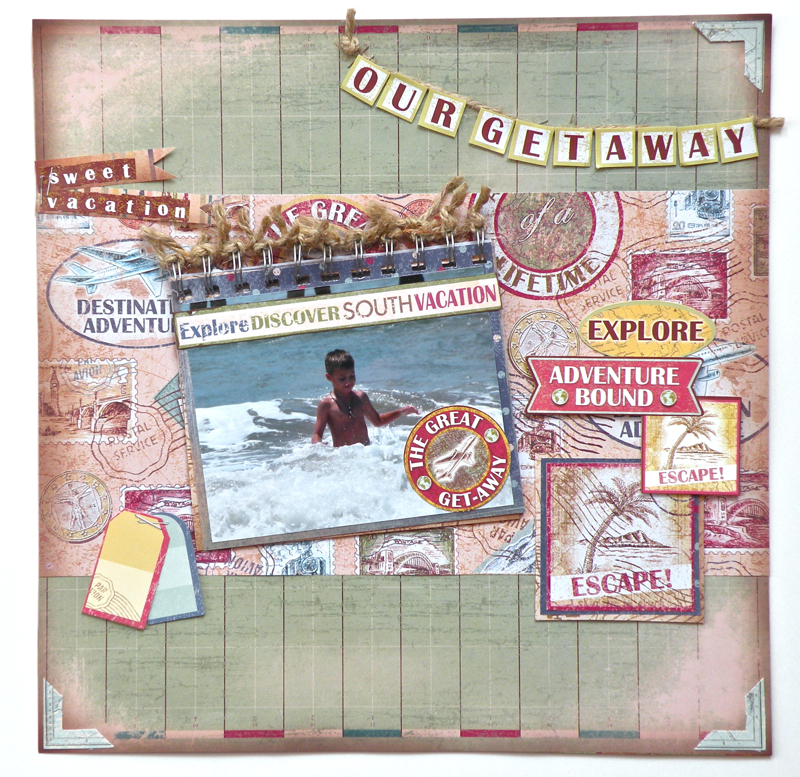
Pinky here with a fun way to scrapbook MANY photos at once and
make your pages more interactive.  

I don't know about you but I am a layering fool, that got me to thinking
why not make a mini album of photos of sorts and put it right on my 
scrapbook page? Using the Zutter Bind-It-All and the 1/2" O-Wires I 
created this scrapbook page that features SEVERAL photos. 

A Photo Flip!

Since this is a very "beachy" layout I added twine to every
single O-Wire for a fun beachy feel...it blends perfectly.
Let me share with you a how-to on making the photo flip. 
Step 1. Trim all photos to uniform size. These are trimmed to 4"X5"
Step 2. Matte each photo leaving extra 1/2" at the top for binding purposes. 
Also trim out one piece of card stock with no photo for backing. 
The matting size shown is 5 1/2"X4 3/4".
Step 3. Using your Bind-It-All 2.0 set to D- Inner Pages, punch out binding holes. 
Step 4. Align punched photos, flip back paper over, using Zutter Bind-It-All 2.0 
and 1/2" binding O-Wires, bind together. 
Step 5. Flip back page to the back, and adhere onto layout. 
Step 6. Carefully thread twine through each O-Wire and tie into knots, trimming off excess. 
Step 7. Using strong adhesive- adhere knots to page for added strength and security. 
Now you can enjoy 6-10 photos on one page. 
Such a fun way to showcase an entire vacation or event. 
I hope you were inspired to think outside the box and inside the Bind-It-All
for scrapbooking and beyond! Until next time-

Supplies: