Showing posts with label bind it all. Show all posts

Monday, August 27, 2012

A Sweet Baby Book, Start to finish

Jennifer Priest here with a quick little video showing how to make a mini book from start to finish using one of the kits in my etsy shop. 


This video features the Sweet Baby Girl Mini Book Kit from start to finish. This same tutorial can be used for the Sweet Baby Boy Kit or you can substitute your own paper and create a book with any theme. I hope you enjoy this -- it goes pretty quick!


Posted by Jennifer Priest

Sunday, August 26, 2012

Junior memories book

Hello all. Nicole here. Where has the time gone? I can't believe it, but my baby sister is starting her Junior year of high school this month. Yikes. I feel so old. Last month while I was visiting my mom and sisters, Katie asked me if I ever made blank mini albums (which I never do), but I told her I could make here a few. In fact, I was really happy that she asked because the thing I love the most about scrapbooking is that I can make beautiful things for other people that are one of a kind. This month I had so much fun using some goodies from the Hydrangea Hippo Esty shop. Have you seen this shop? There are so many adorable trinkets, trims, jewels and so much more in this shop. You must check it out. This mini was a challenge for me since I am not used to creating minis without pictures but I think I did ok. And I think Katie's gonna love it :)


Supplies:
Zutter: 8X8 Cover-Alls in White
Zutter: Owire in Pink
Zutter: 4X6 Movable Pre-Punched Page Protectors
Other:
American Crafts, Echo Park, G.C.D Studios: Papers
Zva Creative: Jewels
May Arts: Trims
Tags, Flowers, Buttons, Trinkets, Leaves, Stickpin: Hydrangea Hippo Esty shop

Friday, August 17, 2012

Tea Party

Hi everyone, Nancy here today to share with you a mini album to go with the teacup mobile I made a couple of weeks ago.  (If you missed that project you can see it here.)  Once again, I used my Cricut to cut the chipboard and my cardstock; and used my trusty Bind-it-All to bring it all together.  I love that about my Bind-it-All...I can cut just about any shape and turn it into a mini album.  I chose to use one inch, white o-wires to hold this little book, which measures about 5 inches across the top, together.
I filled the mini album with lots of yummy papers and chipboard from the Daily Junque collection from Pink Paislee and a few odds and ends from my scrap table including Prima flowers, lace and trims; as well as some Basic Grey Canvas, a couple of older Autumn Leaves buttons, and a resin piece from Melissa Francess that I colored with some alcohol markers.


Here is a close up of the front cover which also has a large pink flower from the Hydrangea Hippo store. 
I was hoping to use this little mini for an upcoming party my daughter is hosting.  But she really wanted to use it now, so we filled it with photos from her third birthday party.  

Thanks for stopping by.

Hugs.

InLinkz.com
Zutter Items Used
Bind it All
White O-Wires
Chipboard

Non Zutter Items:
Patterned Paper & Chipboard: Pink Paislee
Flowers:  Large Pink Hydrangea Hippo
Other Flowers: Prima Marketing
Resin: Melissa Francess
Laces: Prima Marketing
Cording: Crate Paper
Alphabet Stickers: Making Memories
Buttons: Autumn Leaves
Stick Pin: Prima Marketing
Alcohol Markers:  Bic Markits
Jewels: Prima
Teapot charm: Unknown
Canvas tags: Basic Grey

Nancy

Wednesday, August 8, 2012

Tuesday, August 7, 2012

Spinning Round and Round

Hi everyone!  Nancy here today to share with you something a little different that I made with some of the super fun goodies from Zutter.  This month I decided to make something completely different with my chipboard, wires and bind-it-all.
I  started by cutting a piece of a chipboard cover into a tea cup shape with my Cricut and attached a closed one inch pink OWire that I had gently stretched to the lip of the cup.
 I closed a number of other pink OWires and attached them to the saucer of the cup,
 and then went crazy with the embellishments.
 This cute little mobile is what emerged.
I had so much fun with this and can't wait to share it with my niece.  It will be perfect for her room.

Supplies Used:


Hugs.

Nancy Keslin
homesclscrapper.blogspot.com


Tuesday, July 31, 2012

DIY With the BIA


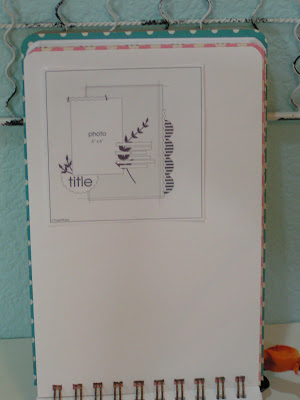
Jennifer Priest here to share with you a custom scrapbooking sketch book I created. It's one of those things you just can't buy because no one sells them.

I’ve been clipping sketches from magazines, printing them from the internet, and sketching my own over the years and I have amassed a large collection of bits and pieces of papers with sketches on them. I’ve seen sketch books made from Composition books but I wanted something totally customized to me. Enter the Bind-It-All!

I started my project by designing blank sketch pages on the computer. I set the margins to ½” on all sides but left about an inch on the bottom so that I had room to punch my binding holes. The pages are printed on 8.5x11 paper and then cut in half to create 8.5 x 5.5 pages. This is a nice size for taking in a crop bag, I think! I printed all the pages on both sides, creating single 12x12 sketch blanks on one side and double layout sketch blanks on the other side of each page.

After I printed and cut all the inner pages, I cut some blank pages to put in the back so I have a spot to glue sketches I’ve printed or cut from mags. You can put divider pages in if you want – I put one to separate sketches I make from the ones I printed or cut out.

To assemble the book, cut one Zutter Chipboard Cover down to 8.5"x11". Then cut it in half to make two 8.5"x5.5" covers. Cover with paper, then punch binding holes on the 5.5” side. Put the book in order with a cover, inner pages, and then a cover. Lay the back cover on the front cover so the outsides of the covers are facing each other. Insert binding wires and bind with the Bind It All. The rule of thumb for choosing wires for your project is to choose a wire with a diameter ¼” larger than your project is thick. Since I plan to glue things to the inside of my book, which will make it thicker over time, I am using an O-wire with ½” bigger diameter than my book is thick right now. Use the Binding Buddy to close all 9 loops of O-Wire at one time. After the book is bound, add a title and decorate! You can also use the Round It All to round the corners so they don’t get bent up while the book is stowed in your tote bag.


Supplies:
  • O-Wires, Chipboard Cover, Round It All, Binding Buddy – Zutter
  • Paper – The Paper Company, October Afternoon
  • Stickers – American Crafts, Making Memories, 7 Gypsies
  • Stamp – Scenic Route
  • Diecuts – October Afternoon, K&Company
  • Ink – Close to My Heart, Colorbox
  • Ribbon & Seam Binding -- Offray, May Arts, Making Memories

What book would you make that you can't find on the market to buy?

Visit my blog at: hydrangeahippo.com

Monday, July 30, 2012

Happy together

Hello! I hope all is well with you! Today I am just going to share a quick and easy mini album that I created for my sister. A few months ago, I came across some post about her relationship with her boyfriend and thought it was so touching so I wanted to create something that she will always have to remember these precious times. I hope she found her soulmate because it's not easy to find that special person you want to be with for the rest of your life and she is SO happy with Scott and I am truly happy for her.
Supplies:
  • Zutter: Bind-it-All
  • Zutter: Owires in Antique Brass
  • Other:
  • Creative Memories: Cardstock
  • Webster's Pages: Papers
  • Webster's Pages: Trims
  • Webster's Pages: Jewels
  • Webster's Pages: Acrylic heart
  • Wesbter's Pages: Flower
  • Creative Memories: Heart Punch

Wednesday, July 25, 2012

Introducing Add-it-Alls and the Binding Buddy!

Fresh from CHA, we're so excited to share with you about our two newest additions to the Zutter family:


Add-it-Alls and the Binding Buddy!

Here's a quick little video that shows you how both of these products work with your Bind-it-All V1.0 (blue) and V2.0 (pink):


We're offering a fabulous special offer for a limited time to those of you who already own a Bind-it-All machine!!!  Visit our website for all the details here: Binding Buddy PreSale


Saturday, July 21, 2012

Bind a Holiday - and a Technique

Hi everyone!  Nancy here today to share with you a fun mini album I made with a super cute kit I picked up from the Hydrangea Hippo etsy store.  My family is heading off to Hawaii soon and I wanted to make a cute mini album to showcase a few of the photos I have yet to take.  LOL
I love these papers from Trinity Paper Arts and think they are just perfect for this project, especially after a quick trip through my Distrezz-it-All to get the lovely worn edges.
I love making small albums to showcase a few special photos, and my Bind-it-All is makes it quick and easy to get to the fun part (for me anyway), embellishing.


I really love the added opportunities working with o-wires brings to my minis.  For this book, not only did I attach lots of buttons, beads, ribbons and other baubles to the o-wires; but I changed the color of the white o-wires to match the project.

This was a simple process involving a few alcohol markers (Bic Mark-its) that coordinated with my papers...
and my o-wires.  I simply colored the o-wires with the markers and then allowed the wire time to dry before binding.
Here you can see a close up of my fully embellished o-wires.
Thanks for stopping by today.

Hugs.

Nancy Keslin