Showing posts with label Zutter Zisters. Show all posts

Wednesday, August 15, 2012

Celebrating the Last of Summer With a Corrugated Board Technique

Hello! It's Amy here today, and I am so happy to share a favorite technique of mine in a video tutorial, and to give you a look at a layout I created using this technique!

As summer reaches its end for us here in Kansas, I wanted to review the celebration of fun we had at the beginning of the summer, visiting family in Minnesota. While we were there, we enjoyed several trips to their clear, beautiful lakes. My daughters all love the water so much, mostly because I am a water lover myself, and had them in the water right away, when they were tiny babies. My oldest daughter is now in her senior year (where did the time go?) and I'm getting nostalgic about everything. Of course, when seeing the picture below of her so happy in the lake, I remembered back to how she would amaze everyone at the swimming pool, by diving in the water, and swimming like a little dolphin, as early as 2 1/2 or 3 years old. No matter if she's an adult or not, she'll always be my "water baby." So, I created this layout around this theme.


Here is the video of the technique used to created the colorful, airbrushed look on the Zutter corrugated board:


And as seen in the video, here are some of the details on the page:


 I got the fabulous idea to create "water" with mist and layers, from a beautiful layout created by Jennifer Priest. You can see it HERE (it's a must see).  I changed it up a bit, by using cheesecloth, and spraying it with many colors and layers of mist, and then shaping it using decoupage paste and Krystal Kote (in Matte) by Helmar.  

Thank you SO much for stopping by the Zutter Zisters blog today, and for checking out my technique and layout! I hope as summer's celebration winds down, you will find fun photos of your summer activities that you can create a beautiful background with too, using this technique!
Other supplies used: 
Patterned Paper: Every Day is a Holiday; Foreign Text Paper/Punchinella/Teal Ribbon/Feather Fibers: Gauche Alchemy; Flowers: Prima, Recollections, Bazzill, Webster's Pages; Crocheted Trim, Hydrangea Hippo; Wooden Alphas: Pink Paislee; Starfish, Dew Drops: The Robin's Nest; Cheesecloth; Ink: Clearsnap, Tattered Angels

Sunday, July 29, 2012

Little Angels On A Clip Board!

Good morning Zutter friendz,

Pinky here with a fun little clip board mini book today. 
You know it's been such a fun summer this year with my friends and
family, and I have been doing so much crafting with my friend's
little girls lately, I thought I would make them little mini albums
to take around and share with their friends. 
I filled them with mini photos of our BBQ's, crafting days, and more!
I wanted something really sturdy, the Clip Board 3X4 mini album from
Zutter is perfect for this!!

Step 1. Using Bind-It-All 2.0 set to Cover Pages and
 3X4" Clip-Board Wood Covers carefully place wood in middle of
Bind-It-All and punch each cover separately. 
Step 2. Trim out 6-8 pages (using patterned paper) at 3X4".
Step 3. Using Bind-It-All 2.0 set to Inner Pages and paper from
step 2, punch pages. 
Step 4. Place pages into covers, roll back cover to the front. 
Step 5. Insert Antique Brass 1/2" Owire.
Placing Owire seam to the back of Bind-It-All, 
place in correct position. Press handle to close wires. 
Step 6. Embellish and create as desired. 

I cannot wait to pass these along to my little friends. 
I hope you had fun with today's mini album, until next time!


Monday, June 18, 2012

Love Letters and 10 Years

Hello friends, Heather here with a fun project I am so excited to share with you using a set of 5x7 acrylic covers  for a special keepsake book I created in celebration of 10 years of marriage with my handsome hubby. I have to start by saying I absolutely love using acrylic in my books. I will add an acrylic cover or page in whenever I can because I love the extra weight it gives and there is something fun about the translucence of the acrylic.


In honor of my anniversary, I was inspired to take a trip down memory lane, finding old pictures and notes that we have written over the years. I realized that I had yet to make a book that documented just our relationship and this was the perfect opportunity. I wanted to keep this book simple, yet still have the personal touches I love, like hidden pockets for love notes, and extra tags to journal on. Hope you enjoy my mini and the step by step instructions so that you can make one of your own.

Start out by punching 8 holes in the acrylic covers. Leave the
 protective film on the covers until you have finished punching to protect
from scratches or cracking.


Continue to punch 8 holes on all of the interior pages
Use 3/4" Black O-Wire to bind the book. Since the book is 1/2" thick
and I added the additional tags and pockets, 3/4" O-Wire is a great
size to allow the pages to turn freely.

Here is the front cover, a picture from our wedding on top
(yes, I am the one smashing cake on him while he was being very sweet,
I could have sworn he was going to do it!)
and a more recent picture underneath. The pictures are attatched on
the 1st page, and I added a die cut and bling to the acryclic

A flashback picture from my Homecoming Dance when
I was a junior in high school
Another fun pocket inside of the paper bag to add notes and old pictures


Supplies:

Best,
Heather

          http://www.whimzeecreations.blogspot.com/


Friday, June 15, 2012

One Cup or Two?


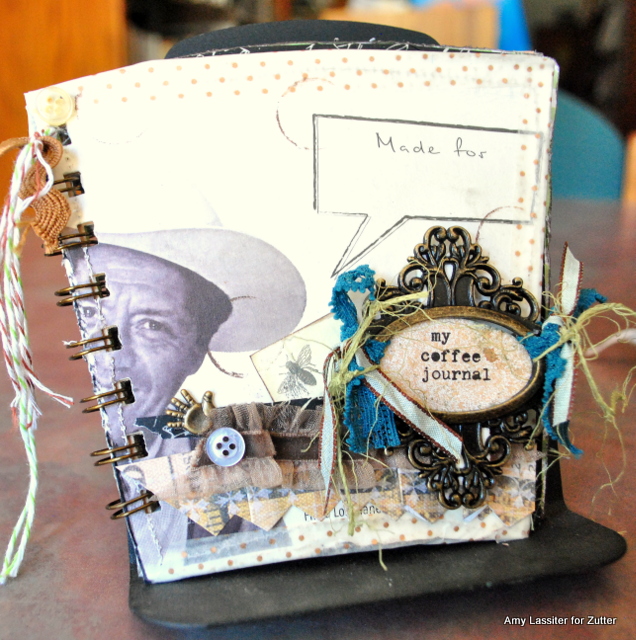
It's Amy here today to share yet another coffee centric set of mini books! I love coffee, but if you've seen my previous posts, you know that's no secret. This time (and I think this is the last of my coffee centric ideas) these mini's were created around the coffee cup album concept by Wilna Furstenberg. I'd had her instructions on my computer's desktop for way over a year. It was so cute, but I was just too daunted by the taping, gluing, and detailed binding of the album. Enter the Bind-It-All, and my fears disappeared! I basically followed all of the instructions, but it was made super easy by just binding the book with 3/4 inch brass o wires. Easy peasy, AND, I made it my own special way (without worrying it would fall apart with my sad taping skills!)


Because I had saved two cups in different sizes, from a trip to my favorite local, organic, very hip coffee house (where I actually worked as a barista about 13 years ago, before getting married) with my sweet 12 year old daughter; I created two minis with covers in different styles. I think these would be super to stick into my purse with a pen and accessories, and I could quickly whip them out, and journal about an enjoyable day, and in Smash style, I could add a cocktail sized napkin, receipt, etc.
 For this larger sized (12 oz) coffee cup mini (cutting and creating instructions are simple, just remove the bottom of the cup by punching it out, and roll out the tops of the cup. I ironed it after unrolling, to smooth it out, and then finished the edges with washi tape), I went with a more vintage, yet quirky look.


 The inside pages are made from scraps I had in my bin, and also coffee bags I had saved, that had fun graphics. All I did was trace the covers of the cup, and cut out. The edges are sewn for stability, and several of them also have washi taped edges.
I thought the cup with the coffee bean farmer on it, and the "made for" speech bubble was so interesting,. and it made for a fun back cover, when set off with a polka dot washi tape. :) 


For the smaller of the two cups (this one was for an affogato, where 2 espresso shots were poured over hand dipped, local ice cream...be still my heart) I went with a grungier, artsier look. I misted circles around the cup's tree in the middle, using a handmade stencil, and then placed stamped circles around those. I liked the geometric look it created. The "made with <3 for_______" was on the cup. I thought that was sweet.


 I'm pretty excited to take these to this coffee shop, and show them what one (or two!) of their cups can do! I'm also excited that I didn't have to throw this cup into the trash, but instead it will become a little journal that holds notes about my "me time" in the coffee shop!

Thank you SO much for joining me today, and I hope you have a wonderful day!


The Fabulous Zutter Products I used: