Showing posts with label Clearsnap. Show all posts

Thursday, September 27, 2012

Old Book Covers? Yes Please!


Jennifer Priest here with a fun Halloween mini I created using actual old book covers! Using book pages for decoupage and other projects, like wreaths, is so popular but what do you do with the leftover book coves? Many vintage books, like the reader's Digest Condensed book here, have old covers with a great patina and fabulous designs. They are great to repurpose as mini album covers like this:


Tie all kinds of lace and trim to the binding to give the book a spooky feel for Halloween!


The pages can be bigger than the covers, like this 5x7 Chipboard Covers and Glassine Bags I used here:


Consider wrapping pages with trim and tying it in a knot after the pages are bound--this eliminates the risk of accidentally punching through and cutting a trim.


Hope you enjoyed this book! And next time, before you throw those old book covers away,think about giving them new life with your Bind-it-All!


Visit my blog at:

Tuesday, September 25, 2012

Meet Our Certified Instructor: Steph Ackerman

Introducing Steph Ackerman, one of our Certified Instructors!


I am a craft-a-holic who loves nothing better than spending time in my craft room creating. I create an assortment of projects - from cards and layouts to mix'd media and altered art.   My day is just not complete if I haven't spent some time crafting. I have a dedicated craft area where I work and teach a wide variety of classes for the beginner and the more experienced crafter.  I love using assorted tools  (Bind-it-all, Cricut, Sizzix, Spellbinders) plus inks and stamps in my work.  I am a firm believer in playing with your supplies because only then can you truly see their full potential.  I have been fortunate to have a number of my projects published.  I am a  Craft and Hobby Association Designer Member.

To book a class or see Steph's schedule please visit:  http://www.stephaniescraps.blogspot.com/

Thursday, August 30, 2012

What's your number?

Hello ladies. Nicole here and today I have a fun tutorial for you. I am going to show you how to create a fun address/phone number book of your own. I'm thinking that this will make a great Christmas gift. Score! First cut 2 pieces of chipboard down to 4X4 and punch the top right and bottom right using your Round-it-All. Then use spray mist to alter the covers.
I found an address page on Maya Road's website and decided to resize the template to 4X4 and then I printed 50 4X4 address pages, front and back to use as my inserts. I cut 9 pieces of 4X4 patterned paper and then folded them in half to use as my dividers.Then I punched holes through each page.
After I punched each page, I fed the wire through each page and then used my Bind-it-All to bind the pages together.
Last, I decorated my cover and here's my final project. I love how it turned out.


  • Supplies:
  • Zutter: Bind-it-All
  • Zutter: 1" Owires in white
  • Zutter: Round-it-All
  • Other:
  • Clearsnap: Mist (Holly Berries)
  • Creative Memories patterned paper
  • May Arts: Flower ribbon in white and String
  • Jillibean Soup: Wooden Button 

Tuesday, August 21, 2012

A coloring book for Edward

Hello everyone. Nicole here. Lately, it seems like all Edward wants to do is sit on my lap so that he can demand me to draw pictures of cars, turtles, mommy and daddy. The list goes on :) I actually love this. I think that I might have a little artist, so I'm doing everything that I can to encourage him to find his creative side.
Since my son loves to draw, I decided to create him a fun coloring book using my Bind-it-All and Clipboards. This was such a quick and easy project and Edward loves it! Go ahead and try creating one of your own. I bet your kids will love it too!
Supplies: Zutter: Bind-it-All Zutter: 6x6 Clipboard Wood Zutter: 1" Antique Brass Owires Other: American Crafts: Chipboard Alphas Clearsnap: Smooch (Mocha) Clearsnap: Mix'd Media Inx (Patina, Truffle) Clearsnap: Glue Gloss

Wednesday, August 15, 2012

Celebrating the Last of Summer With a Corrugated Board Technique

Hello! It's Amy here today, and I am so happy to share a favorite technique of mine in a video tutorial, and to give you a look at a layout I created using this technique!

As summer reaches its end for us here in Kansas, I wanted to review the celebration of fun we had at the beginning of the summer, visiting family in Minnesota. While we were there, we enjoyed several trips to their clear, beautiful lakes. My daughters all love the water so much, mostly because I am a water lover myself, and had them in the water right away, when they were tiny babies. My oldest daughter is now in her senior year (where did the time go?) and I'm getting nostalgic about everything. Of course, when seeing the picture below of her so happy in the lake, I remembered back to how she would amaze everyone at the swimming pool, by diving in the water, and swimming like a little dolphin, as early as 2 1/2 or 3 years old. No matter if she's an adult or not, she'll always be my "water baby." So, I created this layout around this theme.


Here is the video of the technique used to created the colorful, airbrushed look on the Zutter corrugated board:


And as seen in the video, here are some of the details on the page:


 I got the fabulous idea to create "water" with mist and layers, from a beautiful layout created by Jennifer Priest. You can see it HERE (it's a must see).  I changed it up a bit, by using cheesecloth, and spraying it with many colors and layers of mist, and then shaping it using decoupage paste and Krystal Kote (in Matte) by Helmar.  

Thank you SO much for stopping by the Zutter Zisters blog today, and for checking out my technique and layout! I hope as summer's celebration winds down, you will find fun photos of your summer activities that you can create a beautiful background with too, using this technique!
Other supplies used: 
Patterned Paper: Every Day is a Holiday; Foreign Text Paper/Punchinella/Teal Ribbon/Feather Fibers: Gauche Alchemy; Flowers: Prima, Recollections, Bazzill, Webster's Pages; Crocheted Trim, Hydrangea Hippo; Wooden Alphas: Pink Paislee; Starfish, Dew Drops: The Robin's Nest; Cheesecloth; Ink: Clearsnap, Tattered Angels

Saturday, August 4, 2012

Distrezzing It


Did you know you can Distrezz all 4 edges of your card bases? Yes, you can Distrezz the fold!!!


With a light hand, guide the folded side of the card through the Distrezz-it-All, from left to right as if reading the word "Zutter" printed on the machine. This gives a slight distressing to the edge. Then distress the other edges of the card. Ink them up with ColorBox Fluid Chalk Ink in Charcoal to make them really stand out!

The tattered edges look like worn fabric on this sewing themed card:


Here is how I made the card, using only paper scraps from my stash and a few stamps:
  1. Cut a card base to 5.5" x 8.5" and fold in half.
  2. Cut a piece of Grey Dot Patterned Paper to 4" x 5.25" and adhere to the card front. 
  3. Run the edges of the card,including the folded edge, through the Zutter Disztrezz-it-All. Ink the edges with ColorBox Fluid Chalk Ink in Charcoal.
  4. Apply a 1" x 4" strip of Patterned Paper to the lower right side of the card. Add two strips of washi tape over the paper.
  5. Stamp a sentiment onto a 1.75" circle punched from scrap paper. Mount to card using 3D Foam Tabs.
  6. Randomly stamps the background of the card with the scissors stamp using ColorBox Archival Dye In in Wicked Black.
  7. Punch one 1" circle and two 3/4" circles and mount to card with 3D Foam Dots.
Supplies:
  • Paper - Lily Bee, KaiserCraft
  • Washi Tape - Unknown
  • Ink - ColorBox Archival Dye Ink in Wicked Black and ColorBox Fluid Chalk Ink in Charcoal
  • Stamps - Stampin' Up!, Hero Arts
  • Punches- EK Success
  • Cardstock - Bazzill
  • Adhesive - Tombow USA
Here's another tip: Want an intense distressed look? Run the paper through the Distrezz-it-All from right to left, opposite the way you'd read the word "Zutter" on the machine. 


Posted by Jennifer Priest
hydrangeahippo.com


Thursday, July 19, 2012

A Day Out


Hi there everyone! Are we all hyped up
on CHA?!!!
Are we all excited about Zutter's
cool new product?!!!!
I just bet we are!


Well, I for one can't wait to get
my crafty little fingers
on some that's for sure.
Until then we can still play
and come up with some great
creative ideas.
I call this one
A Day Out.
This project was actually inspired
by a day out. It was a day
that I got a chance to meet Jennifer Priest
for the first time and 
made some goodies with the
Bind-It-All 2.0!
I only had a chance to create the
base of this project
but brought it back home
to finish it up.
I couldn't let this project just sit.


Just a few little sweet accents
that reminds me of the fresh
outdoors. 
I wish I had a bike just
like this one. 
Wheels and all!
It sure was a beautiful day
that day and I really wanted
this project to reflect that.
Maybe we all can
get outside, breathe the fresh air,
take in a few sun rays,
and get inspired together!
Thank you for letting me share!


             2. 3/4 Antique Brass Owire
          3. 3/4 Clip-board Covers
                          4. Hydrangea Hippo Sew Sweet Kit
                        5. Studio Calico Blue Grass Mister
                         6. Clearsnap Candle Glow Smooch
               7. Hydrangea Hippo Buttons
          8. Elle's Studio Pink Tags
9. Bo Bunny Paper


                                                              truedivinehand

Saturday, July 7, 2012

Feeling Beachy?

Hi everyone!  Nancy here today to share with you a fun mixed media wall hanging I made using my Zutter Bind-it-All, o-Wires, Canvas Artboard and lots of fun goodies from ClearSnap.
I love the texture and weight of the canvas art board.  It is the perfect weight for heavier items like these small shells.  I began these canvases by spritizing with a mixture of different colors of Smooch Spritz, allowing the colors to bleed into one another.  I then added a bit of gesso and finally a super cute embossed sun.  Did you know that Clearsnap makes scented embossing powders under the Color Box line?  This yellow smells like lemons.  So super fun on a project.
The Zutter canvas readily accepted the different mediums including inks, gesso, spray ink, stamps and embossing.
And the antique brass o-wires complimented my project perfectly.

I had a great time creating this wall hanging and I know you would have fun playing with the art board as well.

 Hugs.


Nancy

Tuesday, July 3, 2012

Summer in the City Mixed Media Album

Summer in the City

Hi, Cheryl here again, from Cheryl’s Window, and here is what is in my studio today.  

It is summer, and being from Florida, most expect beach themes from me. Unfortunately, I am not a beach girl.  CHA is coming up and last summer was my first CHA experience.  The day before CHA started, I had the chance to go into Chicago and experience THE CITY!  And it was so very hot, but it was exhilarating for me- the sights, the sounds, the smells, the people!

I had so much fun listening to this song and building my own mini album using Spellbinder dies designed by Donna Salazar.  I used Creative Book Pages One and Two as well as a few butterflies from her Wonderful Wings Grand Nestabilities collection. 

I created this mixed media album using chipboard for the back page to give my book stability as well as a variety of papers, tags, time card, plastic baggy, envelopes, and a piece of raw canvas.

Before I show you the entire album, I thought I’d share some of the creation process.
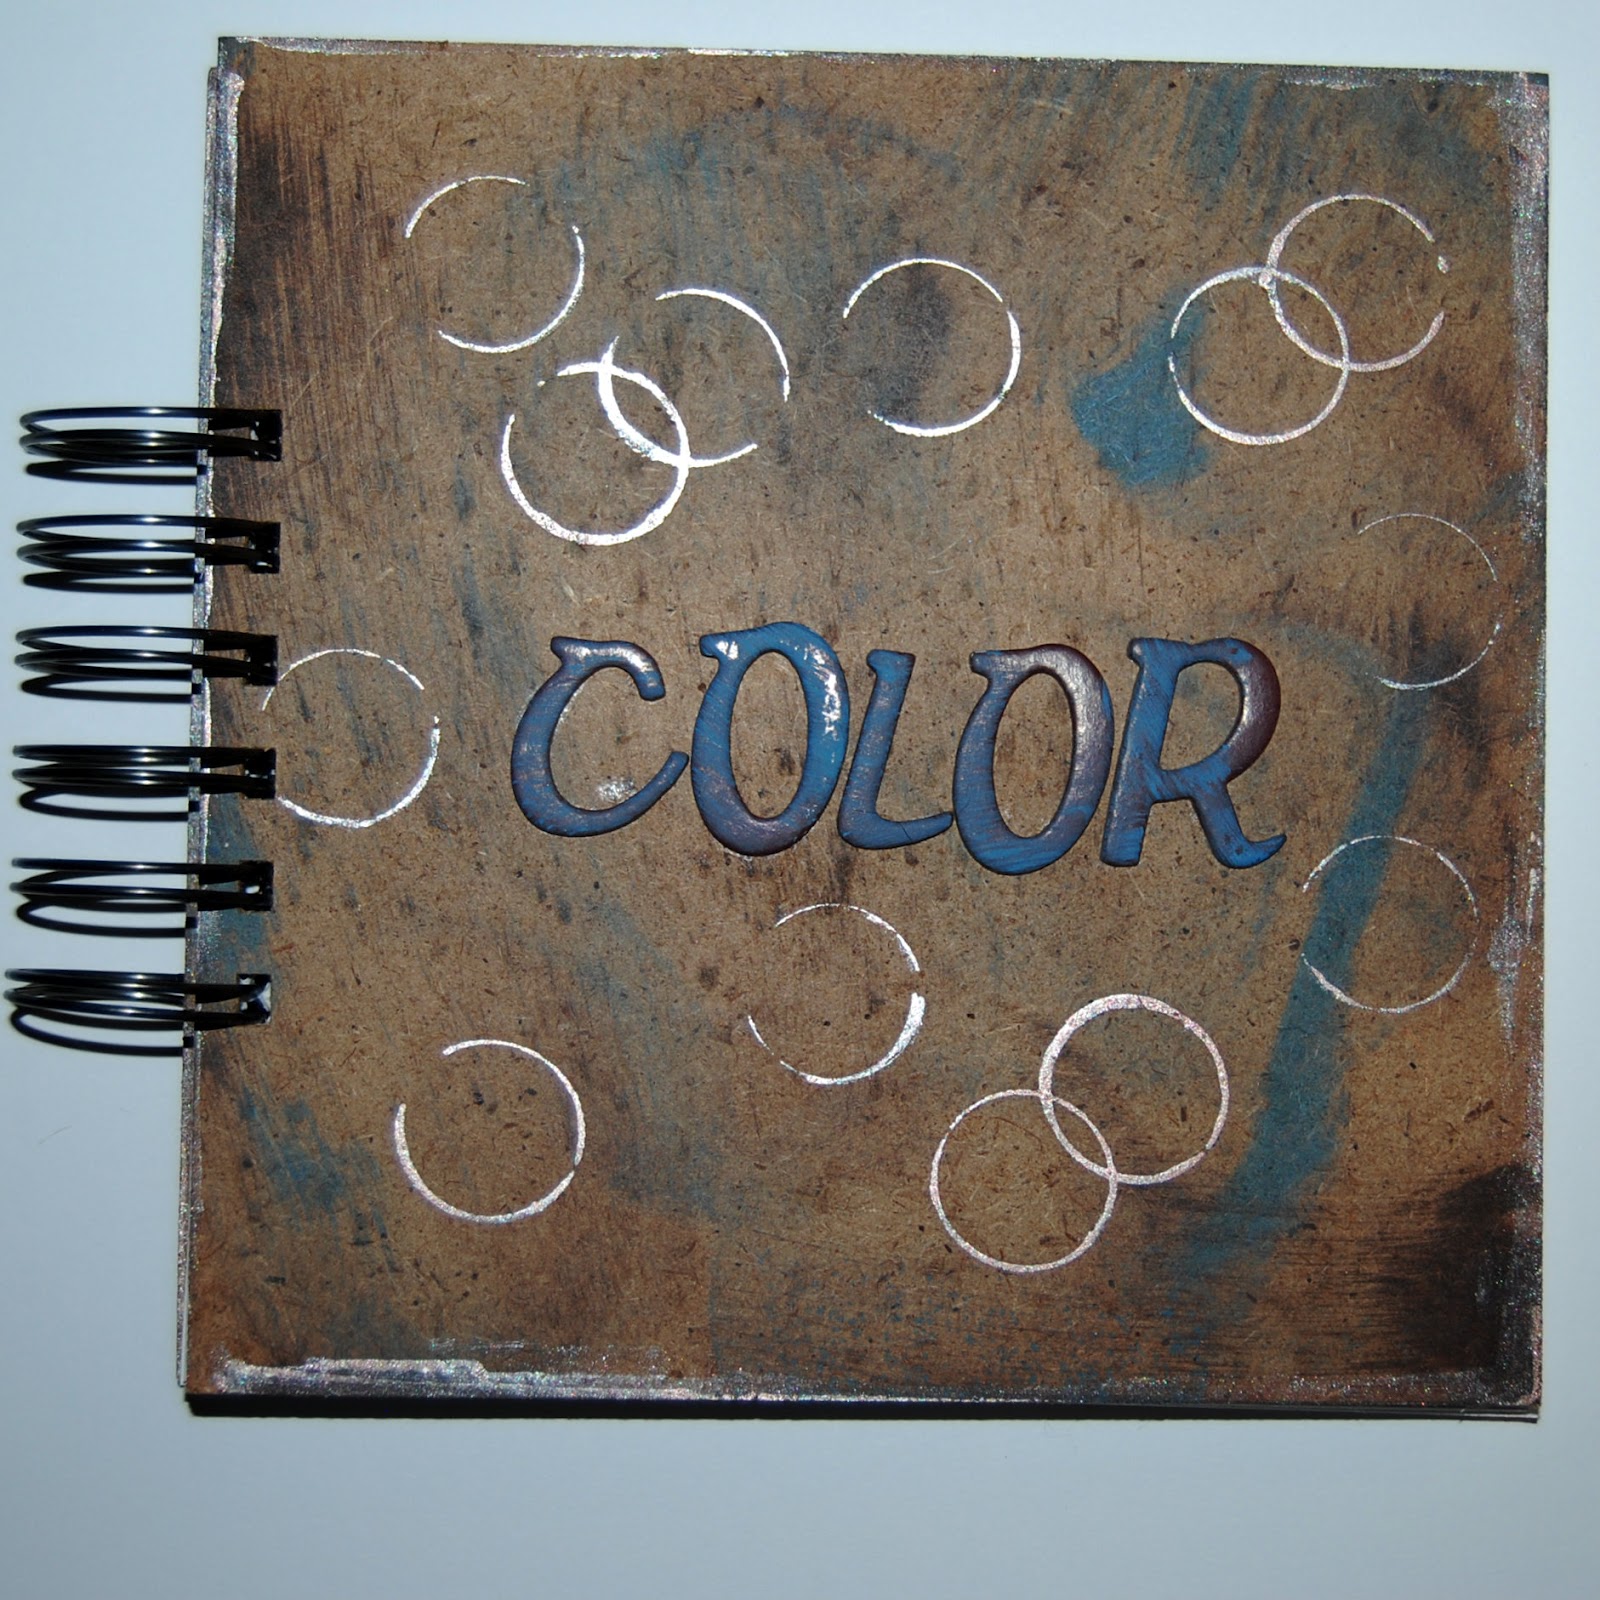
I used Zutter Chipboard cover for the back page of my album.  This provided structure and stability for my mixed album.  However, 8x8 was larger than I wanted, so I used my Zutter Kutter to cut down the board to 7 x 7 and then I rounded two outer corners with the Zutter Corner Rounder.
I inked edges and embossed a few embellishments using various products from ClearSnap.  I also colored and shaded with some with Faber-Castell Gelatos, even while using the die as a stencil.

I had so much fun putting this album together.   It is bright and happy and very summery to me. 
Want to peek inside my album?
Just look at all that layered yumminess.  I still have a few picture spots to fill and I’m trying to decide whether to add more from this trip or add some new pictures from my visit in a few weeks back in Chicago for CHA Summer 2012!

What are your plans for this summer?  Will you make a summer album?  Make sure to share on the BIA Facebook page if so.  We love seeing your creations using Zutter products.

Friday, June 22, 2012

What's The Cat's Meow Flip Card


Hi there Zutter nation!!!
Just popping in to share my latest
creation which is super easy but
fab. Since this month
is all about that special man in
your life, Fathers that is, I 
put together this flip card
just for him.


That's all it takes is a few pages
on the outside and one or two
inside. Place your favorite photos
of time spent, some journaling,
embellish, etc. 
Put as little or as much and
I am sure that it will 
touch his heart.

To all the Fathers out there
you are loved!!!


              3. Clearsnap Smooch Spritz
             Candle Glow and Blue
             4. SEI Mayberry Collection
                       5. Recollection Sparkle Cardstock

                                                                truedivinehand.blogspot.com