Showing posts with label Clipboard Wood. Show all posts

Tuesday, August 21, 2012

A coloring book for Edward

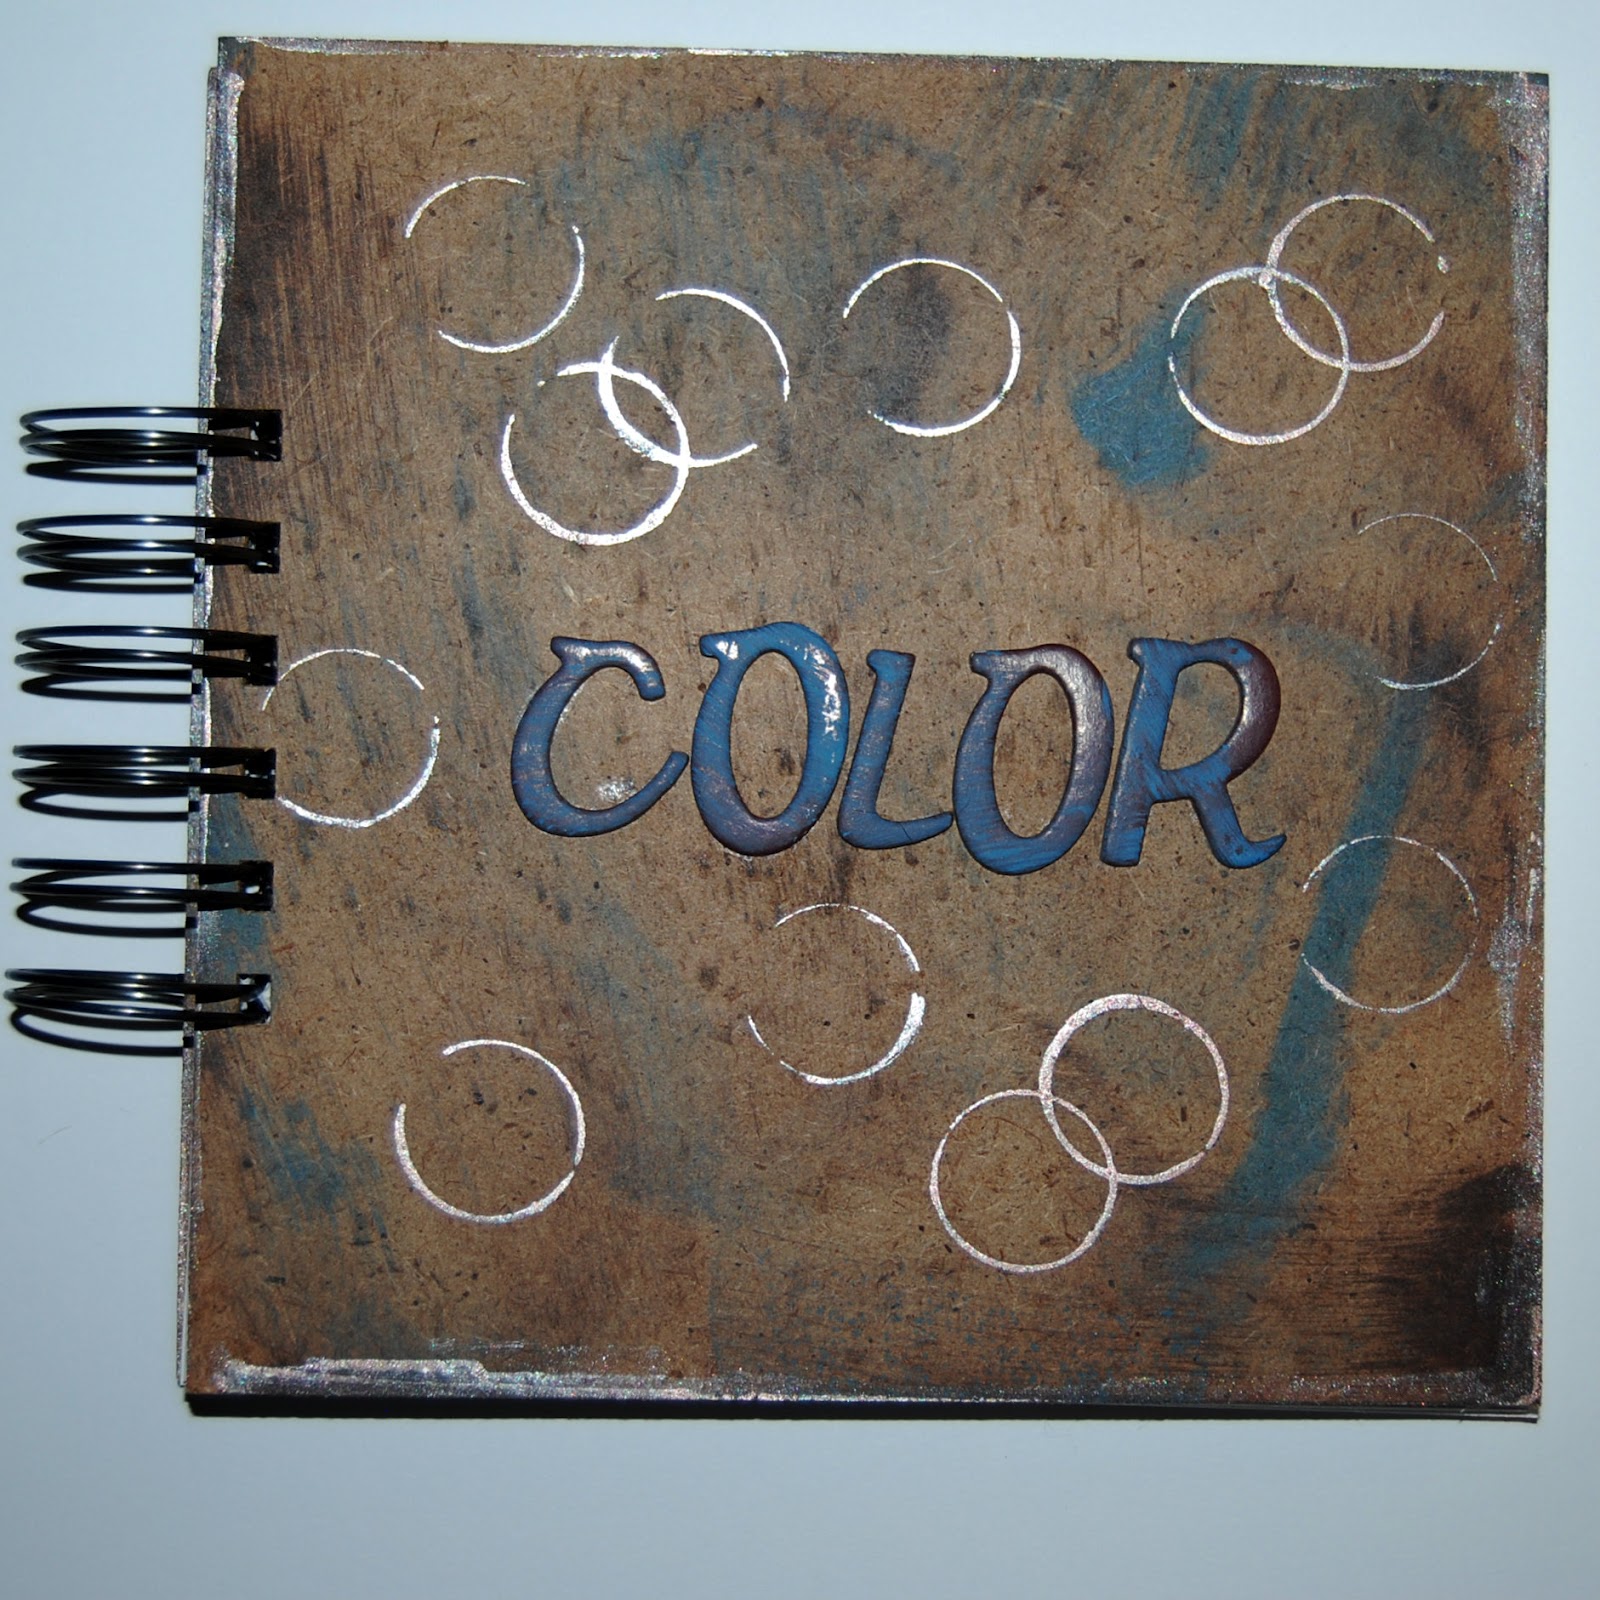
Hello everyone. Nicole here. Lately, it seems like all Edward wants to do is sit on my lap so that he can demand me to draw pictures of cars, turtles, mommy and daddy. The list goes on :) I actually love this. I think that I might have a little artist, so I'm doing everything that I can to encourage him to find his creative side.
Since my son loves to draw, I decided to create him a fun coloring book using my Bind-it-All and Clipboards. This was such a quick and easy project and Edward loves it! Go ahead and try creating one of your own. I bet your kids will love it too!
Supplies: Zutter: Bind-it-All Zutter: 6x6 Clipboard Wood Zutter: 1" Antique Brass Owires Other: American Crafts: Chipboard Alphas Clearsnap: Smooch (Mocha) Clearsnap: Mix'd Media Inx (Patina, Truffle) Clearsnap: Glue Gloss

Sunday, July 29, 2012

Little Angels On A Clip Board!

Good morning Zutter friendz,

Pinky here with a fun little clip board mini book today. 
You know it's been such a fun summer this year with my friends and
family, and I have been doing so much crafting with my friend's
little girls lately, I thought I would make them little mini albums
to take around and share with their friends. 
I filled them with mini photos of our BBQ's, crafting days, and more!
I wanted something really sturdy, the Clip Board 3X4 mini album from
Zutter is perfect for this!!

Step 1. Using Bind-It-All 2.0 set to Cover Pages and
 3X4" Clip-Board Wood Covers carefully place wood in middle of
Bind-It-All and punch each cover separately. 
Step 2. Trim out 6-8 pages (using patterned paper) at 3X4".
Step 3. Using Bind-It-All 2.0 set to Inner Pages and paper from
step 2, punch pages. 
Step 4. Place pages into covers, roll back cover to the front. 
Step 5. Insert Antique Brass 1/2" Owire.
Placing Owire seam to the back of Bind-It-All
place in correct position. Press handle to close wires. 
Step 6. Embellish and create as desired. 

I cannot wait to pass these along to my little friends. 
I hope you had fun with today's mini album, until next time!


Saturday, June 16, 2012

Clip-Board Wood.......Just Fabulous!


Hey there.........Michelle Gutierrez here to show you the mini album I made using the 6"x6" Clip-Board Wood  cover, Heidi Swapp , and Bind It All V2.0.


When I first saw this Sugar Chic line from Heidi Swapp, I knew immediately that it would be a perfect girlie album. The freedom to create an album using this awesome line makes me so happy. Mini albums have been my favorite thing to make and gift for many years now. Along with my Bind It All V2 and 6"x6" clip-board I set off to do just that.


When using the clip-board and because of the thickness, you will need to apply a whole lot of pressure to get the cut through. I had decided to center the album in the middle for my Bind It All and cut only 6 holes for my O-rings.


 On the inside of my mini album I used chipboard and cut it to 5 3/4x5 3/4 to fit inside the 6x6 album. I loved all the embellishments that came with the Heidi Swapp line and I was able to find these cute Zebra gemstone to make perfectly.


Products Used -
  • Zutter Bind-It-All V 2.0
  • Zutter O-Wires in Silver 1"
  • Zutter Clip-Board Wood 6"x6" 
  • Sugar Chic - Heidi Swapp paper, embellishments, and stickers
  • Ribbon - May Arts, & Fabric Barn
  • Heart - Cricut, Plantin cartridge
  • Deckle Scissors
  • Ranger - Stickles
  • Colorbox Ink - Mixed Media, Black
  • Lettering stickers - Authentique 
  • Zebra gemstones - The Paper Studio
I hope you come back soon to see all the awesome stuff our design team will be showcasing.

Sunday, June 3, 2012

Menu Planner on Display

Hello Zutter Fans.  Cheryl Boglioli, from Cheryl’s Window, here again to share my Kitchen Menu Planner.   When we get really busy around here at my house, we find ourselves eating out much more than we should be, which kills our food budget.  So, my daughter and I have started back at planning our menus again. 
I wanted my menu planner to be on display and easily accessible, so I knew Zutter’s Display-It-All would be perfect.  

I went searching the web for a great weekly and a great monthly planner.  I found ones that I liked at Picklebums.  Kate has a lot of great ideas on her blog too. I downloaded her free copies and printed them so that they would fit in 4 x 6 Zutter Pre-punched Page Protectors. 

I dug out BasicGrey Nook & Pantry paper from my stash, which was the perfect color and theme for my kitchen project. 
I even used my BasicGrey Notch & Die set that I haven’t used in a while.  I love using products I already have.
I used the rounded die to create two notches on opposing corners to slide each week’s and each month’s planner card. 
I chose to use the Zutter Page Protectors to store the extra planners as well as a place to store the recipes for the week.  By using the page protectors, this also gave me a way to display whichever recipe we are cooking and protect it from any spills or splatters.  For that same reason, I chose to use a Zutter 6x6 Acrylic Cover to project my entire project.  If something does splatter on it, I can easily just wipe it off.   Since it is going to be in my kitchen, I did not add lots of ribbons or embellishments, although it was really hard not to.  I even wanted to decorate the base, but I know how hard it is to keep things clean and wiped down in my kitchen, so I kept it plain…for now.
I used Tim Holt’s Alterations File Tabs On The Edge dies to cut the page edges for my Recipe, Weekly, and Monthly tabbed pages.  
The extra planners are stored in Zutter Page Protectors behind the weekly and monthly file tab pages.
See how I can just slide in a new page each month? 
And, here is the back page.  I used Zutter Clipboard to provide a good sturdy back to my planner as I hope to use it for a long time.
The Display-It-All was easy to use.  Of course, I could have just rested the wires over the stand, but I decided to actually mount mine onto the display.  After punching the covers and pages, I used the Display-It-All bracket to mark where to punch and then punched holes using my Crop-A-Dile.  Then I inserted the O-wires and used my Bind-It-All to bind my album.  All I had left to do was screw the back cover between the display stand and the display bracket. 
The Display-It-All looks good on my kitchen counter and is not so large as to get in the way or clutter my countertop.  Now I need to go plan this month’s menu and this week’s grocery list.  Do you have any recipes you want to share with me?  Please do, if so. 

Wednesday, May 23, 2012

3"X4" Journal

Hello everyone, Nicole here today to share with you an altered journal I made for my sister using my Zutter Bind -It-All, Round-It-All, 3/4" Pink O-Wires and a pack of 3"X4" Clipboard Wood Covers. 


One of the things I love the most about using Clipboard Wood is that you can alter it. Initially, I was going to cover the Clipboard Wood with patterned paper, but after I thought about it, I thought the textures in the Clipboard Wood would really shine through the mist. First I used my Round-It-All to punch the top and bottom right side of the Clipboard Wood.
 Then, I grabbed some mist and paint to alter the Clipboard Wood and flower.
White the mist and paint was drying, I decied to cut up some old note paper that I had lying around the house to use as my inserts.
After the pages were cut and the Clip-Board Wood was dry, I punched holes through them so that I could bind them together.
Then, I fed the pink 3/4" Owires through the Clip-Board Wood and papers, cut the wire, and binded them together.

Once the journal was binded, I decorated the cover with some beautiful bling, flower and sentimental stamp and I was done. I think this turned out pretty with the pink and green.
Zutter Tools Used:

Other:
  • Jewels: Zva Creative
  • Flower: Zva Creative
  • Mist: Tattered Angels
  • Paint: Tattered Angels
  • Sentimental stamp: Catslife Press

 Thanks for stopping by today and I hope you enjoy the rest of your week!


Thursday, May 17, 2012

Washi Tape Holder with Clipboard Wood


Hello Zutter fans.  Cheryl here again to share my new little happy place on my desk.  This  just makes me smile to look at it.   I’ve seen some really fancy washi tape holders and didn’t want to pay the fancy price tag for a few I’ve seen; so, I went through my stash to see what I had to make one myself.   I just happened to have some Zutter Clipboard Wood in my supplies and I have The Zutter Kutter in my tool arsenal that I knew would cut the Zutter Clipboard Wood.  I’m finding more and more uses for this tool and loved that I didn’t have to find the electric power tools to cut this. 
I started with 3x4 and 6x6 Zutter Clipboard Wood.  I cut the 3x4 wood into two pieces 2x4.
I cut 1” off the 6x6 Zutter Clipboard Wood and then scored at 3” by only cutting to the 3rd dial on The Zutter Kutter.


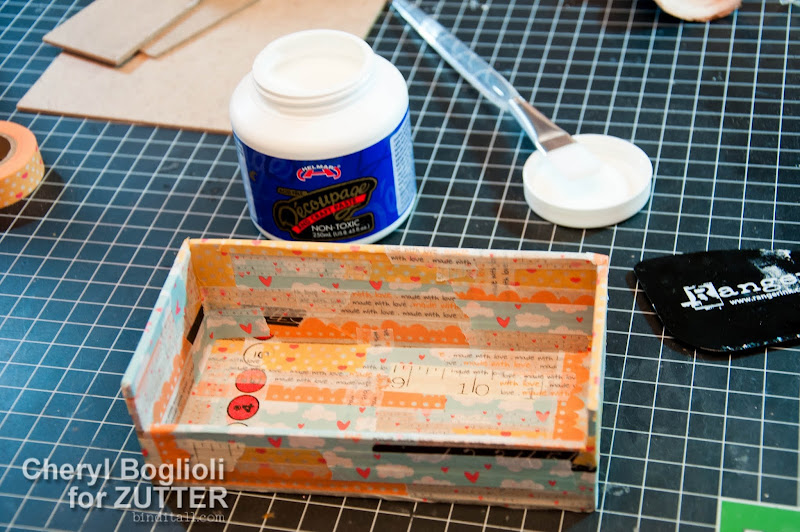
After my pieces were cut, I used Helmar 450 Quick Dry Adhesive to glue the sides together.  I loved that the Helmar 450 Quick Dry Adhesive dried quick enough that I only had to old it for a minute or two and I didn’t have to clamp anything. 
I used an adhesive eraser to remove any glue seepage from my wood joints.
I love working with the Zutter Clipboard Wood because it is strong and yet so easy to sand and work with.  I sanded down the edges and joints. 
I’ve had some very special Washi Tape that was gifted to me by sister designer Jasmine Low.  I’ve used a little of it, but have been hoarding it.  I don’t think that is what Jasmine really meant for me to do with it, so I have decided to really use it and enjoy using it.  After wiping all the sanding dust off by box, I covered it with random strips of Washi tape.   I did add a few small pieces from a retro collection I found at Paper Source too for a little contrast. 
To further protect my tape holder, I coated the taped box with Helmar Decoupage and then sealed it with Helmar Krystal Kote Gloss.   Anyone that has seen my desk in the middle of a project knows that I mist, ink, paint, and basically make a mess of anything in, on, and around my desk when I’m working.  I am a messy artist (and I am embracing that)!  Now I know my little happy tape holder will be protected and can easily be wiped off.
Here is a picture of the backside.  I love that these tapes all fit perfectly in my Zutter Clipboard Wood box.
So, I hope you will take away some life lessons from my project.  #1.   Use what you have.  Go through your stash and see what you may already have before buying something new.   #2.  Look at products in your stash in a new light.   How can I take that product and alter, cut, or modify it to be something new.   Instead of trying to find the right size wood at a lumbar store or my husband’s tool shed, I was able to find a perfectly good product right in my studio.  I was able to create something I wanted for my desk out of two Zutter Clipboard Wood covers.   While these make great album covers, they make a great wood base too.   Please share with us if you find a unique way to use the Zutter Clipboard Wood.  

Posted by Cheryl Boglioli from Cheryl’s Window 


Other Supplies Used


  • Helmar 450 Quick Dry Adhesive
  • Helmar Decoupage and Craft Paste
  • Helmar Krystal Kote Gloss
  • Washi Tape designed by Jasmine Low