Showing posts with label Cheryl Boglioli. Show all posts

Saturday, August 18, 2012

Meet Our Certified Educators: Cheryl Boglioli

Introducing Cheryl Boglioli, one of our Certified Educators!


Cheryl Boglioli is a Florida native, a wife, and a mother of one beautiful daughter.   She is a mixed media artist, craft designer, and educator who loves to stay on the cutting edge of new products and techniques as it pertains to the crafting industry.  She achieved a CHA Designer Member status in 2011 and in 2012 became a full-time designer and educator traveling and teaching workshops at local scrapbook stores and events.  She currently works with several manufacturers in the industry including Tattered Angels, Canvas Corp, Basically Bare, Helmar and Zutter.  


Monday, August 6, 2012

Flipping Fifty Birthday Card


Hello Zutter Fans!  Cheryl Boglioli here with a fun quick and easy birthday card.  I have a dear friend turning 50 this week.  Many of us hate those big numbers and as we age, we realize we still don’t feel like the numbers represented. 
I thought creating a flip chart with numbers was a fun and clever use of some Zutter O-Wires.
I stamped Just Rite Numbers on black cardstock squares with Versamark and embossed them with ClearSnap Mix’d Media Inx in Jasmine. 


Of course I needed to add some distressing to this Flipping Fifty birthday card, so I used the Distrezz-It-All to distrezz the edges of the flip cards as well as the embossed card front.


My flip cards are 1.5” x 2”.  The 1.5” width was the perfect fit for 3 punched holes.  I lined the cards up between the halfway mark and the inner ridge mark as you see above and punched each flip card.
I used Helmar 450 Quick Dry Adhesive to glue down my O-wire to the card front embossed layer and covered with ribbon. I then carefully pinched the O-wires only partially closed with my hands.   Now they can be changed to be any age she wants.  0-9 on each side are included!  I’ll have to make her another when she turns 100!

Here is a better close of the card front put together with the extra embellishments.
And here is the inside of the card!  I printed this on my printer and cut out the label using my Spellbinders Label 8. 
O-Wires can be used for more than binding albums.  What is something original you’ve done with your O-wires.  Share here and on the Bind-It-All Facebook page so that we can see.


Other Supplies Used:
Helmar 450 Quick Dry Adhesive
ImpressArt Metal Stamps - Bridgette Font
ImpressArt Metal - metal butterfly
Papertrey Ink cardstock
Couture Creations Embossing Folder - Timeless
Ranger Distress Ink 
Claudine Hellmuth Black Gesso
Seam Binding
Co'ordinations cardstock


Tuesday, July 3, 2012

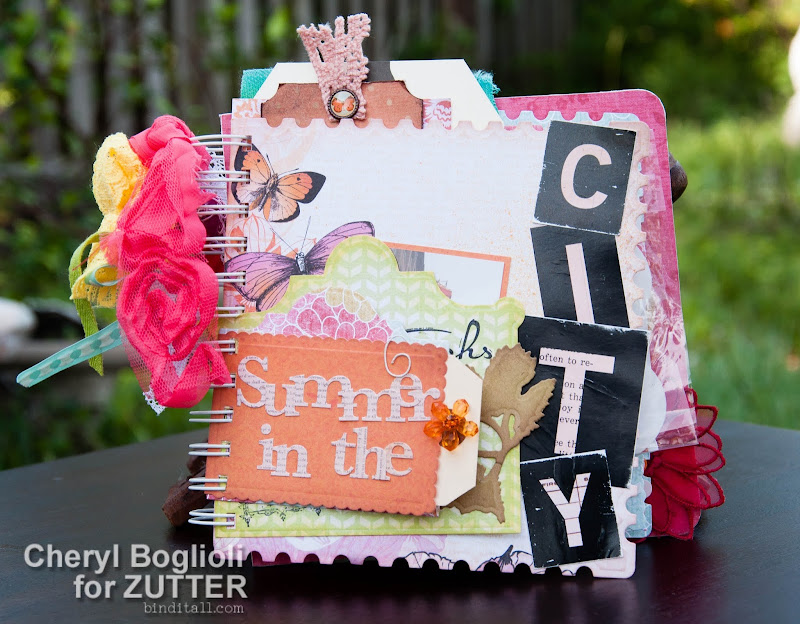
Summer in the City Mixed Media Album

Summer in the City

Hi, Cheryl here again, from Cheryl’s Window, and here is what is in my studio today.  

It is summer, and being from Florida, most expect beach themes from me. Unfortunately, I am not a beach girl.  CHA is coming up and last summer was my first CHA experience.  The day before CHA started, I had the chance to go into Chicago and experience THE CITY!  And it was so very hot, but it was exhilarating for me- the sights, the sounds, the smells, the people!

I had so much fun listening to this song and building my own mini album using Spellbinder dies designed by Donna Salazar.  I used Creative Book Pages One and Two as well as a few butterflies from her Wonderful Wings Grand Nestabilities collection. 

I created this mixed media album using chipboard for the back page to give my book stability as well as a variety of papers, tags, time card, plastic baggy, envelopes, and a piece of raw canvas.

Before I show you the entire album, I thought I’d share some of the creation process.
I used Zutter Chipboard cover for the back page of my album.  This provided structure and stability for my mixed album.  However, 8x8 was larger than I wanted, so I used my Zutter Kutter to cut down the board to 7 x 7 and then I rounded two outer corners with the Zutter Corner Rounder.
I inked edges and embossed a few embellishments using various products from ClearSnap.  I also colored and shaded with some with Faber-Castell Gelatos, even while using the die as a stencil.

I had so much fun putting this album together.   It is bright and happy and very summery to me. 
Want to peek inside my album?
Just look at all that layered yumminess.  I still have a few picture spots to fill and I’m trying to decide whether to add more from this trip or add some new pictures from my visit in a few weeks back in Chicago for CHA Summer 2012!

What are your plans for this summer?  Will you make a summer album?  Make sure to share on the BIA Facebook page if so.  We love seeing your creations using Zutter products.

Sunday, June 17, 2012

Espresso, Café Latte, or Macchiato?

My favorite is a Marble Mocha Macchiato, light syrup and light whip!  However, I’ll never turn down a good cup of coffee and I like to try different ones, though I prefer a darker roast.   At home, my favorite is Starbucks Café Verona, but when I’m on a budget, Maxwell House Italian Roast will do just fine! 

When I saw the coffee line papers by Canvas Corp, I knew I was going to be making a mini album about my love of coffee with these.  And what better way to create a tiny mini than use a little stash of coffee sleeves I’ve been saving?

I traced my coffee sleeves, cut out the papers, and covered my coffee sleeves.
The tags were created using Coffee Defined paper cut up in pieces and then embellished with lots of stash embellies.  This whole thing came together so well since everything was kraft color based and neutral.  
I then went ahead and punched my holes using my Bind-It-All before embellishing.  This is a really important part of creating mini albums and ensures that your embellishments do not get in the way when punching and binding.  After embellishing my sleeves, I bound this mini with the 1.25" O-wires since it was such a chunky little mini.  

I really pulled out a lot of older embellishments and had a little happy party drinking coffee and embellishing my album.  I love the tied burlap on the wires along with my JAVA type charms. Oh, and the back felt piece was a Pink Paislee embellishment that I altered with a coffee circle from the paper collection.  Now, I'm going to go journal about my favorite coffee drinks, friends, places, and travels. So, what is your favorite cup of Joe? 

PS.  HAVE A FABULOUS FATHER'S DAY TO ALL FATHERS!

Until next time,

Sunday, June 3, 2012

Menu Planner on Display

Hello Zutter Fans.  Cheryl Boglioli, from Cheryl’s Window, here again to share my Kitchen Menu Planner.   When we get really busy around here at my house, we find ourselves eating out much more than we should be, which kills our food budget.  So, my daughter and I have started back at planning our menus again. 
I wanted my menu planner to be on display and easily accessible, so I knew Zutter’s Display-It-All would be perfect.  

I went searching the web for a great weekly and a great monthly planner.  I found ones that I liked at Picklebums.  Kate has a lot of great ideas on her blog too. I downloaded her free copies and printed them so that they would fit in 4 x 6 Zutter Pre-punched Page Protectors. 

I dug out BasicGrey Nook & Pantry paper from my stash, which was the perfect color and theme for my kitchen project. 
I even used my BasicGrey Notch & Die set that I haven’t used in a while.  I love using products I already have.
I used the rounded die to create two notches on opposing corners to slide each week’s and each month’s planner card. 
I chose to use the Zutter Page Protectors to store the extra planners as well as a place to store the recipes for the week.  By using the page protectors, this also gave me a way to display whichever recipe we are cooking and protect it from any spills or splatters.  For that same reason, I chose to use a Zutter 6x6 Acrylic Cover to project my entire project.  If something does splatter on it, I can easily just wipe it off.   Since it is going to be in my kitchen, I did not add lots of ribbons or embellishments, although it was really hard not to.  I even wanted to decorate the base, but I know how hard it is to keep things clean and wiped down in my kitchen, so I kept it plain…for now.
I used Tim Holt’s Alterations File Tabs On The Edge dies to cut the page edges for my Recipe, Weekly, and Monthly tabbed pages.  
The extra planners are stored in Zutter Page Protectors behind the weekly and monthly file tab pages.
See how I can just slide in a new page each month? 
And, here is the back page.  I used Zutter Clipboard to provide a good sturdy back to my planner as I hope to use it for a long time.
The Display-It-All was easy to use.  Of course, I could have just rested the wires over the stand, but I decided to actually mount mine onto the display.  After punching the covers and pages, I used the Display-It-All bracket to mark where to punch and then punched holes using my Crop-A-Dile.  Then I inserted the O-wires and used my Bind-It-All to bind my album.  All I had left to do was screw the back cover between the display stand and the display bracket. 
The Display-It-All looks good on my kitchen counter and is not so large as to get in the way or clutter my countertop.  Now I need to go plan this month’s menu and this week’s grocery list.  Do you have any recipes you want to share with me?  Please do, if so. 

Thursday, May 17, 2012

Washi Tape Holder with Clipboard Wood


Hello Zutter fans.  Cheryl here again to share my new little happy place on my desk.  This  just makes me smile to look at it.   I’ve seen some really fancy washi tape holders and didn’t want to pay the fancy price tag for a few I’ve seen; so, I went through my stash to see what I had to make one myself.   I just happened to have some Zutter Clipboard Wood in my supplies and I have The Zutter Kutter in my tool arsenal that I knew would cut the Zutter Clipboard Wood.  I’m finding more and more uses for this tool and loved that I didn’t have to find the electric power tools to cut this. 
I started with 3x4 and 6x6 Zutter Clipboard Wood.  I cut the 3x4 wood into two pieces 2x4.
I cut 1” off the 6x6 Zutter Clipboard Wood and then scored at 3” by only cutting to the 3rd dial on The Zutter Kutter.


After my pieces were cut, I used Helmar 450 Quick Dry Adhesive to glue the sides together.  I loved that the Helmar 450 Quick Dry Adhesive dried quick enough that I only had to old it for a minute or two and I didn’t have to clamp anything. 
I used an adhesive eraser to remove any glue seepage from my wood joints.
I love working with the Zutter Clipboard Wood because it is strong and yet so easy to sand and work with.  I sanded down the edges and joints. 
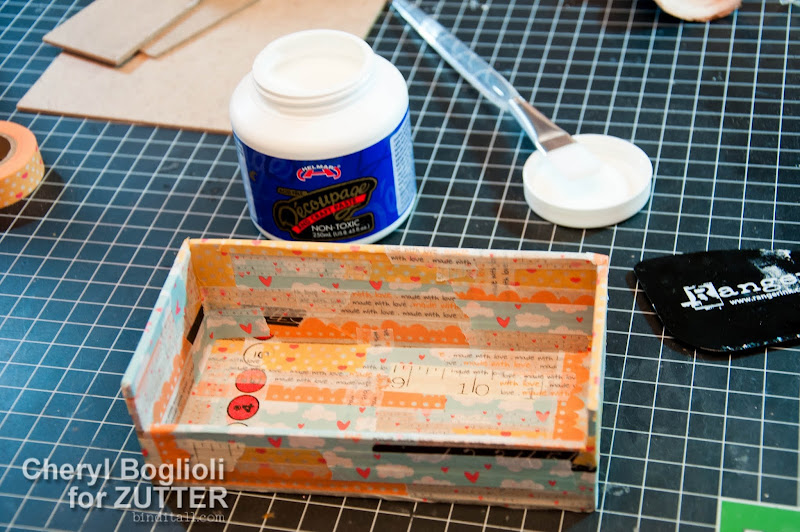
I’ve had some very special Washi Tape that was gifted to me by sister designer Jasmine Low.  I’ve used a little of it, but have been hoarding it.  I don’t think that is what Jasmine really meant for me to do with it, so I have decided to really use it and enjoy using it.  After wiping all the sanding dust off by box, I covered it with random strips of Washi tape.   I did add a few small pieces from a retro collection I found at Paper Source too for a little contrast. 
To further protect my tape holder, I coated the taped box with Helmar Decoupage and then sealed it with Helmar Krystal Kote Gloss.   Anyone that has seen my desk in the middle of a project knows that I mist, ink, paint, and basically make a mess of anything in, on, and around my desk when I’m working.  I am a messy artist (and I am embracing that)!  Now I know my little happy tape holder will be protected and can easily be wiped off.
Here is a picture of the backside.  I love that these tapes all fit perfectly in my Zutter Clipboard Wood box.
So, I hope you will take away some life lessons from my project.  #1.   Use what you have.  Go through your stash and see what you may already have before buying something new.   #2.  Look at products in your stash in a new light.   How can I take that product and alter, cut, or modify it to be something new.   Instead of trying to find the right size wood at a lumbar store or my husband’s tool shed, I was able to find a perfectly good product right in my studio.  I was able to create something I wanted for my desk out of two Zutter Clipboard Wood covers.   While these make great album covers, they make a great wood base too.   Please share with us if you find a unique way to use the Zutter Clipboard Wood.  

Posted by Cheryl Boglioli from Cheryl’s Window 


Other Supplies Used


  • Helmar 450 Quick Dry Adhesive
  • Helmar Decoupage and Craft Paste
  • Helmar Krystal Kote Gloss
  • Washi Tape designed by Jasmine Low