Showing posts with label Summer Mini Album. Show all posts

Tuesday, July 3, 2012

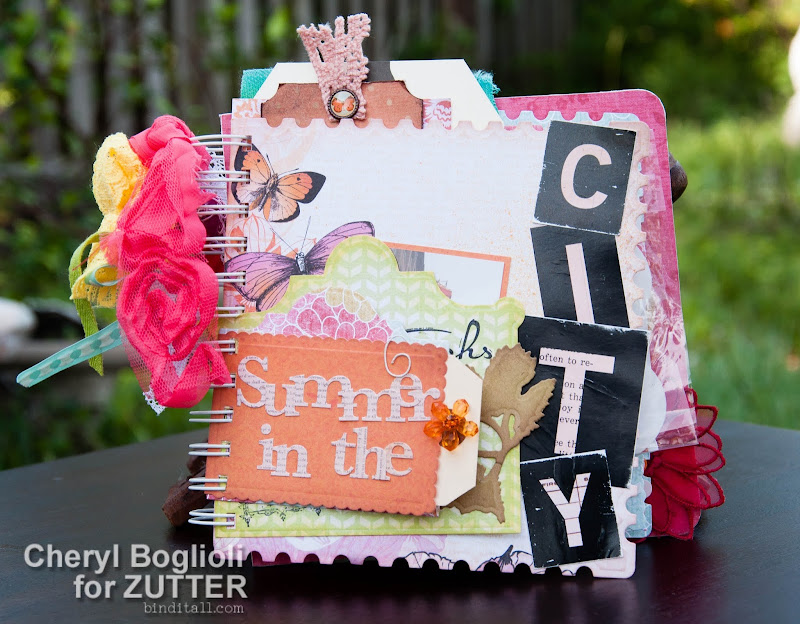
Summer in the City Mixed Media Album

Summer in the City

Hi, Cheryl here again, from Cheryl’s Window, and here is what is in my studio today.  

It is summer, and being from Florida, most expect beach themes from me. Unfortunately, I am not a beach girl.  CHA is coming up and last summer was my first CHA experience.  The day before CHA started, I had the chance to go into Chicago and experience THE CITY!  And it was so very hot, but it was exhilarating for me- the sights, the sounds, the smells, the people!

I had so much fun listening to this song and building my own mini album using Spellbinder dies designed by Donna Salazar.  I used Creative Book Pages One and Two as well as a few butterflies from her Wonderful Wings Grand Nestabilities collection. 

I created this mixed media album using chipboard for the back page to give my book stability as well as a variety of papers, tags, time card, plastic baggy, envelopes, and a piece of raw canvas.

Before I show you the entire album, I thought I’d share some of the creation process.
I used Zutter Chipboard cover for the back page of my album.  This provided structure and stability for my mixed album.  However, 8x8 was larger than I wanted, so I used my Zutter Kutter to cut down the board to 7 x 7 and then I rounded two outer corners with the Zutter Corner Rounder.
I inked edges and embossed a few embellishments using various products from ClearSnap.  I also colored and shaded with some with Faber-Castell Gelatos, even while using the die as a stencil.

I had so much fun putting this album together.   It is bright and happy and very summery to me. 
Want to peek inside my album?
Just look at all that layered yumminess.  I still have a few picture spots to fill and I’m trying to decide whether to add more from this trip or add some new pictures from my visit in a few weeks back in Chicago for CHA Summer 2012!

What are your plans for this summer?  Will you make a summer album?  Make sure to share on the BIA Facebook page if so.  We love seeing your creations using Zutter products.

Friday, April 13, 2012

Happy Spring!

Hello everybody!   I am SOOO happy that spring has arrived!  I have a Cover-Alls mini book project to share with you today that reminds me of warm weather ~  


I LOVE LOVE LOVE the Cover-Alls.  Wait, can you guess how much I love the Cover-Alls?  :) They give such an organized and clean look to any mini book.  I chose the white Cover-All that is compatible with 7.5 x 5 " pages.  This is one of my favorite sizes, because I can easily use 4 x 6 pics, and still have room to jazz things up.  My first step was to create my background paper.  I decided to do quick and easy background pages by misting white cardstock.  First I grabbed some maybe colors ~


Then I tested them out.  I settled on the thicker reddish mist and sprayed several sheets of white cardstock in random ways ~


Then I cut my pages for my mini ~


Next I laid out the photos I wanted to use for each page ~


Then I did a test punch page using my pink Bind-It-All.  I always do this for same size pages, as it helps me decide exactly how I want to punch my pages before I use my "real pages".  Not everybody does this and it definitely isn't required, but I got in the habit when I first started using my Bind-It-All years ago, and it is how I still do it today ~


OK, I am happy with my punched page, now time to get busy. 


I play around with my scraps and embellies, getting the look I like ~


Next I pull the plastic sheet out of the back pocket of the Cover-All ~


Time to punch the holes in the plastic (easy peasy with my pink Bind-It-All) ~


Now it is time to punch my pages ~


Now I put the plastic ON TOP of my pile of pages to be punched ~


Then I bind my pages and the plastic insert together, then flip the plastic out ~


Then I tuck my plastic into the back pocket on the Cover-All.  I finish some decor for the front cover  ~


Then I glue everything down, including a wide bright pink ribbon to tie it up nicely.  Voila!  Cover is done!  ~


Here is a peek at the inside pages ~ 


 I used scraps of cardstock and patterned paper, and odds and ends of embellies.  I used my Distrezz-It-All to distress the edges of some of the cardstock  ~


Want to know a little secret?  I stopped punching my pages before I was finished (I think it was to chat with my 4 year old granddaughter on the phone), and when I came back and started punching again I goofed.  No worries!  My page was punched backwards, so it would have been out of order.  I punched the other side and after the book was put together this boo boo (left page extra holes) ~


turned into this design technique (fabric woven through the extra holes on the page) ~ 


So don't worry if you have a little mistake.  You can incorporate it into your design, or add extra cardstock as another border, or make your page a different size, or even just leave it.  Lots of options!  I actually punch extra holes on purpose many times and weave either ribbon or fabric through, so this was not a worry at all. I also don't mind turning my book to view pages, as long as the pages next to each other match up direction wise.  But if you don't mind that they match up, put your photos however you want.  That is one of the beauties of making your own from scratch mini book!  


Have fun creating a mini using the fabulous Cover-Alls and your Bind-It-All!  Have a joyful and creative day ~ Pam