Showing posts with label Lynne Forsythe. Show all posts

Wednesday, March 7, 2012

Distrezz-it-All Love - and a beautiful card!

I don't know about you, but there is just something about the Distrezz-it-All that makes me squeal!
This WONDER tool chews up paper and leaves the most glorious Distrezzed edge
that one could ever want........in SECONDS!! Just look at the beautiful edges of my card.
I created a tutorial on how to create the above card and how I used the Distrezz-it-All
(and yes you will hear my excitement when I use it)
Also, in the video, I use a new product, that will be being released soon by Zutter.
A durable frosted plastic sheet. I created my own template using this material.
You will have to watch the video and see....
ENJOY!!
Zutter Zister Lynne Forsythe

Wednesday, January 4, 2012

2012.......Say you want a Resolution?

Well, the new year is upon us
.......and many people get to thinking about what resolutions 
they want to make for the coming year!!! Not so much for me this year.
2011 was probably one of the hardest years EVER
....I'm looking forward to 2012!!!
I've been inspired by a member of Swirlydoos to do something different this year..........
to create a Monthly Goal Art Journal!!
NOW.......I LIKE THAT IDEA!!!
It just sent my mind in motion.
I haven't made an album in WAY TOOOO LONG......
so I was more than happy to pull out my 8 x 8 Zutter Canvas Artboard (currently clearance priced!) to use for my cover!!!  
I painted a little, spritzed a lot, inked some more and glued everything down!
The inside pages are varied in size and mediums, cardstock, chipboard,
watercolor paper and Zutter Chipboard (also clearance priced!) OHHHHHH what fun I will have!!!
So........are you making resolutions or pulling out your Zutter goodies to create
your very own goal journal??? Would love to hear your thoughts!!
This will be on the first page of my journal...


If it didn’t Bring you Joy
Just Leave it Behind.
Let’s Ring in the New Year

With Good Things in Mind.
Let Every Bad Memory Go
That Brought Heartache and Pain.
And Let’s Turn a New Leaf

With the Smell of New Rain.
Let’s Forget Past Mistakes
Making Amends for This Year.
Sending You These Greetings

To Bring you Hope and Cheer
Happy New Year!

Zutter Zister DT Member Lynne Forsythe

Tuesday, July 12, 2011

Artsy Beach Bound Journal

Welcome to DAY TWO of Zutter Zummer........I'm Lynne Forsythe from beautiful New Hampshire, thanks for popping in! What a Zummer it has been but I am SOOO looking forward to my Beach Vacation coming up in August. With all that having been said....I decided to create a Beach Bound Memory Book using one of my favorite Zutter product - the Cover-Alls!
~~~~~~~~~~~~~~~~~~~~~~~~~~~~~~~~~~~~~~~~~~~~~~~~~
I began by gathering my supplies:
Claudine Hellmuth Studio Acrylic Paint
(various colors) Multi Medium ~ Matte
Petaloo Color Me Flowers
Hero Arts ~ Sweet Threads
Ranger ~ Archival Ink & Peeled Paint Reinker Mixture
Bella Blvd ~ Alphas

Let the fun begin.......
I covered the Cover~All with dictionary pages with Multi Medium. Placed dabs of paint on my Craft Mat and began to color away!!!
I then stamped on the cover with Archival Ink.
I soaked up the left over paint with Petaloo Color Me flowers.
I dry brushed white paint over top of cover.
With my handy dandy Dreamkuts machine I cut PERFECT 6 x 6 pages for the inside of my book!
I then bound all my pages together with the A~MAZING Bind~it~All!!!
And there you have it.......my Beach Journal!!

Thank you for stopping by and joining the Zutter Zisters as we celebrate ZUTTER ZUMMER!!
~~~~~~~~~~~~~~~~~~~~~~~~~~~~~~~~~~~~~~~~~~~~~~~~~~~
And now, for the Zummer Special of the Day........

inspired by Lynne's perfect 6X6 pages.....
20% off the wonder-tool - The Dreamkuts!

Cut mats with ease and never replace the blade.  
Want to see the Dreamkuts in action?  Check out Video Chapter 5 here.
Use this promo code: Zummer-DK20
You can only use this code through July 16 and only one discount code per order.
~~~~~~~~~~~~~~~~~~~~~~~~~~~~~~~~~~~~~~~~~~~~~~~~~~~~~~~
For today's giveaway....want to win a variety pack of Cover-Alls in sizes and shapes to you in easy-to-put-together minis for awhile?  By the way,original Cover-Alls are on clearance at Bind-it-all.com - now until they are gone, so don't delay, if you love these covers!  No coupon code  needed and no limit. Click here to order.

Leave a comment with your best keepin' cool tips or favorite beach memories!
We'll draw a winner on Monday!


Monday, February 28, 2011

Art Journal Book for the Kiddies

Hello everybody!  How are you all doing?  Fab?  Super fab?  I hope so!  Today we are going to talk about a super quick and easy project you can make for young children.  It is a great project book to take in the car, or when you go out to eat, to the doctor or anywhere you need to keep young children quiet and amused.  I used one of the oh-so-fab 8 x 8 Zutter CoverAlls (the snazzy ones sized for the Zutter Pre-Punched Page Protectors) for the easy peasy cover of this album, as well as some colorful bits and pieces from my embellie stash.  Next I selected some of my fav Zutter Pre-Punched Page Protectors.  They make creating a BREEZE!  One of the things I love about these page protectors is how versatile they are. 
I created a little canvas page that can hold crayons, pencils, markers, or chalk.  Then I used my Pink Bind-It-All (otherwise known as the BIA Version 2.0!) to punch the canvas so it would fit in the book.
Next I used my BIA and punched holes in the "chalkboard fabric" I had glued to a Zutter Clip-Board Wood Cover (one piece, I saved the second piece for another project).
Then I put everything together and assembled them using 1 1/4" Antique Silver O'Wires.
I put the canvas page first, then the "chalkboard" fabric page second. 
Next I filled the page protectors with coloring pages I printed.  There are many free coloring page websites out there.  I selected these images from Better Homes and Gardens. 
Here are a few more pics of my filled page protectors.
I put 6 or so of each printed coloring page in each page protector.  Now my grandkids can either color the same page multiple times, or select several different pages.  Either way, it will be handy for coloring for many visits.  They can use the firm chalkboard as a base for their coloring pages, or  use chalk and draw on the chalkboard, or on their pages.  Whatever they are in the mood for!  I might even put some blank paper in there for them to create their own pictures to color.  This whole project took under one hour, including my printing time.  It can be used for years too, which is a great return of my time, don't you think???  ;) 

Here is the cover, one more time.........
Can't wait to see what you create!  Happy crafting ~ Pam

Tuesday, February 15, 2011

Snow...Snow...Snow!


Right now in New Hampshire it's ALL ABOUT THE SNOW!! I say...if it's going to be winter.... there needs to be snow!

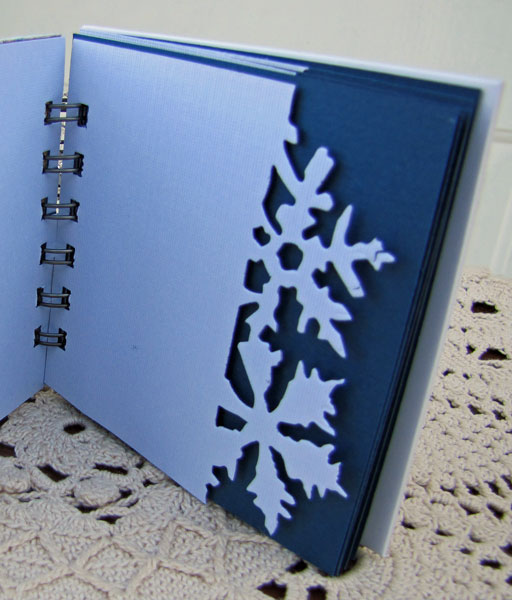
Hence, the inspirations for my latest Zutter Mini. I used my FAVORITE...a 4 x 4 Canvas Art Board Cover and spritzed it with a Faded Jeans Reinker Mixture. Do you see the Vintage Glitter Glass.... the perfect accent!!

Using the Spellbinders Snowflake Pendant Die, I cut multiple snowflakes from assorted mediums and colored each with various combos of Chipped Sapphire, Faded Jeans and Stormy Sky Reinker Mixtures.

Now, onto the  inside pages which were cut using my DreamKuts...I must say I love the ease of this tool!! and ALL my pages are the same size!

In keeping with the theme, I used the Snow Flurries on the Edge Die.
The little ditty was all put together using the AMAZING Bind it All!!

So....regardless of your WEATHER....
there is nothing better than the Bind-it-All to hold your creations ALL TOGETHER!!
(and it even rhymes....hehehe)


Zutter Zister DT Member Lynne Forsythe

Wednesday, December 8, 2010

Merry and Bright........

Do you love your Bind it All?????
want to bind EVERYTHING but not sure how to do that....cause not all pieces are flat....
Well....it can be done!!
I had this wonderful Basic Grey Tag Mini Album I wanted to use.
The solution....
I cut a piece of chipboard, covered it with paper, punched it with my Bind it all...
I then adhered the pieces to the precut chipboard mini album.
and there you have it.....a wonderfully bound Mini!!!

HAPPY ZUTTERING....and may your season be Merry and Bright!!!

Zutter Zister DT Member Lynne Forsythe

Monday, November 15, 2010

Trying a Few New Things (they all go with my Bind-it-All!)

I love trying new things.....and that is where my inspirations for this project came from.  With my handy Zutter tools at the ready, I pulled out some of the "stuff" I'd been anxious to play with.

I wanted to work with Twinkling H20's....something I had never tried before. And, something else I really had wanted to work with was Real Wood by Creative Imaginations.

I pulled out one of my favorite stamps - Flourish by Hero Arts, brayered on some H20's and stamped on the Real Wood and watched what it did. I used Cobalt Archival Ink to stamp the image again.


Using Tim Holtz Tattered Floral Die, I cut flowers out of Linen and Real Wood. I stamped and painted the H20's on the Real Wood, stacked the flowers and placed a brad in the center.

I created a puddle of H20 color on my craft mat and dipped the seam binding into it.

I then pulled out my Bind-it-All and punched holes in the Real Wood and Linen. Then I wove the seam binding through the holes and adhered the creation to the front of a Zutter Flat Spine Cover All.

For the inside pages, I used my DreamKuts. What a dream it is....all the pages are the exact same size with such ease!!!

To finish up, I pulled out my Distrezz-It-All, and roughed up the pages.....just what the book needed.

I challenge you to pull out those "new things" you've been wanting to use.....and give it a try!!  Your Zutter tools will help you bring it all together!

Zutter Zister DT Member Lynne Forsythe

Monday, August 30, 2010

LOVE the Zutter Canvas

While out on a ride one day I stopped at a little store in Warner, NH called WingDoodle. Wow...what a gem of a store! While taking it all in I came across a product by Golden, Fiber Paste. It spiked my curiosity so I bought me a jug of it!! I brought it home to play with. As it was time to for me to begin creating my August Zutter Zister projects I knew what I was going to do, so I pulled out my.........ZUTTER CANVAS ART BOARD COVERS......I think they are my favorite Bind-it-All cover, to work with, by far!!

So the creative process began!! IMPORTANT NOTE: do not gob on tooo much Fiber Paste on the side you are going to bind!!

I proceeded to smear the cover with Fiber Paste....and let it dry. Now, before I added anything else to the cover, I pulled out my Bind-It-All to punch the holes in the cover.

I now began to build the cover.....I cut fabric with Tim Holtz Tattered Floral Die and colored them with Distress Reinker Mixtures, covered them with Multi Medium, dabbed on Distress Stickles. I created some of my GrungePaper Roses, nestled them all together and there you have it!!

For the inside of the book, I used the Zutter 7.5 x 5 Inner pages.  They don't fit this cover, so I had to cut them down to size but it was worth it cause I love the weight of this paper. Now I am going to totally surprise you with what I did next..........I pulled out my Distrezz It All and used it on the edges of the inner pages. I did a fun three hole punch on each end of the cover - just a little something different.

There you have it!  Zutter Canvas Artboard and Fiber Paste.  Punch...bind....Voila!

Wednesday, July 21, 2010

Grunge-o-licious Binding!

Grunge Paper plus the Bind-it-All equals a grunge-o-licious mini just for the filling!!!

Supplies Needed to create this PRETTY:

Bind-It-All
O-Wire
Grunge Paper
Re-inker Mixture (Mini Mister, Reinker Ink, Perfect Pearls and water)
Liquid Pearls
Distress Ink
Stamps
Paper Leaves and Ribbon
Tim Holtz - On the Edge Dies

I cut my pages to their desired sizes and accented the edges with the On the Edge Sizzix Dies.


I stamped on the pages, spritzed the pages and sewed on the pages.

My next step was to bind the edges with my trusty Bind-it-All.

Now to create the Grunge Paper embellies. The center red flower was created by cutting out (2) circles, creating petals by cutting in toward the center and accenting the edges with Liquid Pearls. When the the LP's are dry....spritz away with the Reinker Mixture.

The yellow swirl flower....I cut a circle, stamped on the circle, spritzed with Reinker Mixture. When dry, I cut the circle into a spiral, twisted it, and adhered it to the base. There you have it...

To create the Grunge Paper Rose....check out my tutorial.

Oops...I forgot the ribbon....seam binding spritzed with my Reinker Mixture....that was squinched and dried.

And there you have it....a grunge-o-licious beauty!!!

Thursday, May 27, 2010

Distrezz it All....HAPPY!

I am Distrezz-it-All HAPPY!

OH MY...my favorite new go- to TOOL!!! (and I'm not saying that because I'm on the DT) I was soooo excited to get my hands on one of these and BOY how much fun it is. My daughter even commented the other day as to how much I use it!! ALOT to say the least!!

So of course, I had to include a Distrezzed project for my Zutter Zister DT project this month.

I Distrezzed cardboard, chipboard, watercolor paper, pattern paper, cardstock, I have even Distrezzed photos (not pictured)! I just love the look you get! You can Distrezz a little or alot depending on the direction you put your item through the machine.
  

Another feature I just love is the ability to Distrezz more than one piece of paper at a time....what a time saver. I could have never achieved this look with my little distress tool or a pair of scissors.

Now, I will tell you, it is a bit loud but due to the swiftness in which it Distrezzes....the sound is very short lived and as far as I'm concerned....really not a problem!!

Look at that chowder edge....don't you just love it!! A look that I only could have achieved with my DISTREZZ IT ALL!!
Zutter Zister DT Member Lynne Forsythe
Sunday, April 25, 2010

4 X 4 ACRYLIC ALBUM


Now don't be getting all skittish on me at the mention of ACRYLIC!! Really is is not as hard to work with as you think...as long as you take a moment to think it out!!

Supplies:
Bind-it-All
1/2" Round-it-All
4 x 4 Acrylic covers (2 pkgs)
3/4" Baby Blue OWire

Wallet size Photo
Bo Bunny "Kitchen Spice" Collection
Trim and Bling
Staz On Ink
Studio 490 Stamps
White Pen
Glossy Accents

I first spent an evening fussy cutting the flowers for this album while watching some mindless show on TV, great busy work!

Next, I chose two large background stamps from Studio 490 and stamped on the Acrylic with Brown Staz On ink...(and it must be Staz On ink or it will just wipe off leaving a horrible mess!)

Using my Round-it-All, I rounded the edges of all 4 corners on all pieces....oh the ease of it all! Remember, the Round-it-All can handle rounding the corner of not only acrylic, but chipboard, multiple sheets of cardstock, and even the Zutter Clipboard Wood and Canvas Artboard.

I punched my binding holes using the Bind-It-All. I just eyeballed the pieces in the center of the machine and punched.

Now for what everybody thinks is the hard part....I laid out the album, thinking "through" every page.

To create interest on the "look through", I matted each of the photos with the double sided Kitchen Spice collection.

I sparingly adhered the photos to the album, thinking about where the photos would be on the back side. Added my embellies and lace. I wrote on the B &W photos with Ranger's White Pen.....AND THERE YOU HAVE IT...now that wasn't so hard after all!!


So do give working with Acrylic Albums a try....you will be sooo happy you did!

Zutter Zister DT Member Lynne Forsythe

Wednesday, March 31, 2010

A Box of Love....

I was chosen to design with one of the AMAZING Zutter "Mini Luggage"....and how much fun was that!! Having also just received a fabulous kit from Timeless Daydreams...which contained papers by Fancy Pants.....Vintage Valentine......the creative juices began to flow...

I began by spritzing the suitcase with layers of Glimmer Mist, drying between the layers.

To protect it, I sprayed it with Creative Imaginations - Super Seal.

I, then, adhered a piece of the Vintage Valentine paper to the center panel.

After punching a strip, using the Martha Stewart Scallop Lace Border Punch, I adhered vintage lace to strips and adhered to the top of the box, trimming to size. To add a little extra pizazz, I embellished with vintage buttons, a Glimmer Misted heart accented with a vintage ribbon bow.


To spice up the inside of the box, I used the same punched strip and vintage lace and attached it to the inside pocket. I then braided some crochet thread and strung a heart and key onto it!! I stuffed the pocket with the cutest tickets.

I, then, created a mini album to put inside of "The Love Box". I used the Round-It-All....and 3/8" O-wires and what's inside is my secret.

So, get yourself one of the little pieces of GOODNESS and create yourself a "Box of Love"!!!


Zutter Zister DT Member Lynne Forsythe
**Editor's Note** The Zutter Mini Luggage is only available for a limited time, and is on special Buy 5, Get 1 Free. Click Here.