Thursday, October 11, 2012

DIY Business Tools

Have you ever gone to an office supply store to find a tool you needed and they just don't seem to have it? As a small business owner, I collect email addresses from my customers and I need a place to store them. No store sells email sign up books!


Years ago I used my Bind-it-All to create my own email signup book! I created the "pages" in a word processing program, completely personalized with info for my unique business. Then I printed the pages, cut them apart, and then bound them with my Bind-it-All. After I took the email book with me to a few events, other business owners wanted one of their own! Here are some of the books I have made over the years for other business owners:


It's been super fun to make these books for some of my fellow vendors at Crafted as well as friends in the past. The book above was created for Rain Hannah of Honey & Ollie, a fabulous jewelry shop at Crafted

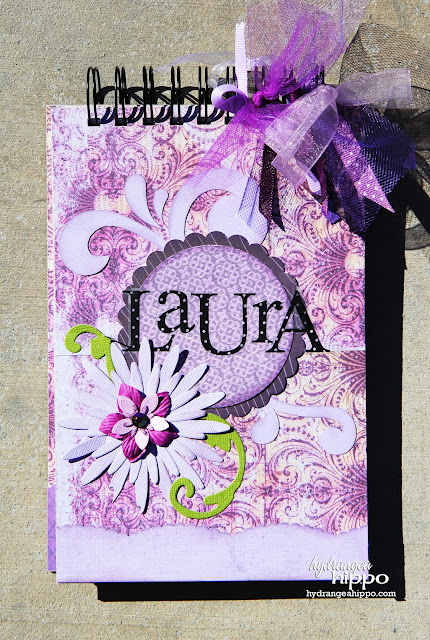
Here is another book I created for Laura Miller of Dove Chocolate Discoveries:


If you have brick and mortar shop, are a direct sales consultant (like Close to My Heart or Miche Bags), or just an independent business owner, email lists are essential to growing your business!


Guess what? Whenever you need a slick and classy business tool, look to your Bind-it-All for a solution. Think of your Bind-it-All outside of the craft room!

Happy Creating :)

Visit my blog at:

Sunday, September 30, 2012

Meet Our Certified Instructors: Kimberly Congdon


Introducing Kimberly Congdon,  one of our Certified Educators! 

Kimberly Congdon lives in Kenosha, Wisconsin.  Which is pretty much in between Chicago and Milwaukee.   Kimberly has a classroom in her home where she has been teaching paper craft classes since January 2008.   You can also find her teaching in Illinois craft stores and in various Stores, Museums, and schools in her town.  Scrapbooking since she was 17,  is her first love but since she is running out of space for storing all of her albums (over 85) she has been doing more altered art projects.  Kimberly teaches between 3-6 classes per week.  Between card classes, cricut classes, scrapbooking, home décor, party décor, and kid classes, she is also busy designing items for a few local stores.  You can find her busy on line as well.  Kimberly is a big fan of pinterest, instagram, and facebook.  Now that she is adding the Zutter certification to her resume you will find her teaching zutter classes real soon.

Website: www.scrapitgirl.com 

Friday, September 28, 2012

Meet Our Certified Instructors: Betty Scott

Introducing Betty Scott, one of our Certified Instructors!


As a child, Betty would sometimes wander away from the house as she gleefully picked flowers from the neighbors’ yards. As a young wife, she was creating sand painted terrariums. As an adult, that passion turned into a career as successful floral designer, owning her own shop for 40 years. Now she spends her free time paper crafting, where she applies her design talents to card making. She’s especially fond of iris folding and creating flowers using paper!  You can see one of her iris fold cards in the June 2012 issue of Scrap & Stamp Arts magazine.


To book a class with Betty and the Create N Craft designers, please visit: http://www.createncraft.com/

Thursday, September 27, 2012

Old Book Covers? Yes Please!


Jennifer Priest here with a fun Halloween mini I created using actual old book covers! Using book pages for decoupage and other projects, like wreaths, is so popular but what do you do with the leftover book coves? Many vintage books, like the reader's Digest Condensed book here, have old covers with a great patina and fabulous designs. They are great to repurpose as mini album covers like this:


Tie all kinds of lace and trim to the binding to give the book a spooky feel for Halloween!


The pages can be bigger than the covers, like this 5x7 Chipboard Covers and Glassine Bags I used here:


Consider wrapping pages with trim and tying it in a knot after the pages are bound--this eliminates the risk of accidentally punching through and cutting a trim.


Hope you enjoyed this book! And next time, before you throw those old book covers away,think about giving them new life with your Bind-it-All!


Visit my blog at:

Tuesday, September 25, 2012

Meet Our Certified Instructor: Steph Ackerman

Introducing Steph Ackerman, one of our Certified Instructors!


I am a craft-a-holic who loves nothing better than spending time in my craft room creating. I create an assortment of projects - from cards and layouts to mix'd media and altered art.   My day is just not complete if I haven't spent some time crafting. I have a dedicated craft area where I work and teach a wide variety of classes for the beginner and the more experienced crafter.  I love using assorted tools  (Bind-it-all, Cricut, Sizzix, Spellbinders) plus inks and stamps in my work.  I am a firm believer in playing with your supplies because only then can you truly see their full potential.  I have been fortunate to have a number of my projects published.  I am a  Craft and Hobby Association Designer Member.

To book a class or see Steph's schedule please visit:  http://www.stephaniescraps.blogspot.com/

Sunday, September 23, 2012

Meet Our Certified Instructors: Candice Windham

Introducing Candice Windham, one of our Certified Instructors!


Born and raised in Memphis, Tennessee, Candice Windham is an award-winning graphic designer, instructor and fine artist, working in watercolor, acrylics, colored pencil, fabric, mixed media and paper and altered arts.

She studied design at the University of Memphis and retired from her graphic design work at Memphis Light, Gas and Water Division to open Candice Windham Design Studio, providing design, layout and illustration for brochures, fliers, annual reports, CD covers and other printed materials, as well as display design for various trade shows. She is also curator and designer of the Memphis Light, Gas and Water Historical Museum.

Candice is the author of Scrapbooking for Home Décor from Fox/Chapel Publishing. Her work has appeared in a variety of paper arts and crafts magazines, including Make it MineStamper’s Sampler and Today’s Creative Home Arts. Her work also appeared in Make It In Minutes: MiniBooks, Make It in Minutes Party Favors and Hostess Gifts, Make It in Minutes Wreaths and Make It in Minutes Last Minute Gifts, a book series from Lark Books, a division of Sterling Publishing Co. She is an instructor in rubber stamping, scrapbooking, mixed media acrylic collage and altered arts.

She was the recipient of the Craft and Hobby Association’s Designer Press Kit Award in Orlando, 2009.

Candice and her husband Larry have a son, Michael, and reside in Brighton, Tennessee along with pups Pete and Sam.


To book a class with Candice or view her schedule, please visit her blog at:  http://www.candicewindhamdesigns.blogspot.com/

Friday, September 21, 2012

Meet Our Certified Instructors: Danielle Hunter


Introducing Danielle Hunter, one of our Certified Instructors!


Danielle Hunter is a multitasking mom of two creative girls and wife to her hubby of 12 years. She lives in Toledo, Ohio and has been dedicated to crafting since childhood. She launched her scrapbooker-for-hire business in 2007 and recently started teaching classes at her local hobby store. Danielle's focus is on eco-friendly scrapbooking and enjoys getting crafty by turning trash into treasure. She's in her third year as a Glue Dots Dottess and her past design teams include MemoryWorks and ScrapTiffany. 


To book a class with Danielle or see her upcoming schedule, please visit: http://www.ecoscrapbook.com

Thursday, September 20, 2012

Keep Forward


Hello Zutter world!
Today we are going to take a little
look at my Keep Forward album.

Big Picture just had a festival
Big Ideas Festival in which there
were a series of in depth challenges
for us to search a little deeper into
what we do.
For this particular challenge it
was to set up a layout or page
of that one goal or dream
we are working on.
I decided to set  up an album
to place my goals in but it doesn't 
stop there.
We actually have to move on them
meaning whether it be something small
or big each day just take a step or
two towards that goal.
I have quite a few but there are
key goals that take priority over all.
This album will be dedicated to
those.

           
There are a number of hard cover pages
and Zutter inserts so that I will
have plenty of space to document
my step-by-step process.
This particular album will be
put to good use for sure.
Hopefully we all will continue to
challenge ourselves to dig a little
deeper in our craft and 
continue to grow in it.
Thank you as always for letting me share!


5. Pink Paislee Digital Kit Happy Now
6. Bella Blvd. Stickers Sophisticates 
7. Echo Park This and That Stickers
8. Prima Stamps
9. Elle's Studio Tags
10. K&Company Smash Marker


Wednesday, September 19, 2012

Meet Our Certified Instructors: Kimberly Seldomridge


Introducing Kimberly Seldomridge, one of our Certified Instructors!


Kimberly Seldomridge has been paper crafting for 10 years.  She lives in Veedersburg, IN with her husband and two girls.  Papercrafting and mixed media have been a personal enjoyment and have grown to become business for her.  Kimberly has designed for Glue Dots and Your Memories Here. She is a Zutter Certified Instructor and a staff member at Scrapbook News and Review Magazine. Her work has been featured on websites and published in an online magazine. She teaches in home paper bag book classes to kids and adults. She does scrapbook birthday parties, baby and bridal showers and other special occasions. Her work includes mixed media journals, canvas, paper bag books, scrapbook albums, mini books and more. She has a FaceBook page called Creatively Fabulous where all her projects, ideas and tutorials are posted. She does custom orders and party decor. She takes pride in her work and is available to help you preserve your precious memories in a lasting and creative way.


To book a class with Kimberly or see her upcoming schedule, please visit: http://creativelyfabulous.blogspot.com/

Tuesday, September 18, 2012

Learn Bind-it-All Basics:

Zutter Innovative Products
Have a Bind-it-All
but don't know what to do with it?

Learn all the basics and become a Bind-it-All DIVA!
Zutter Zertified instructors bring top notch instruction and
creativity in a unique online classroom setting.
 
Students from around the world can take part!
Bind-it-All 101 now open for enrollment.  
  Bind-it-All 101   
Once you master this class you will wonder why you waited so long!
This course will cover the very basics of using the Bind-it-All for punching and binding custom mini books. This information-rich, project-packed, four week course will cover:

Overview of the Bind-it-All : Includes review of settings, tools, maintenance, and accessories.
  1. Punching Basics: Includes creating your own Bind-it-All Punching & Binding Guide and tips for punching centered and even holes.
  2. Binding with Confidence: Covers the use of the Owire Sizing Templates and how to bind perfect "o-shaped" owire spines.
  3. Mini Delights : Create two custom bound mini albums - one 3X4 mini and one 4X4 mini, utilizing easy techniques you can repeat again with any theme.
  4. Everyday Albums : Take your custom binding up a size or two with a 6X6 and 8X8 album. Explore different punching styles for a truly unique project!
    Bonus! Binding Above & Beyond: Explore how to use your Bind-it-All using every day, around-the-house materials. In this lesson we will review other punching materials and expand from the basic to the uber creative! Take these project starters and take off with creative ideas and executions of your own!
Enrollment open now for class beginning October 2, 2012

Monday, September 17, 2012

Let's go to Hawaii...

We were so lucky to be able to go to Hawaii for our vacation this year.  It is one of my favorite places to go.  We always have an amazing time.  Of course the best way to remember your vacations is with a mini album.


I used a 5x7 Cover-All and the Lily Bee Handmade collection for this mini album.  The 5x7 size is one of my favorite sizes to use as the 4x6 photos fit perfectly in it without having to do a lot of cropping or cutting.


I made my cover page a flap page so I could add some extra journaling inside it.  I created this hibiscus flower by cutting out the patterned paper and layering it into a flower shape.


I added a few more flap pages to this album I love how they look and the extra space I get for writing or adding more photos.


I love how the 4x6 photos fit these pages and all I need to do is add a bit of embellishment to the pages, like a banner.


This is one of the biggest minis I have made in a long time, it ended up being 22 pages. 


I also added some fun pinwheels to this mini, they always add a bit of whimsy and fun to anything.


I cherish being able to make these keepsakes for myself and my family.  Why not make one of your last trip so the memories will never be forgotten.

Fleur

Friday, September 7, 2012

Star Student

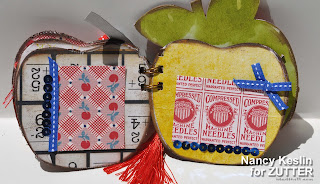
Hi everyone, Nancy here today to share with you a project I made with Back to School in mind.
I started with cutting some chipboard I had using my Cricut, and then cut matching patterned papers from the  School House Vintage kit from Hydrangea Hippo.
 Some quick binding with my Bind it All and Antique Brass O-wires.
 And my mini album was ready to be filled with buttons and bits.
 All I need now is a few photos of my children's friends to complete.

Hope you are having a great day.

Hugs.

Nancy

Saturday, September 1, 2012

A Party in My Studio

Lately, I haven't had a chance to really get out and "party"(meaning hanging out with friends). I do miss it some, but I also know that an evening in my studio is definitely party time for me. Having great supplies in my hands, a fun DVD to watch or music playing, and a favorite beverage nearby...well, that's a party to me! So, in honor of my party spot, I made a celebratory style banner. I love Zutter's pink O wire, and thought it would be fun to use it as an embellishment, rather than just as a practical tool. So on each pennant, I punched different numbers of holes in the covered Zutter chipboard, with my bind-it-all, threaded and bound the o wire, and then added little bobbles hanging from each. I did secure the bound area to the back of the pennant, using Helmar 450, so that it would not twirl around. I used Zutter chipboard for each of the pennants. I did them in two different styles for a funky look.
I've been using these vintage souvenir spoons on lots of projects lately. I found a bunch of them in a flea market several months ago....and they reminded me of my grandmother, who collected spoons on her travels. Grandma traveled with us on vacation a few times, and it was always fun to help her find that special spoon to commemorate the state or place we'd been. I added twine and a flower from Hydrangea Hippo (and most of the other embellishments came from HH, too...I just love all of it!), and glittered the inside of the spoon. That brings out my inner Mary Poppins....with a spoon full of sugar! I felt totally comfortable blinging this baby up as much as possible...because it was for me!
C-R-E-----A-T-E! What does it spell? Party! (Wait, no, Create!) hehe. Thanks so much for joining me today on the Zutter Zister's Blog! I hope you'll take the chance to party and create (which for me, is obviously the same thing!) What can you embellish with Zutter O wire? It's a fun challenge for today!

Zutter Products Used: Chipboard , Bind-It-All, 3.4" Pink O Wire
Other Products: Hydrangea Hippo (ribbons and embellishments), Webster's Pages (patterned papers)

Thursday, August 30, 2012

What's your number?

Hello ladies. Nicole here and today I have a fun tutorial for you. I am going to show you how to create a fun address/phone number book of your own. I'm thinking that this will make a great Christmas gift. Score! First cut 2 pieces of chipboard down to 4X4 and punch the top right and bottom right using your Round-it-All. Then use spray mist to alter the covers.
I found an address page on Maya Road's website and decided to resize the template to 4X4 and then I printed 50 4X4 address pages, front and back to use as my inserts. I cut 9 pieces of 4X4 patterned paper and then folded them in half to use as my dividers.Then I punched holes through each page.
After I punched each page, I fed the wire through each page and then used my Bind-it-All to bind the pages together.
Last, I decorated my cover and here's my final project. I love how it turned out.


  • Supplies:
  • Zutter: Bind-it-All
  • Zutter: 1" Owires in white
  • Zutter: Round-it-All
  • Other:
  • Clearsnap: Mist (Holly Berries)
  • Creative Memories patterned paper
  • May Arts: Flower ribbon in white and String
  • Jillibean Soup: Wooden Button