Showing posts with label Display-it-All. Show all posts

Tuesday, July 24, 2012

Are you a Video Super Star?

We're looking for a few good videos to add to our YouTube channel or list here on our blog and website!


Do you make videos of your scrapbooking, papercrafts, and home decor projects while you make them? Then you're the person we're looking for!


Submit links to your videos here using the Inlinkz Linky Tool. We'll review the videos and let you know if your video has been accepted. You'll receive a FREE Display-it-All if your video is accepted. 


We're looking for the following types of tutorial videos:
  • How-to use Zutter Products
  • Unique Projects created with Zutter Tools
  • Any videos in Spanish
  • Videos with personality!
You can submit as many videos as you like AND you can even submit videos you've spotted online, that you did not make*. So if there is a great video you love on YouTube showing great ideas with Zutter product, please share it with us!!
*If the original video creator submits the same video, they will be eligible to collect the Display-it-All gift upon acceptance of the video.

Submit your entry below -  hurry! 
This call for videos ends August 30, 2012!

Monday, July 2, 2012

Zummer Zchool Starts Now!


Course Length: 4 Weeks
Begins: June 28 (you can enroll up to 2 weeks after the start date)
Cost: $25

Once you master this class, you will wonder why you waited so long! This course will cover the very basics of using the Bind-it-All for punching and binding custom mini books.  This information-rich, project-packed course will cover:
1.  Overview of the Bind-it-All
2. Punching Basics
3. Binding with Confidence
4.  Mini Delights
5. Everyday Albums
BONUS! Binding Above & Beyond 


Course Length: 4 Weeks

Begins: July 12 
Cost: $25
 Enroll Here 
Are you ready to get your punching and binding mojo cookin'?This course is for the experienced (or BIA 101 graduate) who wants to crank out FOUR awesome projects using the Bind-it-All and a bevy of other Zutter tools and products.You will be given the creative freedom to theme your projects as you wish, but will be provided the tools, skills and inspiration to create personalized masterpieces. 
Display-it-All Project
Project from Course
 More Info and to Enroll 


Tuesday, June 26, 2012

Oh So Sweet, Cupcake Recipe Display

           Hello Friends! Heather here to share a super fun and quick project that makes a great gift for the baker in your family. Using the Display-it-All I created a Cupcake Recipe book for my sister in law who makes the most amazing cupcakes (especially the Resse's with peanut butter frosting, yum!!) I whipped this project up in under two hours and I am super excited to share the details with you all today.

First, start off by spray painting the pieces of the Display-it-All, two coats of white spray paint covered it nicely. While your stand is drying, cut out your chipboard, paper, and recipe cards. I was able to find a pack of 25 recipe cards at my local craft store for $1.99, and used those as a template to size my chipboard and paper. I used my Round-it-All to round all of the corners to give the book a softer look. Punch your holes and bind with 3/4" Pink O-Wire and attatch to your Display-it-All stand.

Now you can start the fun part, decorating the cover and inner pages! I used a few simple images from my Silhouette SD to add some kitchen themed die cuts and tabs, tied some coordinating ribbon to the O-Wire, and I have a one of a kind recipe book. Hope I have inspired you to create your own sweet recipe book today.

Best,
Heather 
Front Cover of the Recipe Book. I used 2 cupcake liners to make an
easy and cute flower on the front.
I added lots of recipe cards and also a few blanks pages to add pictures.
                                    The rolling pin and tabs were cut using my Silhouette


Zutter Products Used:

Other Products:
*Pink and Blue Cardstock
*Cupcake Paper, The Paper Studio
*Recipe Cards, The Paper Studio
*Cupcake liners
*Satin White Spray Paint
*Ribbon
*Silhouette SD Macine for die cuts

Saturday, June 23, 2012

What's on the menu?

Hello everyone. Nicole here. Today, I would like to share a menu I made using lots of fun stuff from Doodlebug. I must admit, I'm not much of a cook, but I am a planner. So this adorable menu planner is for my husband.*inserts grin* I have put him in charge of the grocery shopping and cooking since he thinks I spend too much money on groceries and honestly, I think I made out on this part of the deal. hehe. I think the Zutter Display-it-All is the perfect product to hang up my menu for the week. Wouldn't you agree?


Since I was out of 1/2" Owires, I decided to weave lace through the wholes that I made using the Bind-it-All.


This adorable Display-it-All is really simple to use. Simply flip to the page you want to display and place the top metal bar below the middle of the book to hold it into place.


Thanks for visiting today. Please come back again!

Supplies:
  • Zutter: Bind-it-All
  • Zutter: Display-it-All
  • Doodlebug Design: Chipboard Album
  • Doodlebug Design: Trims
  • Doodlebug Design: Jewels

Thursday, June 7, 2012

My Favorite Recipes

Hi everyone, Nancy Keslin here today to share with you a project I made using my Zutter Bind-it-All, some cute Melissa Frances supplies and my Zutter Display-it-All.


I was so thrilled when I ran across this cute little kit at the Scrapbook Expo, covers and insert pages for a fun, kitschy, recipe album.  I knew it would match my kitchen and with a little help from my Bind-it-All I made a simple book to hold some of my families favorite recipes.
White 1-inch O-wires hold my little book together.  And bits of lace, trim, sequins, (from the Hydrangea Hippo store) and a few Prima flowers, as well as a bit of stickles, complete the covers that I rounded with my Zutter Round-it-All.
I painted my Display-it-All with an off white crackle finish so that it would coordinate with my kitchen, adding more flowers and a cute little doll tea pot I had from my daughter's younger days to embellish the base.
I really love how the Display-it-All keeps my recipes within easy eye site and up off my prep surface.
Now all I need to do is get in there and cook.

Thanks for stopping by the Bind-it-All blog today and be sure and come back soon.

Zutter Items Used:


Other Items Used:
  • Melissa Frances Kitschy Kitchen Recipe Cards
  • Sequins, Trims, Flowers Hydrangea Hippo Etsy
  • Prima Flowers, leaves
  • Folk Art Crackle Medium, Acrylic Paint
  • Pleasant Company Teapot


Hugs.

Nancy


Sunday, June 3, 2012

Menu Planner on Display

Hello Zutter Fans.  Cheryl Boglioli, from Cheryl’s Window, here again to share my Kitchen Menu Planner.   When we get really busy around here at my house, we find ourselves eating out much more than we should be, which kills our food budget.  So, my daughter and I have started back at planning our menus again. 
I wanted my menu planner to be on display and easily accessible, so I knew Zutter’s Display-It-All would be perfect.  

I went searching the web for a great weekly and a great monthly planner.  I found ones that I liked at Picklebums.  Kate has a lot of great ideas on her blog too. I downloaded her free copies and printed them so that they would fit in 4 x 6 Zutter Pre-punched Page Protectors. 

I dug out BasicGrey Nook & Pantry paper from my stash, which was the perfect color and theme for my kitchen project. 
I even used my BasicGrey Notch & Die set that I haven’t used in a while.  I love using products I already have.
I used the rounded die to create two notches on opposing corners to slide each week’s and each month’s planner card. 
I chose to use the Zutter Page Protectors to store the extra planners as well as a place to store the recipes for the week.  By using the page protectors, this also gave me a way to display whichever recipe we are cooking and protect it from any spills or splatters.  For that same reason, I chose to use a Zutter 6x6 Acrylic Cover to project my entire project.  If something does splatter on it, I can easily just wipe it off.   Since it is going to be in my kitchen, I did not add lots of ribbons or embellishments, although it was really hard not to.  I even wanted to decorate the base, but I know how hard it is to keep things clean and wiped down in my kitchen, so I kept it plain…for now.
I used Tim Holt’s Alterations File Tabs On The Edge dies to cut the page edges for my Recipe, Weekly, and Monthly tabbed pages.  
The extra planners are stored in Zutter Page Protectors behind the weekly and monthly file tab pages.
See how I can just slide in a new page each month? 
And, here is the back page.  I used Zutter Clipboard to provide a good sturdy back to my planner as I hope to use it for a long time.
The Display-It-All was easy to use.  Of course, I could have just rested the wires over the stand, but I decided to actually mount mine onto the display.  After punching the covers and pages, I used the Display-It-All bracket to mark where to punch and then punched holes using my Crop-A-Dile.  Then I inserted the O-wires and used my Bind-It-All to bind my album.  All I had left to do was screw the back cover between the display stand and the display bracket. 
The Display-It-All looks good on my kitchen counter and is not so large as to get in the way or clutter my countertop.  Now I need to go plan this month’s menu and this week’s grocery list.  Do you have any recipes you want to share with me?  Please do, if so. 

Wednesday, April 18, 2012

Friday, November 12, 2010

ATC Storage In A Jiffy with the Display-it-All (and more!)

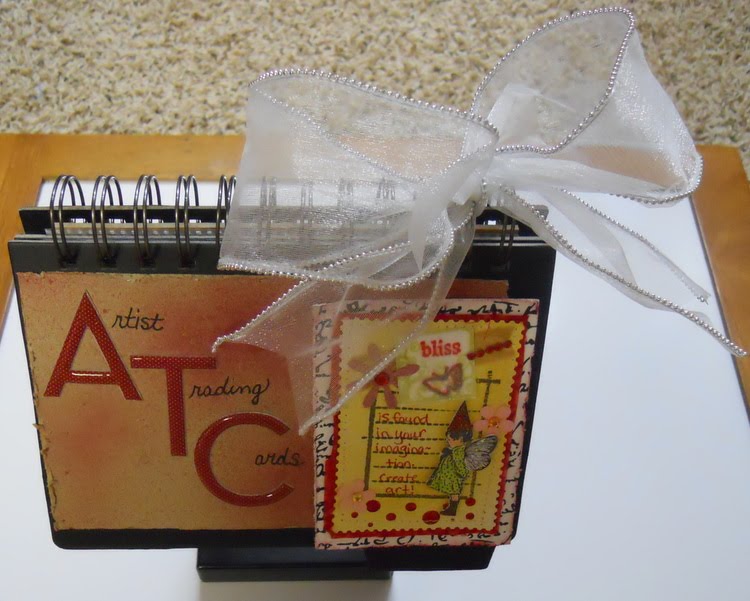
Hellllllooooooooooo everybody! How the heck are you all doing today? Fab? Super fab? I sure hope so! Today I would like to share an easy peasy way to display your ATCs. If you aren't sure what ATCs are, they are just fun little cards ~ Artist Trading Cards that you create and trade with your crafty buddies. (I love participating in ATC swaps, and have some favs from swaps at Scrapbook News and Reviews to name one place.) Anyway, I wanted a fun way to display some of my ATCs, but didn't want to spend boatloads of time creating it. I decided to use one of the Zutter Display-It-Alls with a Tabbed Folder Album I had stashed. I also used the super easy to use Zutter Pre-Punched Page Protectors to hold my ATCs, and tied a fun wired edge ribbon to the owires when I was done. Of course my pink Bind-It-All V2.0 made super quick work of the whole project, especially since the page protectors are already punched, you just need to bind them in your album.  WOOOO HOOO, can you say warp speed fast?  ;)

Here is the front ~

Here is the back ~


Here is a peek inside ~


Another peek ~


Super quick and easy!  Plus the focus is on my ATCs, and with the clear page protectors I can see both sides of the cards!  I love that.  I also love the fact that I can easily add more pages if I want to, I just need to pop some of the Moveable Page Protectors in there, then load them up.  Easy Peasy, gotta love that! Create one yourself, you will be glad you did. I would love to see it if you do, just pop over to the Zutter Zisters Message Board and post a pic when you are done.  :) 
Have fun creating! ~ Pam 


Zutter Zister DT Member Pam Sandy