Showing posts with label Gift. Show all posts

Tuesday, June 26, 2012

Oh So Sweet, Cupcake Recipe Display

           Hello Friends! Heather here to share a super fun and quick project that makes a great gift for the baker in your family. Using the Display-it-All I created a Cupcake Recipe book for my sister in law who makes the most amazing cupcakes (especially the Resse's with peanut butter frosting, yum!!) I whipped this project up in under two hours and I am super excited to share the details with you all today.

First, start off by spray painting the pieces of the Display-it-All, two coats of white spray paint covered it nicely. While your stand is drying, cut out your chipboard, paper, and recipe cards. I was able to find a pack of 25 recipe cards at my local craft store for $1.99, and used those as a template to size my chipboard and paper. I used my Round-it-All to round all of the corners to give the book a softer look. Punch your holes and bind with 3/4" Pink O-Wire and attatch to your Display-it-All stand.

Now you can start the fun part, decorating the cover and inner pages! I used a few simple images from my Silhouette SD to add some kitchen themed die cuts and tabs, tied some coordinating ribbon to the O-Wire, and I have a one of a kind recipe book. Hope I have inspired you to create your own sweet recipe book today.

Best,
Heather 
Front Cover of the Recipe Book. I used 2 cupcake liners to make an
easy and cute flower on the front.
I added lots of recipe cards and also a few blanks pages to add pictures.
                                    The rolling pin and tabs were cut using my Silhouette


Zutter Products Used:

Other Products:
*Pink and Blue Cardstock
*Cupcake Paper, The Paper Studio
*Recipe Cards, The Paper Studio
*Cupcake liners
*Satin White Spray Paint
*Ribbon
*Silhouette SD Macine for die cuts

Monday, June 18, 2012

Love Letters and 10 Years

Hello friends, Heather here with a fun project I am so excited to share with you using a set of 5x7 acrylic covers  for a special keepsake book I created in celebration of 10 years of marriage with my handsome hubby. I have to start by saying I absolutely love using acrylic in my books. I will add an acrylic cover or page in whenever I can because I love the extra weight it gives and there is something fun about the translucence of the acrylic.


In honor of my anniversary, I was inspired to take a trip down memory lane, finding old pictures and notes that we have written over the years. I realized that I had yet to make a book that documented just our relationship and this was the perfect opportunity. I wanted to keep this book simple, yet still have the personal touches I love, like hidden pockets for love notes, and extra tags to journal on. Hope you enjoy my mini and the step by step instructions so that you can make one of your own.

Start out by punching 8 holes in the acrylic covers. Leave the
 protective film on the covers until you have finished punching to protect
from scratches or cracking.


Continue to punch 8 holes on all of the interior pages
Use 3/4" Black O-Wire to bind the book. Since the book is 1/2" thick
and I added the additional tags and pockets, 3/4" O-Wire is a great
size to allow the pages to turn freely.

Here is the front cover, a picture from our wedding on top
(yes, I am the one smashing cake on him while he was being very sweet,
I could have sworn he was going to do it!)
and a more recent picture underneath. The pictures are attatched on
the 1st page, and I added a die cut and bling to the acryclic

A flashback picture from my Homecoming Dance when
I was a junior in high school
Another fun pocket inside of the paper bag to add notes and old pictures


Supplies:

Best,
Heather

          http://www.whimzeecreations.blogspot.com/


Saturday, May 19, 2012

Because You Are Mom


Hi there again! It is Candice Elliott
back with another Zutter Bind-It-All
project for us all. I hope that
everyone had lovely Mothers Day.
Mine was spent with my husband's
family and it was just wonderful
time.

Since I was not able to see my
mother this year I wanted to
make something really special
for her. She had been asking for
pictures of us for a while now.
I wanted to find a way of
showcasing a number of pictures
to her while at the same time
share a few thoughts with her.
I put together a Frame Album and
that is what we are going to be
looking at today! 


To create this I simply created a very mini
album using the Clip Board Covers 3x4"
and 1/2" Silver Owire. I adhered the album
to the frame after putting on the Prima paper.

I used lots and lots of layers! Some of
these layers serve a purpose. When opening the
album some of the flowers hold the pages
in place while when shutting the album
does the same. Also if you take a look a
close look at the frayed flowers I used
the scraps from punching to create those flowers.
The little pieces also reminded me of
confetti. Nothing goes to waste with me!


All that I strive to be has a huge part
to do with my mother. The doctors told her
that if she tried having me that either she
would die, I would die, or the both of
us would die. She was in the doctors
office papers signed and all to have me
aborted but could not go through with
it. Well, as you can see they were
wrong. She did not give up. I am so
grateful for that moment in time.


The title mother definitely does not come easy
so I wanted to let her know that I know now!


Finally I wanted let my mother know that
she is a rare rose. The only one of
her kind and that she is loved more
than I can say. I LOVE YOU MOM!!!
Thank you all once again for
allowing me to share!

Supplies:
Other Products includes:
  • Prima papers, flowers, and letters
  • Websters Pages Elements
  • Sassafras Sticker Elements
  • Making Memories Phrase Stickers
  • Echo Park Element and Letter Stickers
  • Cosmo Cricket Element Stickers
  • My Little Shoebox Element Stickers
                                                            http://truedivinehand.blogspot.com/

Wednesday, May 9, 2012

A Little Whimzee and a Sweet Mother's Day Mini

Hello Friends! Heather Mendenhall here with my first 2012-2013 Zutter Zister design team post. I have been over the moon excited  at having this amazing opportunity to share my love for paper crafting and creating fabulous mini albums with my Zutter products.


My journey into the scrappy world started when I had my daughter Hailey and realized that I wanted her to have more than a simple baby book that was half filled out; I wanted her to have beautiful albums that she would one day share with her own children. For many years it was a hobby, getting together for coffee and scrapping with the moms at preschool, until I started realizing that I wanted a challenge, to make unique albums that no one else had.


This past year I started to really put myself out in the crafting world and have been selling at craft fairs, launching my Etsy shop and blog, and attending conferences to grow my business and let others enjoy my paper crafting creations. I enjoy displaying my art and meeting other crafters and customers who are as excited as I am to take home an album, as I was to create it. I have always believed that handmade items are the most amazing gifts to give and receive, and I feel truly honored to be a part of the community of crafters and artists who live in this handmade world with me.

Today I am going to share a darling mini album that I made as a special order for Mother’s Day. I hope you enjoy and I look forward to creating with you this next year!


Best,
Heather


Supplies:
Posted by Heather Mendenhall

Sunday, April 15, 2012

Mini For A Friend

Hello! Today, I would like to share with you a friendship mini. I can't believe that Mischelle and I have been friends for 14 years now! I gathered all of our photos over the years and scrapped them into this mini. I adore this and hope you do too!


Supplies: 

  • Zutter: Bind-It-All Zutter: Wire 
  • Glitz Designs "Pretty in Pink" Patterned Paper 
  • Glitz Designs "Pretty in Pink" Rhinestones 
  • Glitz Designs "Pretty in Pink", "French Kiss" Cardstock Stickers 
  • Glitz Designs "Pretty in Pink" Teeny alphas 
  • Glitz Designs "Pretty in Pink" Glitzers Glitz Designs "Pretty in Pink" Whatnots 
  • Other: Baker's Twine: Scrap Pantry (Etsy) 
  • Buttons: Epiphany Crafts 
  • Word stickers: Cosmo Cricket 
  • Die cut machine: Cricut Cartridge: Stamp 
  • Pearls: Zva Creative Flower: Zva Creative 
  • Pen: Adhesives: Creative Memories


Monday, December 5, 2011

Travel Mini - Stocking Stuffer?

The holiday season is in full swing and now is the time to think about making handmade gifts!!  This mini makes a great stocking stuffer or coworker gift, all made easy with the Bind It All! I literally made this mini while I watched a movie -- it's that easy!
I have had an 8x8 pad of October Afternoon travel themed paper and stickers in my crop bag for well over a month. I knew it would be perfect for a fun travel themed mini! According to a poll, in which my husband was the only participant, 4x4 is a great, "cute" size for a mini book. I laugh at how much my hubby knows about crafting. He could totally teach a class after listening to all of my blather all these years!
So, back to the project at hand.

First step was to cut a 12x12 Chipboard to 4x4 pieces -- you'll get nine. If you don't get nine, then something went wrong....but that's okay, just use whatever you have on hand. If you have Zutter Chipboard, Clipboard Wood, or Acrylic Covers in 4x4, even better!

After that, cut your patterned paper to 4x4 -- you'll need 18 pieces, 2 per chipboard.


Next randomly glue the 4x4 papers to each side of the chipboard pages. I usually put the same paper on front and back and the leave the middle to a random mish mash of patterns. Not too much thought is involved here--if you think about it too much, you'll spend hours on this project!


Punch all of the pages in the Bind It All. 4x4 is also a great size because you can set the BIA to "C", punch each page once, and it goes super quick.


After all of the pages are punched, apply paint to a foam brush. 


Squirt out just a little paint onto the brush and use the top of the paint bottle to work the paint into the brush. You don't want to apply a blob of paint to the brush and then put that on your book--it will look like a blob! Lightly brush the edges of the pages with the paint to cover the brown chipboard.


Bind all of the pages together. Even though this book is small, I used 1.25" O-Wire because the book is thick and I wanted room for bulky embellishments. The rule of thumb for choosing O-Wire is to choose a diameter of wire about 1/4" larger than your book is thick. A 1' thick book would then use 1.25" O-Wire.


I used a combination of chipboard stickers, twine, and embellishments I made to decorate the pages. 


I made two Epiphany Crafts Square Charms and adhered them to an Epiphany Crafts Charm Setting and hung it from the O-Wire with jump rings. This Charm Setting is double-sided which I LOVE!!! And the O-Wires on the book just have endless decorating possibilities.


And here is the back of the charm:


Supplies:
EC Scallop Circle, Square, and Star Bubble Caps and Studios
EC Square Charm Settings
Paper, Stickers - October Afternoon
Jump Rings - Blue Moon Beads
Paint - Delta
Twine - The Twinery
Ribbon- Unknown
So for all of you who say you don't have time or space to craft, it can happen! Just sit down with a TV tray. a few supplies, and a movie :)

OZZ DT Member Jennifer Priest
hydrangeahippo.blogspot.com

Monday, August 8, 2011

Zummertime Gifts!

Welcome to Day 1 of another delightful week of Zutter Zummer projects, shopping specials and giveaways! Today's project is from the delightful Zutter Zister Pam Sandy - she's from Michigan.  You'll see, Pam creates beautiful projects and loooooooooves vowels!  Read on, check out the shopping special, and leave a comment for todays' giveaway prize!
------------------------------------------------------------------------------------------
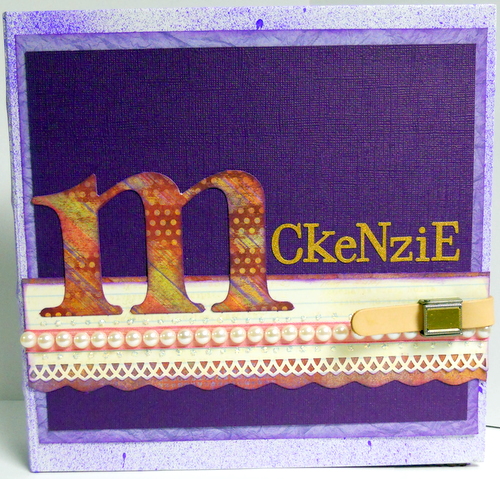
Hello everyone!  Haaaaaaaaaaaappy Zutter Zummer!  We are deep into summer right now, since it is August.  I think of a lot of things when I think about summer, swimming, camping, the lake, our vegetable garden, canning pickles and salsa, and just being outside.  Summer is also a time when many college students have a break, and look for summer jobs.  We were fortunate enough where I work to have the most fabulous summer intern you could ever imagine.  She is smart, efficient, reliable, creative, caring, and compassionate, all good things when you work at a hospital.  I wanted to make her something special as a going away gift, so of course I thought of my Bind-It-All!  Easy peasy to make any type mini I could think of.  I also decided that since my family is moving this summer, it was time to dig into and use some of my stash.  Since McKenzie's favorite color is purple, I went with it.

I have to confess, I am somewhat of a packrat, and I looooooooooove to save things.  Time to create a summertime gift, and lighten my stash while I was at it.  The first thing I do when I am creating a mini is gather a LOT of papers, scraps, and odds and end embellies that all coordinate.  I love that creating my own mini means I can mix manufacturers and supplies with ease.  Here is a photo of my initial pile of "ingredients" ~

Next I went through my piles and cut out my bases and some large accent papers~
After I had my papers cut, I inked everything with a Colorbox Violet Cat's Eye Ink. Inking everything really helps tie your project together when you use assorted manufacturer products, and helps to create a cohesive look.  Next I began assembling my pages.  Some of my pages were folded to add interest (I used my Scor-It-All, it works BEAUTIFULLY!), some were strictly 8 x 8 squares. After my pages were put together, stitched and embellished as I wished, I punched everything with my Bind-It-All, then assembed my mini.  I used an 8x8 Bamboo Spine CoverAll (love those things, they look so neat and tidy, and hold a boatload of stuff inside).  I sprayed the white CoverAll with a sparkly purple mist, then embellished the cover, and added a Perfect Closure to hold it all together ~ 

Here are a few pics of the inside of the album ~ 
Don't forget to use your Round-It-All for creating perfect round corners in a second ~
I embellished a cardboard CD holder and put it on the next to last page.  I thought if McKenzie had some favorite photos or a CD of songs, she could store it in her Mini.  I left lots of space for her to journal and add bits of her favorite things, in addition to photos.  Hopefully she will like her mini, and thinks of her summer 2011 when she uses it. 

If you have someone in need of a gift, don't forget to think about using your Bind-It-All to create a one of a kind special gift.  Dig through your stash too, it is a lot of fun.  :) 
Happy creating! ~ Pam
------------------------------------------------------------------------------------------
SCORE BIG WITH THE SCORE-IT-ALL!
Today's shopping special and giveaway are one and the same!  Save 20% on all Scor-it-All products.  Shop here for large and mini Scor-it-All boards, totes, replacement tools, sliding rulers and the A2 Envelope Template. 
All at 20% off with this coupon code:  Zummer-Scor20
Pam used the Scor-it-All for making pages in the project above.  It's an indispensable tool that creates professional grade folds, with no cracks in your paper!  These tools almost NEVER go on sale, so if you've been wanting one, now's the time!  Don't forget a tote, sliding ruler and replacement tool.  All at a great deal!
Note, one coupon code can be used per order, so if you want multiple Zummer specials, you must complete separate orders

If you are feeling lucky, leave a comment below and tell us....now that Zummer is almost near it's end, what is on tap for you during these last lazy, hot days?  We will draw a random winner for a MINI SCOR-IT-ALL board.  Winners announce on Monday!

WE LOVE ZUMMER!