Hi there!!! Are you a busy scrapper, but in need of a cute and quick little project for a gift? I have just the thing for you!!! A darling little wallet picture holder that not only comes together super fast but can be adapted for any style! The
Zutter 3X4 Cover-All is the key to all the easy-peasy-ness (is that a word?)
For my project, all I used is one piece of white cardstock, a few colors of spray mist, a
Curved Spine 3 x 4 Cover-All, (or any style Cover-All), a bit of Gesso or white paint, 2 jeweled brads, bits of ribbon, and a few scraps or letter stickers.
First, spray your white cardstock lightly with a spray mist. Let dry (or if you are impatient like I am, use your heat gun to zip it dry in a minute). Flip it over, and lightly mist the other side in a coordinating color (I used two colors of green). Let dry.
Next, cut the misted cardstock into three strips, each 4" wide.
Take each strip, one at a time and cut it into 4 equal pieces (3" wide each). You should have 12 little 3" x 4" pieces of misted CS. I chose to use my
Distrezz-It-All to lightly distress each edge. Set aside.
Paint a smidge of Gesso on the front of your Cover-All. Let dry or use a heat gun to dry. Lightly spray a little glitter mist spray over the cover, let dry or heat dry. Next add a few letter stickers or cut out letters to say "A few pics" - or any title. Adhere to dry cover front.
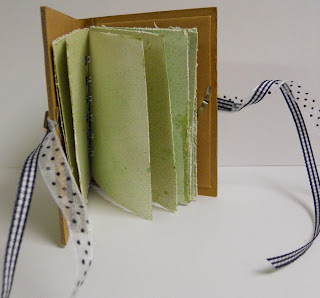
Punch a small hole in the front cover edge for a brad and ribbon(s), repeat on the back cover. Place ribbon(s) over hole, and insert brad to hold it. Repeat for back of cover. (here is a pic of the back cover once the mini is finished and the ribbon has been tied).

Next, punch holes on one side of each 3 x 4" piece of misted CS using your
Bind-It-All. Grab the insert out of the Cover-All and do the same. Bind your pages and plastic with your BIA, and slip the plastic insert into the holder inside the Cover-All.

TA DAAAAAH! Your itsy bitsy mini is done! Look at those lovely lightly distressed edges of my misted cardstock!
This project can be whipped together in well under 30 minutes. You can also use a piece of a favorite patterned paper to shave off even more time! If you don't have an itty-bitty Cover-All, this project can be easily adapted to larger sizes -
Cover-Alls come is a variety of sizes including 6X6 and 8X8 - using additional cardstock.
Happy creating and gifting!
Zutter Zister DT Member Pam Sandy

 I also used the fabulous rivets and rivet set tool to apply these metal pieces cut from license plates to spell "2009".
 To cover the inside covers I cut a piece of chipboard just a bit smaller than the page and covered it with paper and then applied that covered piece of chipboard to the inside covers. A single strip of paper down the middle of the inside of the spine of the album and you are done!


