Showing posts with label BIA Love. Show all posts

Monday, February 13, 2012

A Love Note from Gerda!

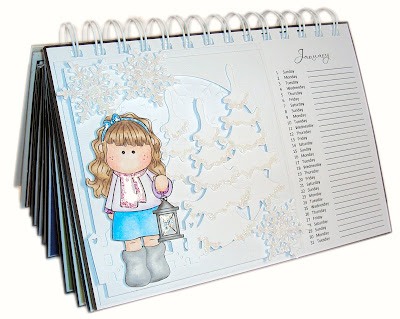
We love this Bind-it-All project from Gerda in Germany!  The cuteness factor is off the charts, and just shows what you can do with your Bind-it-All and YOUR creativity and talents!  Make your own custom calendar!


Supplies:
Zutter Bind-it-All
Zutter Inner Pages
Digital Images and Calendar Template by Stampfairy (http://www.stampfairy.com/digistamps_birthdayoccasions_mollythroughouttheyear.htm)
Prisma Pencils
Cuttlebug
Various Dies and Embossing Folders

I started by printing the template that I downloaded from the Stampfairy Store. Afterwards I cut the cardstock and used my wonderful Zutter Bind-it-All to put everything together. Then I colored all the digis I needed and created little scenes for each month. It took me several days because I am a slow crafter but getting the basic calendar together was a question of minutes. It was my first attempt and it worked without any problems.


My name is Gerda Burghardt, I am the owner and creator of Stampfairy - a website where you find homemade digital stamps for all kinds of crafting needs. I am 30 years old and live in Germany. I started drawing digital images in late 2010 and it became an addiction pretty fast. I started cardmaking a few months later to support my team and I find it so much fun, especially with all the great tools you can buy to take any creation to another level.  My Website: http://www.stampfairy.com/ and my blog is:  http://stampfairyworld.blogspot.com/

Thank you for sharing your wonderful project, Gerda.  We LOVE it!  and hope you enjoy spending your $25 in Zutter Bucka at www.binditall.com
Happy Valentine's Day!

Thursday, February 9, 2012

A Love Note from Michelle!

Continuing with the BIA LOVE - to celebrate upcoming Valentine's Day - enjoy this project from blog guest Michelle Reaves. 

I needed a convenient and pretty way to store my Spellbinders Dies and decided to make an album for them. My new Bind-it-All had been sitting on my craft table waiting for it's debut and this was it! I took 12X12 cardstock and cut it down the middle and used the pieces for my album cover and back. I then took some of my favorite 12X12 papers and folded them down the middle and glued them shut to form my album pages. Next I cut strips of magnetic sheeting with my Xyron and adhered them to the pages -- these magnetic strips will hold my dies in place. Once I had my cover, back cover and pages ready I followed the instructions in the nifty guide that came with my Bind-it-All and Voila! I had the perfect storage album for my dies. I admit when I first got my Bind-it-All I was a bit intimidated but it was so easy and so fun to use! Watching the BIA DVD really helped ease my fears. The next step was to embellish the front cover inside and out..fun fun fun! I created the closure for the album using the Tim Holtz Hardware Findings Die and Grungeboard along with a Tim Holtz Hitch Fastener. The pocket on the inside cover holds the info for each die from the original packaging. I used Tim Holtz Tissue Tape around the outside edges of the covers for a nice finished look and feel.

Supplies Used:
Tim Holtz: Vintage Shabby Paper Stash, Hardware Findings Die, Hitch Fasteners, Metal Corners,  Muse Tokens, Ideaology Baubles, Harlequin Grunge Board, Ornate Plates, Swivel Clasps, Timepieces, Long Fasteners
Ranger Glue n Seal, Glossy Accents, Distress Ink (Vintage Photo, Aged Mahogany, Pine Needles, Walnut Stain)
Spellbinders Tear Drop Circles Die
Prima Say it with Pearls Flourish
Bo Bunny ETC Cling Stamp
Meet Michelle.....
My name is Michelle Reaves, I live deep in the woods in beautiful southeast Arkansas with my retired husband, 2 horses, 4 dogs, 10 chickens, 1 turkey and 8 ducks. I've been an avid crafter for well over 30 yrs with woodworking, decorative painting and some sewing..I really preferred the power tools and paints over the sewing machine! Ten years ago I ordered my first bit of scrapping paper and inks and was hooked from the get go! I love making tags, cards, mini albums, altered items and a bit of mixed media. My husband and I recently turned the third bedroom into a craft room (or craft cave as he likes to call it) for me and I spend most of my time in here getting inky fingers and playing with the papers. I'm thrilled with my Bind-it-All, it has taken my mini albums to a whole new level!!  My Blog is http://plumspaperplays.blogspot.com
Michelle with her Duck Scrappy!
 Thank you for sharing with us, Michelle.  $25 in Zutter Buckz are on the way!
Do you have BIA Love? Tell us about it - before February 14.  See the post below.

Tuesday, February 7, 2012

A Love Note from Kriss!

Love letters are ever so fun to get!  Enjoy this Bind-it-All love from Kriss Cramer of East Fallowfield (near Philadelphia), Pennsylvania.  She’s created a football-themed project, rather appropriate since we just celebrated the culmination of football season here in the U.S. this past weekend!
---------------------------------------------
BIA Love from Kriss:
Ever since I bought my first Bind-It-All (shortly after the release of the original one), it has been and still remains one of my favorite craft tools! The obvious reasons would be the versatility of projects you can create with it, and since I love to create small albums, books, and notes books it's the perfect tool. But the biggest reason I love this tool is that is made well and it works like a work horse. It's sturdy and easily cuts through multiple sheets of cardstock and chipboard. I have used my original Bind-It-All to teach classes and it has been well used over the years, and yet it punches holes with the same clean cuts it did when it was new.

I have since purchased the Bind-it-All V2.0 and because of the quality of workmanship in these tools, I purchased the Zutter Kutter.

The project  I want to share with you is a autograph book I made for my 12 year-old son, Levi, when we surprised him with a trip to Steeler's Training Camp this summer. The best part was when we ran into my sister and her family the second day of camp and when she saw Levi's autograph book, she said "Oh, I wish I would have seen that in the merchandise tent!" 
Football camp autograph book!
Zutter Tools & Supplies:
Zutter Kutter, Bind It All V2.0, Zutter 3/4" Black Owire
Cuttlebug Die Cutting Machine and Diamond Plate Embossing Folder, Provo Craft
Limelight Alphabet Die Set, Sizzix
Foil Tape Sheets, Pitch Black Adirondack Alcohol Ink, Heatit tool, Blending Solution, Jet Black Archival Ink Pad, and Glossy Accents, Ranger
Pattern Paper, My Mind's Eye
Black and White Cardstock
Chipboard 
  1. Using the Zutter Kutter, cut two pieces of chipboard, two sheets of black cardstock, and 20 sheets of white cardstock to 5 1/2" x 8 /2".
  2. Cover the front side of both chipboard panels with pattern paper.
  3. Cut Foil Tape Sheet to 2" x 9 1/2" and two pieces to 1" x 3". Ink entire surface, of all three pieces, with Pitch Black Alcohol Ink and heat set with Heatit tool. Emboss each piece using Diamond Plate embossing folder and Cuttlebug. Apply a small amount of Blending Solution to a soft rag and gently rub the raised surface to remove the black ink. Remove the paper backing from the 2" x 9 1/2" strip and apply 3" down on the front cover; wrap edges around to back. Create corners with 1" x 3" strips and add to the top corners of the front cover.
  4. Using black cardstock, cut letters to spell Steelers five times. Using Glossy Accents, glue five layers of each letter together to create a thick, raised letter. Once dry, sand any rough edges with sand paper or emery file. Glue letters to cover with Glossy Accents and then apply a layer of Glossy Accents to the top of each letter for an epoxy effect.
  5. Using a computer, print out place and date on coordinating cardstock. Punch with decorative label punch, ink edges, and apply to cover.
  6. Apply pattern paper to the inside of both the front and back covers.
  7. Put book in order - front cover, black cardstock panel, 20 white cardstock panels, black cardstock panel, and back cover. According to Bind-it-All guides, punch holes covers and pages. Put together with 3/4" Black Owire.

Getting autographs!


Kriss Cramer

Our love note crafter today is Kriss Cramer.  She has always had a love of arts and crafts, but it wasn’t until she went from career-mom to stay-at-home mom did she really realize just how much she loved it. Her pretty pattern papers, ink pads, stamps, and paints have landed her gigs as designer, teacher, trainer, and published artist. She is married to a good guy and has a terrific son. Her home in East Fallowfield (near Philadelphia), Pennsylvania is always open to her crafty girlfriends and their daughters. (The men in her life don’t get that excited about pretty papers.) See more of Kriss’ crafty goodness at Art Interrupted.

Thank you, Kriss - we are sending you $25 in Zutter Buckz to spend at www.binditall.com!

Friday, February 3, 2012

A Love Note from Lorraine!

We are sharing our first Love Note from Zister Lorraine! Enjoy - and congratulate Lorraine on receiving $25 in Zutter Buckz!
For my Bind It All....
How do I love thee?
Let me count the ways.
My soul delights
in pushing your little handle
and creating all sorts of books out of paper
and assorted coverings.
With great ease you help me bind together a treasured keepsake or gift
from the heart.
Uncomplicated and comfortable, even under stress,
you make every attachment a carefree experience.
You look absolutely adorable sitting on the desk
waiting patiently for our next adventure.
I love thee for all these reasons and so much more.

Here is Lorraine's adorable project!


Supplies:
Zutter Bind-it-All
Zutter 3”x4” Cover-all
Zutter Owire 1/2” Brown
Materials: Kraft, denim, navy and faux leather cardstock, scraps of denim fabric, jean rivet button, button blanks twine
This mini album/purse combo was made using Zutter 3”x4” Cover-all and 1/2” Brown owire.  It’s covered with denim cardstock and faux leather paper. The handles and bottom strip were folded then machine stitched. Covers were embellished with a jean rivet button and button blanks covered with denim material scraps. The beads were rolled using the same papers and were attached to a piece of cotton twine. The entire cover was edged with brown ink and a touch of gold. The inside pages were made using 5 pieces of 4”x 6” kraft cardstock, folded in half to form a pocket page. A navy mat was added to both sides of each pocket and embellished simply with punched flowers and pearl gems. Each pocket has a kraft paper tag which is 2.25”x 3.5” and is covered on one side with the jean paper. A small strip of ripped denim material was added to each for the ribbon.
About Lorraine:  A friend gave me my Bind-it-All a few years ago (I know ...awesome gift !) I’ve been crafting most of my life and have contributed to various publications. Creating one of a kind journals for family, friends and my Etsy shop is an absolute delight for me. I also enjoy altering CDs, making ornaments, greeting cards and assorted gift items. I live in Delaware with my husband and our little dog Blossom.

Thanks for the LOVE, Lorraine!

Tuesday, January 31, 2012

Love Notes to your Bind-it-All

Want to win some Zutter Buckz?  Send us a love note about why you LOVE your Bind-it-All along with a photo or two (and description) of a recently created Bind-it-All project (designed and created by YOU).  We will showcase some of these love notes as guest blogger projects here.  Email nan@binditall.com between February 1-14 with your "love note" and photos.  International love notes welcome.  Winners need to agree to allow their projects to be posted here and on the BIA Facebook page. 
Declare your BIA LOVE!