Showing posts with label projects. Show all posts

Thursday, May 17, 2012

Washi Tape Holder with Clipboard Wood


Hello Zutter fans.  Cheryl here again to share my new little happy place on my desk.  This  just makes me smile to look at it.   I’ve seen some really fancy washi tape holders and didn’t want to pay the fancy price tag for a few I’ve seen; so, I went through my stash to see what I had to make one myself.   I just happened to have some Zutter Clipboard Wood in my supplies and I have The Zutter Kutter in my tool arsenal that I knew would cut the Zutter Clipboard Wood.  I’m finding more and more uses for this tool and loved that I didn’t have to find the electric power tools to cut this. 
I started with 3x4 and 6x6 Zutter Clipboard Wood.  I cut the 3x4 wood into two pieces 2x4.
I cut 1” off the 6x6 Zutter Clipboard Wood and then scored at 3” by only cutting to the 3rd dial on The Zutter Kutter.


After my pieces were cut, I used Helmar 450 Quick Dry Adhesive to glue the sides together.  I loved that the Helmar 450 Quick Dry Adhesive dried quick enough that I only had to old it for a minute or two and I didn’t have to clamp anything. 
I used an adhesive eraser to remove any glue seepage from my wood joints.
I love working with the Zutter Clipboard Wood because it is strong and yet so easy to sand and work with.  I sanded down the edges and joints. 
I’ve had some very special Washi Tape that was gifted to me by sister designer Jasmine Low.  I’ve used a little of it, but have been hoarding it.  I don’t think that is what Jasmine really meant for me to do with it, so I have decided to really use it and enjoy using it.  After wiping all the sanding dust off by box, I covered it with random strips of Washi tape.   I did add a few small pieces from a retro collection I found at Paper Source too for a little contrast. 
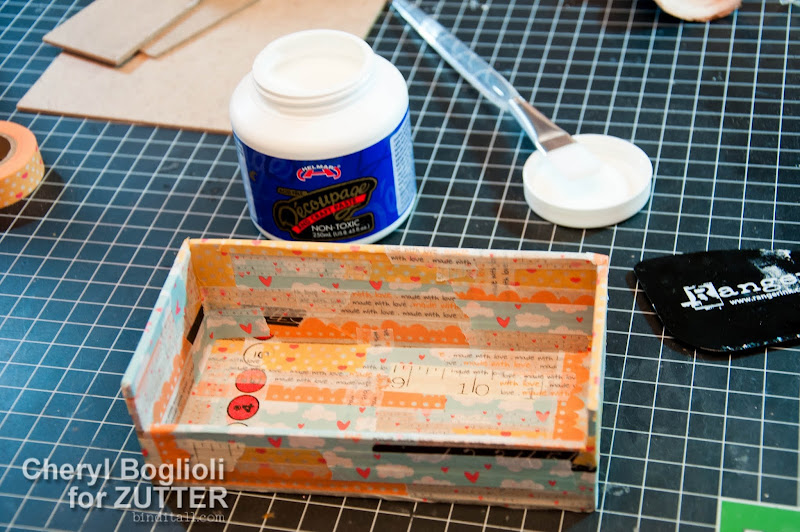
To further protect my tape holder, I coated the taped box with Helmar Decoupage and then sealed it with Helmar Krystal Kote Gloss.   Anyone that has seen my desk in the middle of a project knows that I mist, ink, paint, and basically make a mess of anything in, on, and around my desk when I’m working.  I am a messy artist (and I am embracing that)!  Now I know my little happy tape holder will be protected and can easily be wiped off.
Here is a picture of the backside.  I love that these tapes all fit perfectly in my Zutter Clipboard Wood box.
So, I hope you will take away some life lessons from my project.  #1.   Use what you have.  Go through your stash and see what you may already have before buying something new.   #2.  Look at products in your stash in a new light.   How can I take that product and alter, cut, or modify it to be something new.   Instead of trying to find the right size wood at a lumbar store or my husband’s tool shed, I was able to find a perfectly good product right in my studio.  I was able to create something I wanted for my desk out of two Zutter Clipboard Wood covers.   While these make great album covers, they make a great wood base too.   Please share with us if you find a unique way to use the Zutter Clipboard Wood.  

Posted by Cheryl Boglioli from Cheryl’s Window 


Other Supplies Used


  • Helmar 450 Quick Dry Adhesive
  • Helmar Decoupage and Craft Paste
  • Helmar Krystal Kote Gloss
  • Washi Tape designed by Jasmine Low

Sunday, May 13, 2012

Hello, Amy!

It's Amy here today with my first post as a Zutter Zister! I feel incredibly blessed to be a part of this amazing team, where the original Zutter Zisters set the bar for fantastic and innovative album design. I have deeply admired what Zutter has to offer for so long, and been so inspired by the ways the design team has showcased such fun and exciting products! So, needless to say, I'm thrilled to be showing you a few of my projects featuring these products, and to let you know a little about me.


 grungeboard, tissue tape, button, Tim Holtz; Tag, KI Memories; Twine, Pink Paislee; gaffer tape, 7 Gypsies; paper flower, paper, Creative Memories; 
border punch, purple ribbon, Martha Stewart; corrugated alphas, Jillibean Soup; canvas fabric, brown ribbon, vintage


I thought I'd kick things off with one of my favorite album covers, for a travel journal; because besides being a mom to 3 lovely, creative girls, and the wife to my best friend from college, I'm a courageous soul, who loves to explore the world, even if it is just where I am at that very moment. I try not to be limited by fear, and to try to use each of the talents I may have to the fullest. One day, I hope to travel the world, and see the sights in such places as India, Peru, Thailand, South America......the whole globe! Of course, the best part will be scrapping all of those memories!


Stickers, Authentique; journaling tags, papers, Jenni Bowlin; paint, Liquitex; mist, Tattered Angels; ribbon, Martha Stewart, vintage; 
metal elements, Tim Holtz; handle,  upcycled


Since I started scrapbooking and crafting a few years ago, one of the main things that really keeps my creative motor running, is thinking of fun ways to showcase my memories. I love how the bind-it-all makes it easy to take a fun, different idea, and make it a reality! Like this "haunted house" album I made showcasing the photos from our annual family "Halloweenie Roast" at my mom and dad's farm. It was fun to figure out how to make the album open up like the doors of a haunted house, by binding them on each side, to one large piece of Zutter corrugated board in the back. The album doors open wide to a panorama of photos of the event! (The handle to the door, is a old cabinet pull I found in the drawer in my garage!)


Oh, and as a quick aside, if you see the books that are fitting for this album (spooky Agatha Christie mysteries) on the side of the album, and maybe the shelves of books behind, you'll see this was photographed at my place of work....a library! I am the director of a small public library (with perfect evening light for photographing projects after work), as my main source of employment, as well as being a church soloist and section leader. I am a trained operatic soprano....who obviously took a bit of a detour. Hehe.


papers, Jenni Bowlin; paper flowers, paper circle, Creative Memories; stamp, Graphic 45;
 flowers, Webster's Pages, Prima; Dymo labeler; Alphas, Jenni Bowlin, Doodlebug; paint, Liquitex, Mist, Tattered Angels
twine, rickrack, fabric, buttons, library card, vintage.
 You'll see that these last two projects are created using Zutter's 13x13 corrugated board.  I have a slight obsession with this corrugated board, for any project! I love the texture and dimension it provides, and how it absorbs paint and mist. I use Zutter's corrugated board so much, that I have developed a special painting technique for the cardboard, that I will be so excited to share with you all very soon!
Stamps, fabric and plastic flowers, brads, Jenni Bowlin; paper, Fancy Pants, Jillibean Soup, vintage; 
paint, Liquitex, mist, Tattered Angels, Clearsnap


You will also find that I enjoy finding and using recycled and thrifted elements, especially in my mini books. I love to take things that have pretty or usual graphics (like the coffee bags that I turned into book pages HERE on the bind-it-all blog),and use them on my pages. It always makes me feel so bad to throw them away! (No, please don't sign me up for the next episode of Hoarders, my husband keeps me in check!)

Thank you so much for joining me today on this walk down my Zutter project memory lane.


Tuesday, April 17, 2012

Online Classes from Zome of our Zisters


Spring Online Classes  
with Zutter & My Creative Classroom!
Whether you are new to the Bind-it-All, or a seasoned pro, we've got a class for you!

Jennifer Desktop Calendar  

You've either already taken the Bind-it-All 101 course or you're familiar with using the Bind-it-All. In this course, we'll take binding to the next level, creating several projects using the Bind-It-All tool and accessories, like the Round-It-All, OWires, and Cover-Alls. It's not about the basics anymore - we'll learn techniques for addressing challenging binding situations such as binding irregular shaped pages, binding on the edges of a project, binding pages of various sizes, creating projects besides books, tips for fixing mistakes, and more.

Lesson One: Binding Pages of Varying Sizes
Lesson Two: Binding On the Edge
Lesson Three: Creating Projects 
Lesson Four: Alternative Binding Options 
Class Begins: May 9
4 Weeks - $25
Instructor: Jennifer Priest 


4 weeks - $25
Updated Curriculum
 
Once you master this class you will wonder why you waited so long! This course will cover the very basics of using the Bind-it-All for punching and binding custom mini books. This information-rich, project-packed, four week course will cover:
  1. Overview of the Bind-it-All : Includes review of settings, tools, maintenance, and accessories.
  2. Punching Basics: Includes creating your own Bind-it-All Punching & Binding Guide and tips for punching centered and even holes.
  3. Binding with Confidence: Covers the use of the Owire Sizing Templates and how to bind perfect "o-shaped" owire spines.
  4. Mini Delights : Create two custom bound mini albums - one 3X4 mini and one 4X4 mini, utilizing easy techniques you can repeat again with any theme.
  5. Everyday Albums : Take your custom binding up a size or two with a 6X6 and 8X8 album. Explore different punching styles for a truly unique project!
  6. Bonus! Binding Above & Beyond: Explore how to use your Bind-it-All using every day, around-the-house materials. In this lesson we will review other punching materials and expand from the basic to the uber creative! Take these project starters and take off with creative ideas and executions of your own!
Once you master this course, you will feel confident in taking on any custom binding project. 
Quick Links...
 

Wednesday, April 11, 2012

Upcycled Coffee Bag Journal

I'm so happy to share this project with you today on the Bind-It-All blog! 


About a year ago, I was about to throw away one of my Starbucks coffee bags, when I looked at at it, and thought that it was such a shame to throw it out, because it was so pretty! Of course, it seemed a bit silly just to keep it because I liked how it looked, but I decided to give myself a day to think about a creative use for the bag, before I pitched it. 

When I was sitting in my studio that evening, I saw my brand new Bind-It-All sitting there, and it hit me! I could collect the coffee bags, and create an album especially for my coffee loving friend Christina! I asked my extended family to save their pretty and unusual bags for me, too....and I ended up with some pretty interesting ones, especially when my parents went on their travels. 


The day I mailed the coffee album to my friend was such a great one. Though I usually only get to "virtually" enjoy coffee with Christina, I could make a handmade gift to let her know I was thinking of her over coffee each day. I think this idea makes a great unique gift for any coffee lovers out there. :)