Showing posts with label journal. Show all posts

Saturday, July 28, 2012

A Mixed Up Summer Journal

It's Amy here today, to share a recent book I made for myself. I have recently become very dependent on Google calendar on my iPhone to organize myself and my family, but I often need a place to quickly write a note, stick a business card or brochure, sketch out an inspirational idea, or tuck tickets from a movie or event. I was sort of needing a Smash book, but something more along the lines of a smash book meets journal, meets spiral notebook. I decided the only way to have this strange book, to my own to suit my needs and style, was to craft one myself. 
 
To embellish the inside covers, I simply took two pieces of super cheap stationery, ($1.25 for 150 sheets), cut them to fit the inside of the book covers,  and distressed them with the distrezz-it-all. Then I decoupaged them to the book, and gave the white area of the paper a coat of gesso, before misting them with black mist, and some drips from the cap.


I started with an old library book discard for my book's cover. The covers of this book were sturdy, but very vintage, and it was easy to tear the binding apart, and use just the outside covers. I decided I would have pages of differing sizes and textures inside, so I punched the holes with my bind-it-all on the top and bottom only. In retrospect, I would have punched all along the side, to simplify the process....but I do like the look of the separate sets of o wires.


I used my bind-it-all to punch and bind all kinds of interesting and quirky objects, like this 45 record I cut in half (the other half is on the book cover). The bind-it-all is amazing, and can just bite into nearly anything! I covered the cut ends in washi tape, and it kept the edges from potentially chipping and splintering during the punching process.
 

 I wrapped stamp packaging with washi tape (if anything needed edges, it was washi taped!) , and threw those in the mix of pages that also include library card pockets, a restaurant beer coaster, and legal sized envelopes. It always inspires me to have a mix of ideas, even in something somewhat utilitarian. Since this book will accompany me pretty much everywhere, I definitely wanted it to be inspiring! (Even if it's a little quirky and strange at the same time).

Another soft cover to a book was a fun addition, but it felt a little thin, so I added washi (again) to the edges. 


I had an old spiral notebook with some blank pages left, so I tore them out, and bound them, as well. Zutter chipboard helped me out with some stability, so I put gesso on one side of four pieces, and put October Afternoon travel themed papers on the other side. The other blank papers are more of the stationery, and it is simply folded in half and bound. There are plenty for me to use to journal/make notes on.


My summer has been quite mixed-up, and definitely hasn't been what I planned. But now, I have a fun and inspiring journal to tote with me during the last "dog days" before school starts. 
I hope maybe you will give creating a "mixed up" book a try.....it's so easy! Just grab your great Zutter tools, some random things you love, and in just a little bit of time, you'll have something special to use for ideas and inspiration, too! Thank you so much for joining me today! 


Friday, June 15, 2012

One Cup or Two?


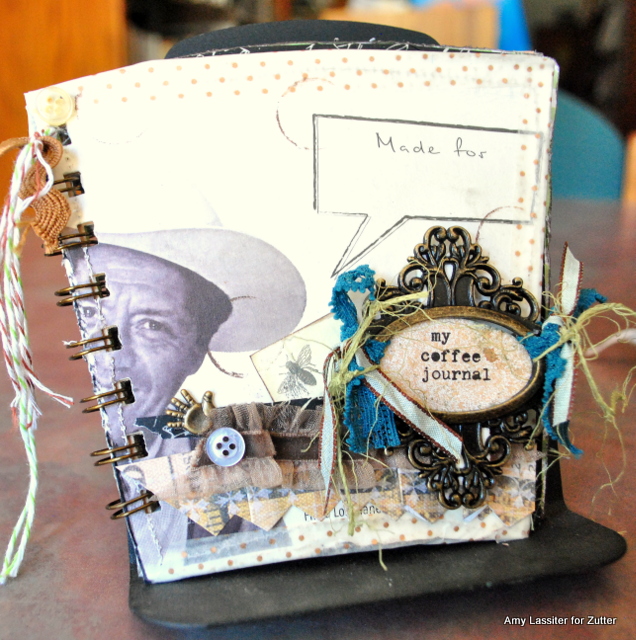
It's Amy here today to share yet another coffee centric set of mini books! I love coffee, but if you've seen my previous posts, you know that's no secret. This time (and I think this is the last of my coffee centric ideas) these mini's were created around the coffee cup album concept by Wilna Furstenberg. I'd had her instructions on my computer's desktop for way over a year. It was so cute, but I was just too daunted by the taping, gluing, and detailed binding of the album. Enter the Bind-It-All, and my fears disappeared! I basically followed all of the instructions, but it was made super easy by just binding the book with 3/4 inch brass o wires. Easy peasy, AND, I made it my own special way (without worrying it would fall apart with my sad taping skills!)


Because I had saved two cups in different sizes, from a trip to my favorite local, organic, very hip coffee house (where I actually worked as a barista about 13 years ago, before getting married) with my sweet 12 year old daughter; I created two minis with covers in different styles. I think these would be super to stick into my purse with a pen and accessories, and I could quickly whip them out, and journal about an enjoyable day, and in Smash style, I could add a cocktail sized napkin, receipt, etc.
 For this larger sized (12 oz) coffee cup mini (cutting and creating instructions are simple, just remove the bottom of the cup by punching it out, and roll out the tops of the cup. I ironed it after unrolling, to smooth it out, and then finished the edges with washi tape), I went with a more vintage, yet quirky look.


 The inside pages are made from scraps I had in my bin, and also coffee bags I had saved, that had fun graphics. All I did was trace the covers of the cup, and cut out. The edges are sewn for stability, and several of them also have washi taped edges.
I thought the cup with the coffee bean farmer on it, and the "made for" speech bubble was so interesting,. and it made for a fun back cover, when set off with a polka dot washi tape. :) 


For the smaller of the two cups (this one was for an affogato, where 2 espresso shots were poured over hand dipped, local ice cream...be still my heart) I went with a grungier, artsier look. I misted circles around the cup's tree in the middle, using a handmade stencil, and then placed stamped circles around those. I liked the geometric look it created. The "made with <3 for_______" was on the cup. I thought that was sweet.


 I'm pretty excited to take these to this coffee shop, and show them what one (or two!) of their cups can do! I'm also excited that I didn't have to throw this cup into the trash, but instead it will become a little journal that holds notes about my "me time" in the coffee shop!

Thank you SO much for joining me today, and I hope you have a wonderful day!


The Fabulous Zutter Products I used:


Wednesday, May 23, 2012

3"X4" Journal

Hello everyone, Nicole here today to share with you an altered journal I made for my sister using my Zutter Bind -It-All, Round-It-All, 3/4" Pink O-Wires and a pack of 3"X4" Clipboard Wood Covers. 


One of the things I love the most about using Clipboard Wood is that you can alter it. Initially, I was going to cover the Clipboard Wood with patterned paper, but after I thought about it, I thought the textures in the Clipboard Wood would really shine through the mist. First I used my Round-It-All to punch the top and bottom right side of the Clipboard Wood.
 Then, I grabbed some mist and paint to alter the Clipboard Wood and flower.
White the mist and paint was drying, I decied to cut up some old note paper that I had lying around the house to use as my inserts.
After the pages were cut and the Clip-Board Wood was dry, I punched holes through them so that I could bind them together.
Then, I fed the pink 3/4" Owires through the Clip-Board Wood and papers, cut the wire, and binded them together.

Once the journal was binded, I decorated the cover with some beautiful bling, flower and sentimental stamp and I was done. I think this turned out pretty with the pink and green.
Zutter Tools Used:

Other:
  • Jewels: Zva Creative
  • Flower: Zva Creative
  • Mist: Tattered Angels
  • Paint: Tattered Angels
  • Sentimental stamp: Catslife Press

 Thanks for stopping by today and I hope you enjoy the rest of your week!


Monday, May 21, 2012

Bind a Jounal

Hi everyone, Nancy here today to share another fun project I made with my Bind- it-All.


Living in Northern California, my husband and I occasionally get the opportunity to try wines (I think the nearest winery is only 7 miles, and one of our favorites is just 15). But keeping them straight; remembering which wines we have had and would like to buy, and which we are not interested in purchasing can be difficult.  I decided to create a small wine journal to save our tasting notes and wine labels.


I chose to use the 7.5x5 Acrylic covers due to their light weight and beautiful translucent properties.  I kept the cover fairly flat as I wanted to be able to toss the journal into my purse if needed.  I really love how you can see the front page of the journal through the cover, showing off the Webster's Pages papers I have had in my stash for quite some time.
 I created a little pocket on the first inner page to hold bits of paper for our notes.
 Here is one of the labels we saved with the tasting notes next to it.
One-half inch silver 0-Wires hold my journal together nicely.
And of course, I couldn't resist tying some scraps of trim to the o-wires to coordinate with the Webster's Pages papers.  Definitely a favorite technique for me.
Thanks for stopping by the Bind-it-All blog today.


Nancy

Wednesday, April 11, 2012

Upcycled Coffee Bag Journal

I'm so happy to share this project with you today on the Bind-It-All blog! 


About a year ago, I was about to throw away one of my Starbucks coffee bags, when I looked at at it, and thought that it was such a shame to throw it out, because it was so pretty! Of course, it seemed a bit silly just to keep it because I liked how it looked, but I decided to give myself a day to think about a creative use for the bag, before I pitched it. 

When I was sitting in my studio that evening, I saw my brand new Bind-It-All sitting there, and it hit me! I could collect the coffee bags, and create an album especially for my coffee loving friend Christina! I asked my extended family to save their pretty and unusual bags for me, too....and I ended up with some pretty interesting ones, especially when my parents went on their travels. 


The day I mailed the coffee album to my friend was such a great one. Though I usually only get to "virtually" enjoy coffee with Christina, I could make a handmade gift to let her know I was thinking of her over coffee each day. I think this idea makes a great unique gift for any coffee lovers out there. :)