Friday, May 15, 2009

Bind-it-All & Scor-it: Made for Each Other!

We here on the BIA DT are a biased bunch, no doubt about it! We will go on and on about how great this little tool is and give you countless reasons why you can’t live without it – not only for scrapbooking but for general paper crafting (and crafting in general).

Yet ANOTHER reason to love the tool is that you can make mini books from a variety of materials. A lot of scrappers ask me about chipboard, acrylic, wood, fabric…..but you can make a really cute project with just cardstock or sturdy patterned paper. I also discovered that using the Scor-it along with the BIA opens up new possibilities for creativity. For something fast and fun (and to use paper you probably have on hand), try this:
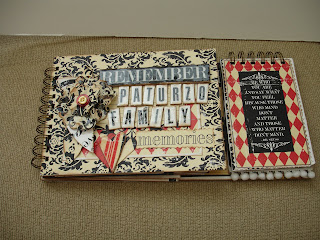
The inspiration for this project is from the Bind-it-All Around the World Idea Book, and an adorable project made by Yvonne Tinney in Virginia. It’s a simple-to-do envelope book that, once constructed, can be embellished and decorated any way (and to any degree) you wish. This would be a great “keeper” for recipes, memorabilia or as a folder to take on a vacation to collect mementos and ticket stubs, etc. I can also see using something like this to sort photos in my never-ending need to organize when I scrap! Virginia's version is a school memories booklet, to hold treaures and photos to document a school year!

Here are the supplies and tools used, and general directions:

1. 6 pieces of cardstock, trimmed 9X9” (really cute paper from Jillibean Soup is used in the sample below and in the video)
2. Round corners with the Zutter Round-it-All
(I trimmed them all at once - gotta love the RIA!)
3. Ink or distress, as desired
4. Score about 3 ½” on three corners of each sheet, using the Scor-it Board
5. Secure flaps to form pockets; use a good strong adhesive (or stitch like Yvonne did in her project!)
6. Punch holes along pocket edge using the Zutter Bind-it-All (again, I punched multiple pages at once to save time and because the BIA V2.0 has a wider punching channel to make this easier!)
7. Place pages in desired order
8. Bind with preferred color of Owire, I used Antique Brass to go with this paper
9. Embellish and complete


Now, this video doesn't have any voice over - just a bit of cuckoo music. When I was taping, both my daughters decided it was a good afternoon to gab over everything I was doing. To avoid your hearing me tell them to "go outside" about a million times, I chose to just add the music this time. Most of the steps are pretty self-explanatory, so sorry about that!

I love how the Scor-it makes the folding task so much easier and cleaner. I didn't realize that using the Scor-it helps keep the paper from cracking and is a professional grade scoring tool. I don't know what I did without it before! Gonna go play with it and experiment with some fold-out flaps for my next mini book! Goodness knows I have plenty of paper in the stash to make use of!
What have you made with your BIA and Scor-it?
Don't forget! The Beyond the Book May Challenge closes TODAY!!!! Post a comment/link NOW!!!
Have a great day!


Tuesday, May 12, 2009

BIA makes more than books! (Part 2)


This is my second offering in a series of non-book BIA projects. (See several posts below this one for my first non-book BIA project for the May blogging.) This project is a hanging album of three of my husband's nieces and nephews.

Please note that you can use as much or as little of the binding to suit your project. Here, I used just a few little pieces of o-rings to connect the panels. This is a very good way to use up leftover scraps of o-rings you end up with from other projects.

Directions are similar to the post "BIA makes more than books" a few posts down. =)

Materials:
- Zutter Innovative - 1/2" brown o-rings
- Basic Grey - patterned paper collection, alpha stickers
- Bazzill Basics - chipboard, cardstock
- Stampin' Up! - ribbon, ink
- Adirondack - acrylic paint
- Foof-fa-la - buttons
- Heidi Grace - epoxy stickers
- We R Memory Keepers - extra large eyelets


Visit us again soon more more projects and tips! --Lea

Wednesday, May 6, 2009

Reflections: An "UP"fold Album


I hope everyone had a creative National Scrapbook Day last weekend. It’s one of the few “holidays” we can call our own, and gives us license to be uber creative (and maybe a little silly too!). I was fortunate enough to attend a weekend event in Newport Beach called Reflections – a wonderful scrapbooking retreat that brought innovative teachers to intimate teaching settings (about 20-25 students per class made it really enjoyable and fun!). One of the teachers we were immensely entertained by was Stephanie Ackerman – a long time friend of Zutter – who taught her family album using the Bind-it-All, Dreamkuts and Teresa Collins’ line of Family Documented papers.

If you are still on the fence about why you might need/want a Bind-it-All, this album should help convince you. In Stephanie’s unique style, you can see how you can create an album that opens to the left, and also up on the right. It’s more than a gatefold ….it’s an UPfold….I guess. You can only get a customized album like this using the Bind-it-All!

My album doesn't have photos in it yet, but Teresa's paper are so warm and versatile that my photos will look so great....and Stephanie designed this album to be interactive in unique ways. The journaling cards, tags and file folders are placed so they fold out. Pages are scored to open like doors (and punched with border punches to give them a pretty touch). The paper letters are adhered to scrap chipboard and cut out (then covered with Glossy Accents) for an easy, shiny homemade embellishment. All of Teresa's papers work perfectly in the Dreamkuts....just cut in halves or thirds and you are done - you don't need your other trimmer or make complicated measurements when you cut! It's a dream! The right side of the album with the little 4X6 flip top is so clever, and adds a unique element to the album that you can't get in a ready-made book. The piece de resistance is the Antique Brass Owire that is perfect with this homestyle album.


So remember, with the Bind-it-All you can bind your projects in multiple variations to add that special tough to your book! Have fun!

Tuesday, May 5, 2009

OH!!! Owire Winners

Happy Cinco de Mayo everyone! Time to break out the tamales and guacamole and say OLE AY yiyiyiyiyiyi! Congrats to our OH! Wire winners from our "Perfect O" video. Franny was tickled to read all the nice comments about her video debut. I think we have coined an official new Zutter phrase: "Are your Owires o-ish?"

Random Integer Generator
Here are your random numbers:
53 66
Timestamp: 2009-05-05 18:08:05 UTC

So here are the winners for today:

#53 Lynn from Conover, NC
#66 Lee Ann Koesters, South Australia

Ladies, send me your shipping address (nan@binditall.com) with your preference of color. In addition to choosing from Antique Brass or Antique Silver, you can pick from Baby Blue or Baby Pink.
Keep your Owires o-ish everyone!

Sunday, May 3, 2009

BIA makes more than just books!

Happy May, all! The Bind-it-All does more than just bind books. To get more inspiration on what you can make wth the BIA, please go to the Design Team Galleries on the Zutter Zisters site and browse to your heart's content.

Case in point, one of my May projects is a three-paneled tabletop project called Susanna. This one is really easy to make and doesn't take much in materials. It is a quick project if you need something to give as a gift. The project I made below used 5" x 7" panels.


{ Click on photo for a closer look.}

Directions:
  • Use any size Zutter Innovative chipboard, clipboard or acrylic covers OR you can cut three any-size panels from your stash that you wish.
  • Paint or ink the edges of the panels and cover with patterned paper.
  • Bind the three panels.
  • Add matted photos, rub-ons and embellishments.

Materials I used for this project:

  • Zutter Innovative – ½” brown o-ring
  • We R Memory Keepers – patterned paper collection, alphabet stickers, rub-ons, chipboard diecuts
  • Bazzill Basics – chipboard, cardstock
  • Adirondack – acrylic paint

Thanks for coming by! I'll post a few more projects in May. Happy crafting! --Lea

Tuesday, April 28, 2009

Make Your Own "Cosy-All"

These days everything has a "cosy":
  • Starbuck's Cosies... (I have one my friend Elena made for me)
  • Cell Phone and iPod Cosies... (How else do you keep from scratching the screen?!)
  • Water Bottle Cosies... (my aunt crochets these to put over the horn of the saddle to hang her water bottle when going horseback riding)
It's just a fun little thing that makes your stuff "comfortable". I am pretty sure the term is derived from tea cosy.

Here's the wikipedia definition: A tea cosy (American English tea cozy) is a cover for a teapot,[1] traditionally made of cloth or wool, which is used to insulate the tea, keeping it warm while it brews.

Like I was saying, lots of things have cosies so...

What about Cover-Alls?!

Norma Kennedy, the winner of our spring challenge made a sort of cosy for her address book using fabric. I have been thinking of covering a Cover-All with felt for sometime and now I finally did it!


This is just the Cover-All without the book inside because I wanted to show that the whole Cover-All is truly covered with felt (and it isn't glued on).


Want to make one yourself? Here's how:

Gather the following supplies:
  • Sewing Machine
  • Felt
  • Cover-All
  • Felt Flowers
  • Buttons
  • Craft Thread
  • Needle
  • Scissors
  • Pinking Shears
  • Paint for distressing
1. Lay two layers of felt under the Cover-All and trim to be one inch larger than the Cover-All on all sides.


2. Using scissors (here I used pinking shears), snip the fabric where the envelope on the back of the Cover-All opens for the plastic sheet to slide in and out of the Cover-All. Do this on the top and the bottom of the cover.


3. Place the Cover-All to the side.

4. On one of the felt sheets cut from the notch you snipped on one side to the notch on the other side. This will be the inside of the Cover-All and will form the slot for that plastic sheet to slide into when you make your book. Do not cut BOTH sheets, just one.


5. Place the Cover-All between the two sheets of felt (the one solid piece on the outside and the cut in half piece on the inside). Sew closed with a sewing machine.

6. Trim the excess felt from the Cover-All using pinking shears. This is what the inside will look like once it is all sewn and trimmed:

Here's the slot on the inside where the plastic piece can slip into the back of the Cover-All:


7. Slip the Cosy-All off the Cover-All so you can embroider designs on the cover. I used a bit of paint on a foam brush to dry brush the book for a distressed effect. When you've finished, slip the Cosy-All back on the Cover-All and decorate the book inside.

Here are the exact supplies I used:
  • 8x8 Craft Color Cover-All by Zutter
  • Felt from the remnant section at Joann's (good place to get deals on fabric for scrapping!)
  • Felt Sheets from Joann's
  • Sizzix Big Shot & Dies
  • Joann's Pinking Shears
  • 3" Doll Needle from Joann's
  • Folk Art Craft Paint
  • Felt Flowers by K & Co
  • Sequins from Athenian
  • Buttons by American Crafts
  • Craft Thread from Joann's
I embroidered some swirls onto the cover and then stitched on some felt flowers. I used a Sizzix Big Shot to diecut some flowers from sheets of felt available from the craft store. The other flowers came in a pack, pre-assembled with adhesive on the back. I carefully peeled them away from the adhesive so that when I sewed them on, the adhesive would not gum up my needle.


To attach the little sequin flowers, I stitched up from the bottom of the sequin through the hole in the center. Then I tied a double knot (or square knot) in the center. And then I threaded the needle back down through the hole in the center of the sequin and tied the string off.

Happy Creating!! And may all your books be "cozy"!

Friday, April 24, 2009

The Beyond the Book May Challenge

Hi y'all, Vicki Flinchum here! I'm jumping on here today to give you a new challenge! I want you to create a project that IS NOT an album! That's right! It can be anything but!!! The only "requirement" is that you use the Bind-it-All in some way, shape or form. If you use other Zutter tools or supplies all the bettter! We have a prize that will make your head spin! The brand new Zutter Spinner Album Kit!!! I'm going to post one for you later....when I get mine done! (I have my dear daugther's Girl Scout Troop calling me right now though, so it's not quite complete!).

Our new challenge begins today and the last comments must be posted by May 15 – that’s a Friday. Get creating and post a link to your creation here under this post. Our DT will huddle and make their selection by May 22nd! At that time, we will have another challenge for June! Sound fun? Hope so! Let’s see what you’ve got!

In the meantime, to get those creative juices flowing, here are a couple of NON ALBUM projects using my latest favorite scrappy supply....Zutter Clipboard.


Post a comment with a link to your project. Make sure you comment about what you did to use the Bind-it-All (like, "I punched holes for the ribbon"). Have fun and go beyooooooooond the book!

And if you haven't yet, make sure you check out the Owire video below and leave a comment to win some OH-wire!!!!