Teabag Pocket Book
Before you start cutting paper up its always best to check the size of the teabag packet that you are going to use – I measured about 4 different brands and they were all similar in size (just over 2.5” long by 2 ¼” wide) so maybe there is a standard, but checking it out first will save heartache later and you can then adjust my measurements accordingly. Also, this same pattern could be used for lots of different things from seed packets for a gardener to toilette wipes or perfume sachets. Using these instructions you can also just add tags as the inserts and make it a normal mini book for quotes or photos – the only limit is your imagination!
Materials List
Zutter’s Red o’wire 1 ¼ “
Bazzil cardstock – RedPatterned paper
Chipboard for covers each measuring 3 ½” x 2 ¾”
Flowers
Ribbon – various (20” required for ties)
BG Brad
Tools
Bind It All
Round It All
Scor-It Board
Circle Punch
1. Check size of the packet you will be using. Just over 2 ½” long by 2 ¼” and add an 1/8” for the fold to make into a pocket.
2. Add enough on for the BIA holes which meant I ended up with 6 pieces of paper measuring 5 1/8” x 3 ¼”
Tip. Attached to my o’wire sizing ring I have a piece of chipboard that I use to check how many holes I will need and the distance required so that I don’t add embellies where I will be punching and binding.

3. Score fold lines to make pockets – I used my Scor-It Board because it takes the faff out of measuring each piece a couple of times but if you don’t have one a ruler and bone folder will work, just measure both sides before scoring.
 4. Fold your pocket pages ready for gluing.
 5. DST (double sided tape) the join fold inside to form the pocket (this makes the pocket equally attractive from front and back).
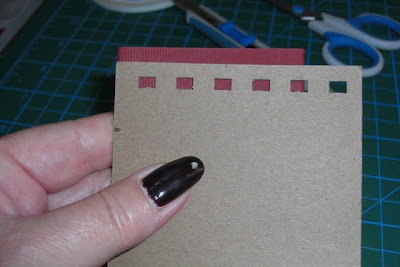
I used my circle punch to snip half circles so that it is easy to remove the contents of the pocket.

 6. Decorate pockets to your taste
Tip. I alternate the join of the pockets, one up, one down, alternating the pages so that the end project is equally fat from top and bottom, otherwise you will find that with the joins all the same way your final book will be fatter at the top than the bottom or vice versa.
7. Punch holes in the pockets with the BIA
8. Cut chipboard for front and back covers measuring 3 ½” x 2 ¾”
9. Attach a 10” length of ribbon to each cover for your closure, I added a small square of the patterned paper to the ends to make it look like the string on a teabag.
10. Decorate covers with patterned paper but leave adding any fat embellishments till after punching the holes. I took the corners off the outside edges with my Round It All.
Tip. I like to punch the holes for binding with papers on both sides of the cover but this means if you want to add flowers/ ribbon/brads/closures then the backs show through on the inside of your cover which isn’t very pretty! I attach the inside cover paper with one strip of repositional Herma, punch the holes and then remove it. You can then attach it properly once you have finished the front and cover up all the bits that you don’t want to be seen.
11. Insert your teabags into the pockets and with the covers make a pile, the height of this will indicate what size o’wire you will require to bind your project. I used 6 pockets on my book so needed the fatter 1 ¼” o’wire.
12. Sit back and admire your handiwork!!


21 comments:
Toteally adorable little book.
Eveline.
What a sweet little gift idea!!
fantastic, thanks very much
What a fab idea and very clear intructions
Lovely little book and great instructions
Thanks
Great instructions as always Annette. Super little book and love the colours you have used.
Toni :o)
SO,NEAT! I am gonna try this one! :) My mom loves tea..what a wonderful surprise to make for her! :)
Love this Annette! So cute!
OMG!!! This is too cute!!!
Great instruction on a very lovely booklet.
xx Monica
Love this project!!!
Wow, thanks for the great instructions. I am going to have a go.
What a fantastic idea - such a lovely gift to give someone.
ohh..so lovely, i must try it someday!
Love this project and I plan on completing one asap...check out my blog post and how I plan on completing my "Teabag Mini Book"...thanks so much for the inspiration. Fondly, Roberta
http://con-tain-it.typepad.com/my_weblog/2009/06/wednesdays-workbook.html
O my gosh I Love it
OMG that is tooo stinkin cute!
Love this! I'm going to have to remember it for holiday gifts to give my co-workers. =)
Absolutely gorgeous - so cute!
I don't have a BIA :( But might see if I can do this with book rings. I might get a BIA one day *sigh*
very sweet little idea for a book.
Jackie :-)
Annette, I made one last night. A little bit bigger than yours to accommodate the larger foil-wrapped tea bags. Come on by my blog later!
http://leasanders.wordpress.com
Post a Comment