
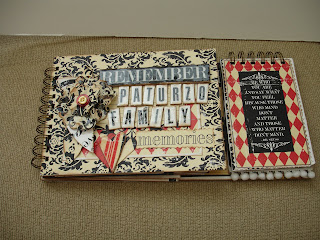


If you are still on the fence about why you might need/want a Bind-it-All, this album should help convince you. In Stephanie’s unique style, you can see how you can create an album that opens to the left, and also up on the right. It’s more than a gatefold ….it’s an UPfold….I guess. You can only get a customized album like this using the Bind-it-All! 
My album doesn't have photos in it yet, but Teresa's paper are so warm and versatile that my photos will look so great....and Stephanie designed this album to be interactive in unique ways. The journaling cards, tags and file folders are placed so they fold out. Pages are scored to open like doors (and punched with border punches to give them a pretty touch). The paper letters are adhered to scrap chipboard and cut out (then covered with Glossy Accents) for an easy, shiny homemade embellishment. All of Teresa's papers work perfectly in the Dreamkuts....just cut in halves or thirds and you are done - you don't need your other trimmer or make complicated measurements when you cut! It's a dream! The right side of the album with the little 4X6 flip top is so clever, and adds a unique element to the album that you can't get in a ready-made book. The piece de resistance is the Antique Brass Owire that is perfect with this homestyle album.


11 comments:
Cool project, Nan! I'll have to try this. =)
Really cool book! I may have to try this, too!
Thanks for sharing!
Uber cool lil book!!! LOVE it!
TFS :*)
Looks wonderful.
Eveline.
I am always amazed at the talent that surrounds us every day! AWESOME project!
Beautiful job Nan! I love Stephanie's work and Teresa's papers!
I've followed your blog for some time now and envied all the nice things you've created with the machine... Well, I've finally ordered my own Bind-It-All so now I'll be able to try out some of your creations :) Thanks for all the inspiration!!
http://cina99.bloggagratis.se
I love this, I am making a birthday present for a 6 year old and have decided to do a take on this with a colouring pad and place to hide pencils, THANKS for the inspiration!!!
This is great! Will definately give this a go!
you need to make this into an album kit...so i can BUY it! LOVE LOVE LOVE!
You can email stephanie@homngrownhospitality.com to see if she has any kits left over from the event!!
Post a Comment