Wednesday, July 7, 2010

Add a little Flap with your Binding

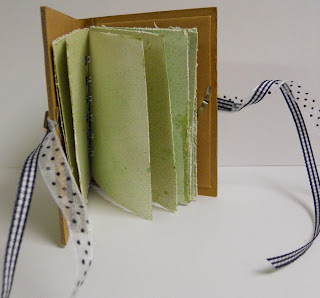
One of my favorite albums to make are flap books that have little fold-out pages which give you lots of places to add journaling.

For this album I made every other page a flap which is really easy to do. For this album which is a 6x6 album I made the inside pages 5.75 x 5.75 and for the flap pages you add 4" to one side so the piece ends up being 5.75 x 9.75 ad then score it 2" in from each side.

As I was making it I wanted to add something to each flap and realized I could thread it through the binding holes and wrap it around the flap so i played with a few different ideas on each flap.

Give a flap album a try and post them at the Zutter Zisters Message Board gallery - I would love to see them. 


Zutter Zister DT Member Fleur Smith

Sunday, July 4, 2010

Happy 4th of July

The Zutter Team participated in our local Independence Day parade yesterday (yes, on July 3rd!), with the Zutter mini horses!  We love to show off the horses and the crowd - especially the kids - love to pet them.  The team at Zutter often takes their mini horses to schools and events for children to meet and interact with the animals.  They are considered "therapy" horses and are trained as such.  They are really sweet animals, and it's hard to resist all that cuteness!  


I came home and put together a quick Cover-All album to give the boss man....just need to finish the inner pages with lots of these pictures.
Have a great holiday weekend and Happy Birthday U.S.A!!

Thursday, July 1, 2010

Recycle-Reuse!!!

My goal for this little project was to use some Zutter chipboard scraps that I had left over from other projects! I am very happy with how it turned out. The covers I kept the same size but all the inside pages are different!

To take my reusing/recycling theme even farther I decided to use my left over "punchings" from my Bind-it-All to create the mane of my lion! I am thinking these pieces would make a great border on a page or project or even as the material for a shaker box!!


Challenge yourself to reuse/recycle on your next project and make sure to incorporate your "punchings" too!!! Happy creating with Zutter!!


Zutter Zister DT Member Shelley Haganman

Monday, June 28, 2010

Easy peasy, fast and fun! With a Cover-All!

Hi there!!! Are you a busy scrapper, but in need of a cute and quick little project for a gift? I have just the thing for you!!! A darling little wallet picture holder that not only comes together super fast but can be adapted for any style!  The Zutter 3X4 Cover-All is the key to all the easy-peasy-ness (is that a word?)


For my project, all I used is one piece of white cardstock, a few colors of spray mist, a Curved Spine 3 x 4 Cover-All, (or any style Cover-All), a bit of Gesso or white paint, 2 jeweled brads, bits of ribbon, and a few scraps or letter stickers.

First, spray your white cardstock lightly with a spray mist. Let dry (or if you are impatient like I am, use your heat gun to zip it dry in a minute). Flip it over, and lightly mist the other side in a coordinating color (I used two colors of green). Let dry.

Next, cut the misted cardstock into three strips, each 4" wide.
Take each strip, one at a time and cut it into 4 equal pieces (3" wide each). You should have 12 little 3" x 4" pieces of misted CS. I chose to use my Distrezz-It-All to lightly distress each edge. Set aside.

Paint a smidge of Gesso on the front of your Cover-All. Let dry or use a heat gun to dry. Lightly spray a little glitter mist spray over the cover, let dry or heat dry. Next add a few letter stickers or cut out letters to say "A few pics" - or any title. Adhere to dry cover front.

Punch a small hole in the front cover edge for a brad and ribbon(s), repeat on the back cover. Place ribbon(s) over hole, and insert brad to hold it. Repeat for back of cover. (here is a pic of the back cover once the mini is finished and the ribbon has been tied).


Next, punch holes on one side of each 3 x 4" piece of misted CS using your Bind-It-All. Grab the insert out of the Cover-All and do the same. Bind your pages and plastic with your BIA, and slip the plastic insert into the holder inside the Cover-All.


TA DAAAAAH! Your itsy bitsy mini is done! Look at those lovely lightly distressed edges of my misted cardstock!


This project can be whipped together in well under 30 minutes. You can also use a piece of a favorite patterned paper to shave off even more time! If you don't have an itty-bitty Cover-All, this project can be easily adapted to larger sizes - Cover-Alls come is a variety of sizes including 6X6 and 8X8 - using additional cardstock.

Happy creating and gifting!

Zutter Zister DT Member Pam Sandy

Friday, June 25, 2010

Baby Blog Hop Winner!

Looks like everyone loves babies! Thank you for sharing in the joy of our newest, littlest Zutter Zister SAGE and for all the wonderful wishes.
 We generated a random number from all the comments left and the number is.....

Random Integer Generator

Here are your random numbers:
25 
Timestamp: 2010-06-25 03:57:54 UTC

Robin said...
OMGosh, How Sweet she is!! Looking forward to hopping to see all the projects!!
June 21, 2010 5:12:00 PM PDT

Robin, please email me at nan@binditall.com with your shipping address so we can send you some Baby Blue and Baby Pink owire and some oh-so-easy Cover-Alls!!  Congrats and Happy Zutterin'!


Monday, June 21, 2010

Welcome to Sage Lawrence - Our Baby Blog Hop Inspiration!

Say HELLO to the newest, littlest Zutter Zister SAGE ADRIANNE LAWRENCE, born on May 31st to our Zutter Zister DT member Down Under, Sophie Sim-Lawrence and her husband!  We are tickled PINK to have a new baby to coo over!  And isn't she the sweetest little thing?

Congratulations Sophie! To you and your proud family!
The Zutter Zisters have been cookin' up a little surprise for Sophie while WE were waiting for the big day.  We all have made a baby-themed Zutter inspired project for Sophie - and since none of us knew if we were creating for a baby boy or a baby girl, the projects are suitable for any baby occasion!  So jump on the blog hop to the blogs of the design team members below.

Leave a comment starting here and on each of the blogs for a chance to win a baby-inspired prize package.
**********************************************************************
Two 6-piece packages of 3/4" Owire - one of each color of BABY BLUE and BABY PINK
(great colors for any occasion, but we sure do love baby projects!)
A 6-piece bundle of Cover-Alls in a variety of styles, colors and sizes 
(amazingly convenient covers for quick, inspired albums!)


Visit these blogs for our baby gifts for little Sage!

Fleur Smith

We'll be drawing winners this Friday, June 25, so be sure to check back on each blog to see if you've won!

But wait, there's MORE! Zutter is having a sale on ALL owire - 15% off site-wide - starting today - for a limited time only.  Shop here for an automatic 15% discount on ALL owire packages.  Every size, color, package!!! Get those baby colors and the gorgeous Antique Silver and Antique Brass!  Yum!

Thanks for hoppin' with us and enjoy the joyful baby inspired projects!

Sophie, we all will be sending these projects for you and Sage to enjoy!
Hugs & Kissed from all the Zisters

Friday, June 18, 2010

Clipboard Wood Wall Hanging - House Warming Gift

I know several people who purchased new homes this year. It's sometimes difficult to know what to get someone as a house warming present. Then I thought about creating something homemade, from the heart. I came up with this little gift. It’s a fairly quick, easy Zutter Clipboard Wood project to make. And, best of all...it's a chance to recycle and use some of your scraps as well as customize for a particular home or decor.
The Zutter Clipboard Wood is sturdier than chipboard and is still punchable in the Bind-it-All V2.0. Try it for home projects like this, or for anything where chipboard or cardboard alone just won't do.


House Warming Wall Hanging
Gather your materials. You will need the following items to complete this project.

Tools:
Zutter Bind-It-All
Purple Cows 2in1 Trimmer and #2801 Straight Blade
Scissors, Circle Punch, border punch - I used Fiskars Threading Water Border, Small Butterfly Punch
Martha Stewart Bird Punch, Printer, Paint Brushes

Supplies:
Zutter 8”X10” Clipboard Cover
Zutter 1 ¼” Antique Brass Owires
Vintage dictionary pages; Prima patterned paper, Ranger Crackle Finish
Plaid Turquoise Acrylic Paint, Mod Podge, Copic Markers, Helmar Adhesive

Before starting, remember: Measure twice, cut once.

1. Use Mod Podge to cover one side of an 8”X10” Clipboard Cover. Let dry. Paint on crackle finish. Then apply a thin layer of paint to surface. Set aside to dry.
2. Punch two holes on each side of top. Bind with 1 ¼” Owire. Add ribbon to hang.
3. Use scissors to cut out a tree trunk and leaves. Cut out clouds.
4. Cut out house shape and fold over edges to create dimension. Add windows, shutters, roof, steps and door.
5. Punch out and add butterflies and bird.
6. Print out “Home Sweet Home”. Trim to look like banner, add to wall hanging.
7. Gift to a proud new home owner!

OZZ DT Member Vicki Flinchum