Showing posts with label Lea Sanders. Show all posts

Tuesday, April 24, 2012

Smile and Cherry Blossoms


I was inspired by the annual Cherry Blossom Festival in Washington, D.C. to create this going-away present for a friend.  This project is very easy on supplies.  Just a few sheets of paper, ink, covers and bits of ribbon, to make a book of pockets and tags.  Instead of directing the canvas to the outside of the book, I chose to ink the canvas and use on the inside.


Steps I took to create this project:


- Ink the canvas side of each cover with your choice of colors to match your project.  Lay aside to let dry.  When dry, adhere paper to the smooth side.

- Make five pockets using 6 ½” x 12” pieces of paper.  Measure so that the width is just a smidge smaller than the 5” width of the covers.  No need to adhere the short end of the pocket shut as the wire binding will serve the same purpose.  Punch small arcs into one side of each pocket edge.

- Make five tags by layering patterned paper on cardstock that is slightly smaller in width than the pockets.  I made the tags a little long so that they would stick out of the pockets.  Round the edges and add jumbo eyelets.  

- Braid four lengths of twine to make loops for the tags.


Punch the covers and pockets.  A tip for those times when you don’t have a ruler – to be sure that you are consistently punching so that your covers or your inside pages all match up, use the wire guide on the side of the Bind-it-All.  My intent was to center the cover for punching without the use of a ruler.  I eyeballed how much of the cover stuck out from each side of the Bind-it All, trying to get it as even as I could and then used the little wire guide to mark the end of the cover.  I punched the cover and without moving the wire marker, added the second cover up to the wire guide and punched.  I did the same process with the pockets.


Bind the project.  Make sure to put the back cover on top of the front cover before binding so that the closure after binding will be on the inside of the back cover.

Add additional embellishments to the cover and put the tags in the pockets.


Supplies:
  • Zutter Tools/Materials:  Bind-it-All, Canvas Art Board Covers:  5” x 7”, 1 ¼” white O-wire, Corner Rounder
  • SEI – patterned paper, cardstock
  • Stampin’ Up! – jumbo eyelets, ink
  • Timeless Twine - twine
  • Doodlebug – gems
  • ColorBok – clear sticker
  • lace, burlap, flowered ribbon

May the fairer months bring you inspiration to make beautiful gifts with your Bind-it-All!

OZZ Lea Sanders
http://leasanders.wordpress.com

Friday, March 9, 2012

Love and Marriage - BIA Style


What better way to share in a friend's wedding bliss? I celebrated my co-worker's wedding with a personalized Bind-it-All album in her wedding colors and the couple's names on the cover.


The Bind-it-All allows for great versatility and flexibility to create something beautiful for every occasion.


Hope this inspires you to create handmade projects to celebrate milestones in the lives of your friends and family.

Zutter Products
  • Zutter Tools Used: Bind-it-All
  • Owire Size & Color: 1 1/4” white
Other Materials
  • ClearScraps – tabbed chipboard
  • Stampin’ Up! – ink, scalloped chipboard, striped grosgrain ribbon
  • Basic Grey - patterned paper
  • PaperSourceBazzill – cardstock
  • Lil’ Davis Designs – epoxy alphabet
  • Prima – flowers, bling, patterned burlap
  • Pebbles – cardstock stickers
  • DoodleBug – jewels
  • acrylic, ribbon
Lea Millora Sanders
Original Zutter Zister


Tuesday, October 18, 2011

Colorful, Quick & Custom

 I made this project for a dear friend of mine who was changing jobs. This book is for her friends and co-workers to write their well-wishes in. Try repurposing things in your projects. The flowers inside the book are actually table confetti that I found in the bridal section of the craft store. They made perfect embellishments. You can find lots of items for your projects that weren’t packaged for scrapbooking.

With some brightly colored paper, and simple tools like border punches, you can create dazzling pages to showcase photos and other memorabilia.  Of course, your Bind-it-All makes creating custom books easy as ever!

Zutter Products:
Zutter Tools Used: Bind-it-All
Owire Size & Color: 1” Antique Silver

Other Materials:
SEI - patterned paper, epoxy stickers, brads; Bazzill – textured cardstock; EK Success – foam alpha stickers;Prima – flower;flower table confetti 
 

See if you can create your own colorful book for someone special (you, perhaps?)

OZZ DT Member Lea Sanders

Wednesday, August 10, 2011

Zummer with the BIA, 4th of July, and Elf Slippers

It's Day 3 of another HOT week of Zutter Zummer.  We KNOW that July has passed, and it makes us a little sad that summer has flown by so fast.  But we can still relish the joys of summer celebrations....especially when you have this colorful mini album from OZZ DT Member Lea Sanders.  We always love Lea's bright, clean designs.  Enjoy her tips and make sure you check out the shopping special and giveaway below.
------------------------------------------------------------------------------------------------
What screams hot summer fun more than Fourth of July weekend in Washington, D.C.? My family decided to visit the Smithsonian Folklife Festival in D.C. and then a quiet, casual cook-out with sparklers away from the bustling crowds. So casual in fact that my hubby was in p.j. pants and my son was wearing Christmas elf slippers!

I wanted a very sturdy cover for this project as I knew I would be adding a lot of embellishments and heavier items. The Clipboard wood was perfect. Don't be afraid to ink the Clipboard wood, it takes just time. I recommend rubbing it in until it dries before adhering any paper or embellishments.  With the Clipboard Wood, don't hold back on adding the fun trim, like the pom poms!  The wood won't buckle or give in to the extra weight.

So while your summer memories are still fresh, whip out your supplies and your Bind-it-All and secure the good times in an album that will last!

Supplies -
  • Zutter - 1 1/4" white O-wire, 8" Clipboard Wood Covers
  • Other: ClearScraps – tabbed chipboard, Creative Imaginations - patterned paper, cardstock stickers, Hot of the Press – patterned paper, Colorbok – patterned paper, Bazzill – textured cardstock, Cloud9 – foiled chipboard alpha, K&Company – embossed stickers, adhesive stars, Jolee’s Boutique – glittered foam stickers, Epiphany Crafts – epoxy bubble caps, pom  pom trim
Lea's album is made with Clipboard Wood....a sturdy, punchable cover material that's perfect for making albums that LAST!  Zutter also makes Chipboard, Acrylic and Canvas Artboard covers that provide a variety of surfaces and textures - all deliciously punchable with your Bind-it-All.  Each package of material contains two pieces - a front and back cover! Or mix and match materials - like Acrylic front cover and Clipboard Wood back cover!  So many options for creating binding perfection!
NOW....
ALL Clipboard Wood, Chipboard and Inner Cardstock Pages, Acrylic, and Canvas covers are 50% OFF!
NO Coupon code needed and NO limit. 
Stock up now for upcoming projects!
No other discounts apply to theses items, and regular shipping charges applies.

Would you like to win a sample pack of Clipboard Wood, Acrylic, Canvas and Chipboard?  Leave us a comment telling us which summer holiday or event you wouldn't mind celebrating more than once during the summer.  Heck, why not once a week?  We will draw a random winner and announce the lucky crafter on Monday!

WE LOVE ZUMMER!

Thursday, June 2, 2011

Twilight with the Bind-it-All!

I'm not the only Zutter Zister who is a Twilight fan!  I know you are out there!  Last month I attended the Twilight Convention in Arlington, VA - and I love making projects for this event.  This album served as a combination memory and autograph book. Convention guests signed on the scalloped pages and I am in the process of filling the pages with pictures from all the fun I had.

Don’t be afraid to make an extra thick project - this book will be thick with memorabilia!  The Zutter 1 ¼” owires can handle the extra bulk!
With some perfect color-themed paper and some simple additions (like border punches, ribbon, folded pages, etc.), this album came together beautifully.  The red owire was PERFECT!


Zutter Products & Materials Used:
Zutter Tools Used: Bind-it-All
Owire Size & Color: 1 ¼” red
Covers/Cover-Alls: 8” Zutter Acrylic Covers
Other Materials: 7Gypsies – 8” black book boards, Patterned Paper/cardstock: DCWV, Fancy Pants, Teresa Collins,Glitz Design, Creative Imaginations, Bazzill Basics, Stampin’ Up! – ink; Judikins – Diamond Glaze

Isn't it GREAT to create your own CUSTOM albums?
 
OZZ DT Member Lea Sanders

Thursday, April 14, 2011

Nothing "Retiring" About this Book!

One of the nicest things about being able to make your own bound books is that you can create personalized projects for any ocassion.  I recently made this retirement book for a sweet co-worker, and was able to customize it to his personality (and allow for my artistic urges!)
I gave the project a bit of a travel theme with postcard die cuts for a touch of whimsy.  After all, now that he is retiring, he will be a man of leisure!  I added tags, tickets and clips to the cover for dimension and texture, but left lots of open space on the pages for him to add photos and journaling.
Remember, when layering multiple embellishments, ensure you have enough clearance for the punches or embellish the thicker items after punching the pages.  In general use owire that is 1/4-1/2" thicker in diameter than what you think your finished project will be.  For most crafters, the 3/4-1" diameter owire suits typical projects.  Going extra bulky?  Use the 1 1/4" size.

I used the Zutter Bind-it-All (of course!), 1” Antique Silver owire, and 8” Acrylic Covers. The paper and embellies are Little Yellow Bicycle, Making Memories, along with miscellaneous buttons and ribbon.  Note how punching the page edges make them just THAT much more "wow"!  Jazz up the book with tags and note cards that you can punch and add in where you wish!

Make a special book for someone (maybe you!) and share with us at our message board!

OZZ DT Member Lea Sanders

Sunday, February 13, 2011

Love U Much Acrylic Album


Say I LOVE YOU with a sweet memory album this year!
 I wanted to make a quick and easy book for Valentine’s Day and this one was it. This project used very little materials but still makes an impact by maximizing the use of patterned paper.  Use a variety of sizes of small strips of various colors/patterns to make a colorful cover, and then have fun with coordinating colors and patterns for the inside pages.  These pages are ready for some lovey-dovey V-Day photos!

Don't forget an abundance of ribbon for the spine!


Hope you have a sweet Valentine's Day!

OZZ DT Member Lea Sanders

Tuesday, January 11, 2011

Warm Memories from Lea Sanders


Yes, I know this is an Autumn project, but we didn't get around to blogging about it till now.  OZZ DT Lea Sanders' lives in Northern Virginia where the colors are just amazing in the Fall.  She picked some papers to go with the local color to create this very warm, very special album of days she spent with her family.
This was her first use of Hang-it-Alls, and she creatively used them as an album closure instead of as hangers! Clever! And, this hearty album is made with 10" Clipboard Wood Covers.  The wood is oh-so-punchable with your Bind-it-All and durable too!  Try adding your local colors to create your special custom bound album!
Zutter Tools Used:

  • Bind-it-All, Pound-it-All Block, Rivet Setter & Hammer
  • Owire Size & Color: 1 ¼” Antique Brass
  • Covers/Cover-Alls: 10” Clipboard Covers, 9” Chipboard Covers
  • Other: Antique Brass Hang-It-Alls, Antique Brass Rivets
Other Materials:
  • Imaginesce – pattered paper, chipboard stickers
  • K&Company –layered stickers, epoxy stickers, embossed stickers
  • Heidi Grace – epoxy stickers
  • Stampin’ Up! - ink
  • ribbon

Nan for OZZ DT Member Lea Sanders

Sunday, October 31, 2010

More Boo for your Binding!

It's Halloween....oooooh, so scary!  But oh so fun to scare up creative projects! A couple of the Original Zutter Zisters have been having a scary good time!

First up - Annette West - just recently transplanted from Saudi Arabia to Calgary, Canada.
Annette made this creepy crawly coffin with a - surprise! - mini book tucked inside.
 Read what Annette had to say about this frightfully fun project:

"I made the coffin from chipboard, it was a breeze to use my Zutter Kutter to make the shapes and then covered it with all the bits and pieces I found at the Dollar Store – my first time in a country that loves to decorate for Halloween, I was amazed at all the fun stuff you can find!

I cut thin chipboard into coffin shapes for the covers and pages and then covered these with patterned papers. Made pockets for lots of tags and extra journaling on some of the pages and then decorated the owire with fibres, skulls and chains with dangly bits and a little glass bottle filled with shiny stuff."

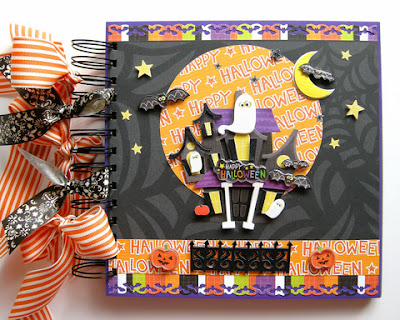
 Lea Sanders has made some spooktacular albums for this time of year (or as in the case of the Twilight projects - good for ANY time of year!) This Halloween album has such howling detailed goodness on the cover - with stickers, epoxy stickers and patterned papers from K & Company.  The inside pages carry on the patterns with ghosts, bats and witches!  Love the beautiful black owire binding too - nicely rounded owire - nothing scary there! 
And Lea knows the way around a Twilight project!  These Cullen-themed goodies were made for a Facebook contest she hosted.  I am so envious of Lea's Twi-themed projects.  She used papers from Creative Imaginations, Basic Grey, and Teresa Collins, along with glittered alpha stickers from American Crafts.  The covered brads from Imaginisce sets the covers off nicely.  I take a bite of these any day!
So although today is Halloween....make sure you make some time to cherish the memories with a BOO-tiful project for yourself!

Happy Howling Halloween!

Sunday, April 18, 2010

Team Twilight!


Sorry, all. I've been very absent from the BIA blog the last several months but I'm hoping these new Twilight-themed projects will to your liking. My daughter and I will be attending our very first Twilight Convention April 23-25 and made these just for the occasion - autograph book, event book and spinner album centerpiece (for a contest at the convention).


Autograph Book - filled with four pockets, each with a double-sided card for autographs


Event Book - This larger book will hold photos, memorabilia and other items that I might pick up along the way. There are four pages with pockets.


Spinner Album Centerpiece - This project is my baby of the three Twilight-themed projects. It took about 2-3 weeks to complete and I totally love it! Though I don't expect to win the centerpiece contest, I'm hoping this will make a good showing. =)


I used a lot of unconventional items in my projects - mostly home decor trims, buttons and comic book banking boards for the lighter pages in the spinner album. Take a chance and use non-scrappy items for your next project. (Note: None of the pictures included in the projects are mine. All of the pictures in all three projects are available on the internet on various Twilight sites.)
Photos of the completed (with photos, autographs, etc.) will be posted to my blog in May. Come by to see the finished results. =)

OZZ Design Team Member Lea Sanders