Pages

Saturday, June 30, 2012

Be true to you.

Hello everyone, Nicole here. Today I would like to share a fun piece of art I created for my craft room. I had so much fun playing with canvas, templates, and paint. As far as the mess involved, it was well worth it.


First, I altered a 5"X7" piece of canvas using a stencil and some Smooch ink. I used a plain marker for the title.


After I finished painting, I let the piece sit for about an hour to dry. Once dried, I popped the glass out from a 5"X7" frame and popped the 5"X7" canvas board behind the frame.
And here is my final project. I just love how this turned out. This really was an easy project and so much fun.
  • Supplies:
  • Zutter: 5"X7" Canvas Artboard
  • Other:
  • Template: Crafter's Workshop
  • Spray Ink: Smooch
  • Pearlized Accent Ink: Smooch
  • Black marker: Ranger
  • Gray marker: Creative Memories
  • Acrylic Stamp: Technique Tuesday
  • Wooden Frame: Target

Friday, June 29, 2012

Switch It Up-Multi Purpose Banners!

Good morning Zutter friends, 
Pinky here with a fun "interactive" banner today.
When I saw these pink O'Wires I instantly wanted to make a fun project
after thinking for a couple days I decided to make a banner, and what better
way to incorporate the amazing Bind-It-All to make it multi purpose!

The front of this banner makes a cute girl's banner, but if you 
flip the back page over it's the perfect party banner. You could do this with seasons, 
holidays, party's, names...just imagine the endless possibilities.

Step 1. Create your banner pieces, for this banner create 10 (5 for Party & 5 for name).
Step 2. Cut 10 alternating pieces 1/2" smaller. 
 Step 3. Stitch each individual piece together. (Sort)
Step 4. Depending on thickness separate into 3-4 pieces for use in Bind-It-All machine.
Step 5. Punch amount of holes needed using Bind-It-All.
]
 Step 6. Empty punched paper from side of Bind-It-All.


 Step 7. Adjust Zutter Bind-It-All to 3/4" for 3/4" O'Wires 
(size according to what chosen O'Wire is)
Step 8. To ensure proper O'Wire placement, bring the back banner
 (PARTY) to the front and press handle firmly.
Step 9. Flip front of banner back into place, and embellish. 
Step 10. Thread 1 1/2" vintage lace through each binding. 
Step 11. Using same lace- tie bow in between each banner piece. 
Here you can see each side of the banner. 
Just have fun with it! You could make it with 4-5 layers if you
 come up with the right words and pieces!

I hope you enjoyed today's idea. 
Until next time-


Thursday, June 28, 2012

Grads of 2012

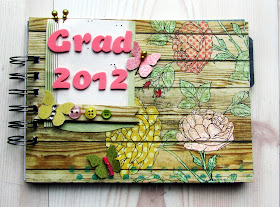
This year my son is graduating from Grade 7 and moving onto high school.  I have spent the year with his class making scrapbooks about their final year of elementary school.  It is a really small school and they don't have yearbooks so we added some extra blank paper in the back of them so they can get all their classmates to sign them.

At the end of the year they had a new student come into the class and I didn't want her to be the only one with nothing to get signed so I whipped up a little Grad 2012 autograph book with a few pages to add photos if she wants.


I was so thrilled to be able to do this with his class and the kids were very excited about making them too.  Next week is our final week of school and we will be presenting the final scrapbooks to the kids, I can't wait to see their faces.


Congrats to all the grads of 2012!

Tuesday, June 26, 2012

Oh So Sweet, Cupcake Recipe Display

           Hello Friends! Heather here to share a super fun and quick project that makes a great gift for the baker in your family. Using the Display-it-All I created a Cupcake Recipe book for my sister in law who makes the most amazing cupcakes (especially the Resse's with peanut butter frosting, yum!!) I whipped this project up in under two hours and I am super excited to share the details with you all today.

First, start off by spray painting the pieces of the Display-it-All, two coats of white spray paint covered it nicely. While your stand is drying, cut out your chipboard, paper, and recipe cards. I was able to find a pack of 25 recipe cards at my local craft store for $1.99, and used those as a template to size my chipboard and paper. I used my Round-it-All to round all of the corners to give the book a softer look. Punch your holes and bind with 3/4" Pink O-Wire and attatch to your Display-it-All stand.

Now you can start the fun part, decorating the cover and inner pages! I used a few simple images from my Silhouette SD to add some kitchen themed die cuts and tabs, tied some coordinating ribbon to the O-Wire, and I have a one of a kind recipe book. Hope I have inspired you to create your own sweet recipe book today.

Best,
Heather 
Front Cover of the Recipe Book. I used 2 cupcake liners to make an
easy and cute flower on the front.
I added lots of recipe cards and also a few blanks pages to add pictures.
                                    The rolling pin and tabs were cut using my Silhouette


Zutter Products Used:

Other Products:
*Pink and Blue Cardstock
*Cupcake Paper, The Paper Studio
*Recipe Cards, The Paper Studio
*Cupcake liners
*Satin White Spray Paint
*Ribbon
*Silhouette SD Macine for die cuts

Saturday, June 23, 2012

What's on the menu?

Hello everyone. Nicole here. Today, I would like to share a menu I made using lots of fun stuff from Doodlebug. I must admit, I'm not much of a cook, but I am a planner. So this adorable menu planner is for my husband.*inserts grin* I have put him in charge of the grocery shopping and cooking since he thinks I spend too much money on groceries and honestly, I think I made out on this part of the deal. hehe. I think the Zutter Display-it-All is the perfect product to hang up my menu for the week. Wouldn't you agree?


Since I was out of 1/2" Owires, I decided to weave lace through the wholes that I made using the Bind-it-All.


This adorable Display-it-All is really simple to use. Simply flip to the page you want to display and place the top metal bar below the middle of the book to hold it into place.


Thanks for visiting today. Please come back again!

Supplies:
  • Zutter: Bind-it-All
  • Zutter: Display-it-All
  • Doodlebug Design: Chipboard Album
  • Doodlebug Design: Trims
  • Doodlebug Design: Jewels

Friday, June 22, 2012

What's The Cat's Meow Flip Card


Hi there Zutter nation!!!
Just popping in to share my latest
creation which is super easy but
fab. Since this month
is all about that special man in
your life, Fathers that is, I 
put together this flip card
just for him.


That's all it takes is a few pages
on the outside and one or two
inside. Place your favorite photos
of time spent, some journaling,
embellish, etc. 
Put as little or as much and
I am sure that it will 
touch his heart.

To all the Fathers out there
you are loved!!!


              3. Clearsnap Smooch Spritz
             Candle Glow and Blue
             4. SEI Mayberry Collection
                       5. Recollection Sparkle Cardstock

                                                                truedivinehand.blogspot.com

Thursday, June 21, 2012

Coffee Sleeves and Instagram

Hi everyone!  Nancy here today to share with you a project I made using some coffee sleeves and my favorite binding tool, the Bind-it-All.


I love using my phone to take photos and have taken bunches of shots using Instagram.  This small format was perfect for these low resolution photos.
I really put my Distrezz-it-All to work to create the shabby chic look I was after. Placing the papers over the coffee sleeves. And then binding with 1 inch Antique Brass O-Wires.
I used lots of different trims and flowers from the Hydrangea Hippo store to coordinate with my Prima Marketing papers.
The size of this album was just perfect for using up some scraps I had lying around from previous projects.
So, have you ever used the Distrezz-it-All?


Hugs.


Nancy