Pages

Friday, November 25, 2011

The Girls Layout - with the Distrezz-it-All & Corrugated Board!

We are pleased to share this project with you from the
Design Team from Donna Salazar Designs 
featuring the Zutter Distrezz-it-All and Zutter Corrugated Board.
------------------------------------------------------------------------
While I was at the Scrapping Frenzy convention in Alabama I had a chance to make this layout.  The photos are of me with my mom and sisters from my last trip out to Arizona.
As you can see in the photo below there was a whole lotta Distrezzin' goin on! I used my Distrezz-it-All from Zutter on the background paper ("Textures" Memory Mosaics), on the Artistic Paper, on the photo mats ("Nana's Notebook" from Trunk in the Attic), on the extra corrugated  board die cut with my Creative Pages set (the first one) and then right on the photos themselves! I Smooch Spritzed the Artistic Paper with "Caramel Latte" and the new "Cashmere" color. I also inked the edges of almost EVERYTHING with my new Mix'd Media Inx from Clearsnap.
SAM_2905
Below is a double butterfly made with my Wonderful Wings Spellbinder dies. I die cut the lacey part out of my Artistic Paper and the background part from shipping labels. I used the sticky side of the sticker to adhere Fairydust Glitter in Pralines & Cream. The fancy tag was die cut from my 8x8 paper pad that has "Compatible" images that you can die cut from the Spellbinder dies and then to make it even more fabulous, I added the bling from Want2Scrap that matched the fancy tags as well!
SAM_2907
In the photo below, I die cut the lacey strip from my Creative Pages Two set out of my Corrugated board from Zutter, embossed it and inked it with my "Truffle" Mix'd Media Inx, then wrinkled it and made a ruffle out of it. Before I distrezzed the Artistic Paper I tore it to make it smaller (I shoulda used a paper trimmer) and I ended up tearing a long gash in it. I had bought a Sew Easy months ago but hadn't had a chance to play with it yet. However, I was sitting next to Monica at the crop and she had one so I got to try it out. The result is the stitching with the super thick string below. The Smooch Spritz was still damp on the string when I used my Inx on it and since they are water based the Inx blended really nicely. I also fussy cut the roses out of my Antiquities paper and embossed them with clear emboss to make them stand out.
SAM_2908
The structured flower below is made with my Rose Creations dies from Spellbinders and Artistic Paper. The rose was Smooch Spritzed with "Cashmere". The smaller flowers were made from my Grand Peony Creations and my Crafty Chronicle and was Smooch Spritzed with "Caramel Latte". The leaves are from an oooooold Spellbinder set and I Smooch Spritzed them with my new "Evergreen" color. The bling swirls are from Want2Scrap and they are called Finesse Swirls. I cut them all apart and make the swirls go the way I need them to go... it is super easy to do.
SAM_2909
On the left you can see a couple layers of my Shadow Flowers from Spellbinders. The medium sized die was used with my Crafty Chronicle for the Shadow Flower with the text and the large Shadow Flower was used with shipping labels with the glitter on the sticky side.
SAM_2911
In the photo below you can see the Distrezzing a little better. And just in case you are wondering... I'll list who is in the pictures from left to right in the large photo: Me, my younger sister (DeeAnna), my mom (Nancy), and my older sister (Debbie).
SAM_2912
In the photo below you can see the title letters that I cut out using my new "Donna's Aphas" from Spellbinders (We were soooo original on the naming of that die... LOL). I die cut the letters out of my Corrugated Board from Zutter, Spritzed them with the new "Gingerale" Smooch Spritz and inked the edges with my new Mix'd Media Inx in "Truffle". You can also see the extra Corrugated board behind the letters and this was entirely inked with the "Truffle" as well. **TIP - When you ink over a large area, make sure that you pat the pad over the surface you want to ink and don't drag the pad across. This can help extend the life of your Inx pads.** You can also see the second set of roses that were fussy cut from my Antiquities paper and embossed with Clear Emboss from Clearsnap.
SAM_2913
In the photo below you can see the "Compatible" image that was die cut from my Artistic Paper Journal Cards. I Smooch Spritzed the card with "Cashmere" and while it was still damp I inked the edges with my Mix'd Media Inx in Truffle. You can also see the second medium Shadow Flower cut from my Crafty Chronicle behind the journal card and you can see that both the Chronicle Shadow Flowers were inked with my Mix'd Media Inx in "Truffle".
SAM_2915
In the photo below you can see the medium shadow flower (cut from a shipping label and glittered on the sticky side with Pralines & Cream Fairydust) peeking out from the bottom. I also added a dymo label behind the opening on the page tab (that is from my Creative Pages Two die set from Spellbinders) and adhered it to the Artistic Paper. I finished the layout by using my vintage Dymo labeler to add "THE GIRLS" to the center of the Fancy Tag.
SAM_2916
  Thanks for stopping by today!

Sunday, November 20, 2011

Zutter Zanta Holiday Binding Online Class

No time like the "present" to get going on fun crafting ideas.  The best thing is, these ideas can be used year-round - not just for the holidays - and with supplies you likely have already or can be adapted to what you already have.

Need a sleigh full of handmade, homemade holiday gifts in a hurry?  Grab your Bind-it-All and let Zutter Zanta guide you!

  • Week 1 Projects: Mini Album in Minutes, Gift Tags/Ornaments, Home for Holidays Album, Resolutions Album
  • Week 2 Projects: Magnet Frames w/Zutter Rivets, NOEL Banner, CD Album, Hanging Wipe Board/Memo Pad
Zutter Zanta class kit can be purchased here at clearance and discounted rate. Registered students also get a site-wide discount on regular priced items at www.binditall.com.
Class starts December 9,  for 2 weeks  ~   $15  ~   Read more and register here. 

Tuesday, November 15, 2011

Fall Pop-Up Card with Zutter Corrugated Board

We are pleased to share this project with you from the
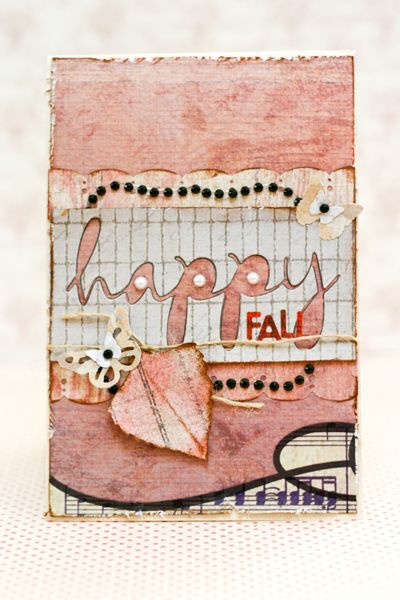
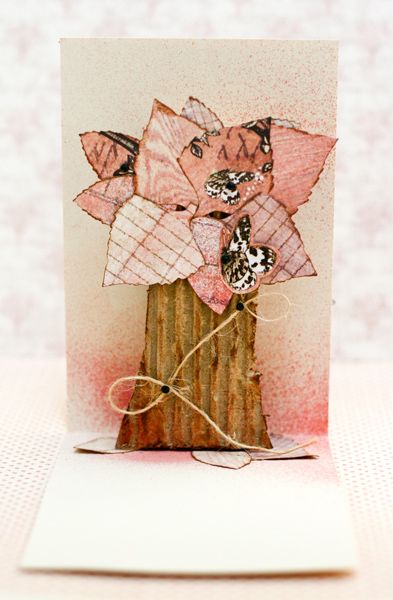
Design Team from Donna Salazar Designs featuring a Zutter's Corrugated Board on a unique Fall-themed card.
------------------------------------------------------------------------
When I learned that I would be creating a "Fall" themed project, I was kinda intimidated because in Malaysia we do not have Fall season. I have seen this season on the Internet, in the movies and magazines. I really do love the fall season, hope to experience it someday! So I decided to show you how I created this fall card with a pop-up tree on the inside- using Zutter's Corrugated Board as a key component.
Photobucket
Here is the tutorial of creating a fall pop-up card...
First you need a card base of this size: 30.5cm x 11cm. Fold them into half.
Photobucket
Photobucket
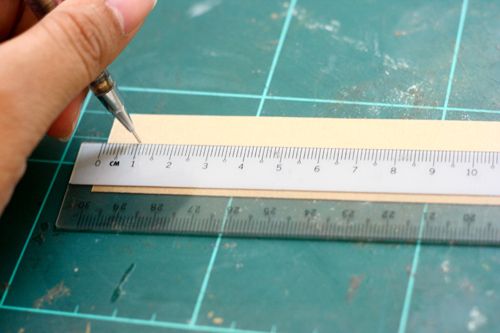
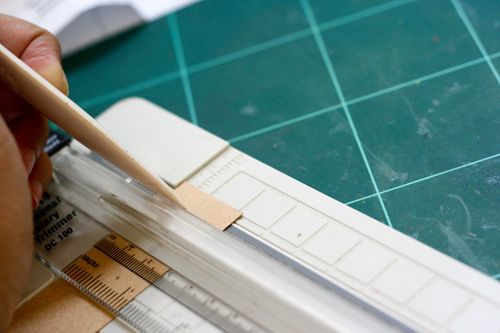
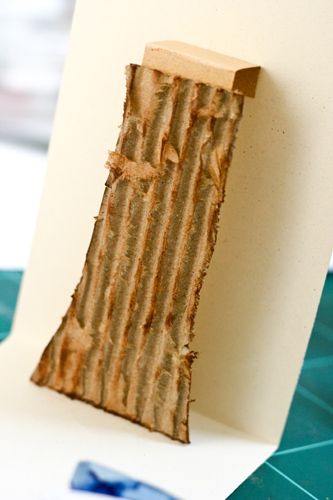
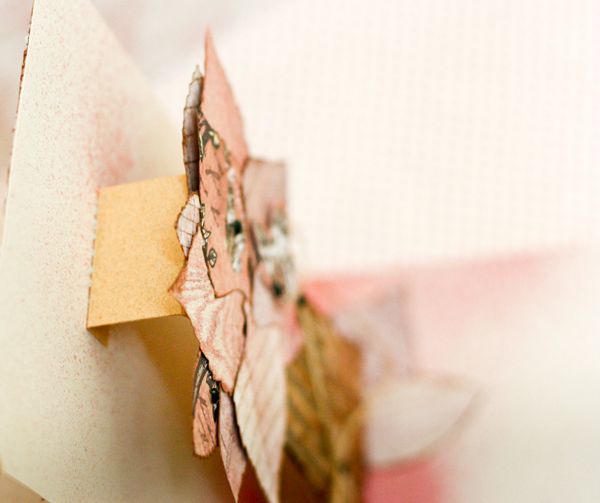
To create the pop-up base, cut a 13cm strip of cardstock, then score it 1cm from the edge followed by 3cm from the edge (ie: the gap between the 2 scores is 2cm) on the both sides of the strip.
Photobucket
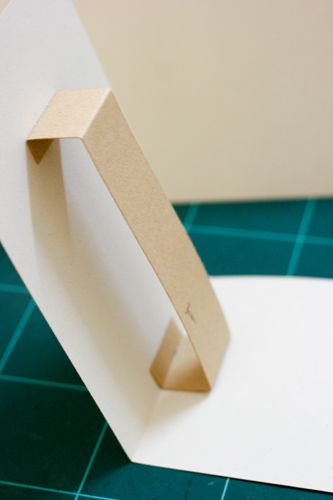
Fold all the scored lines and adhere it to the card base just like the picture shown.
Photobucket
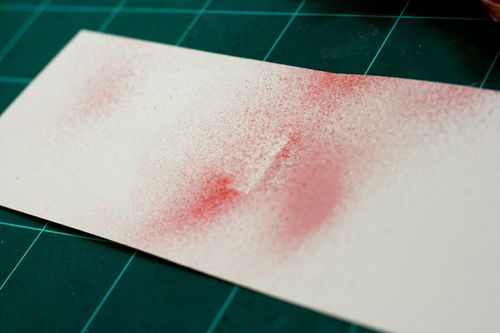
Remember to spritz the smooch to create the red background.
Photobucket
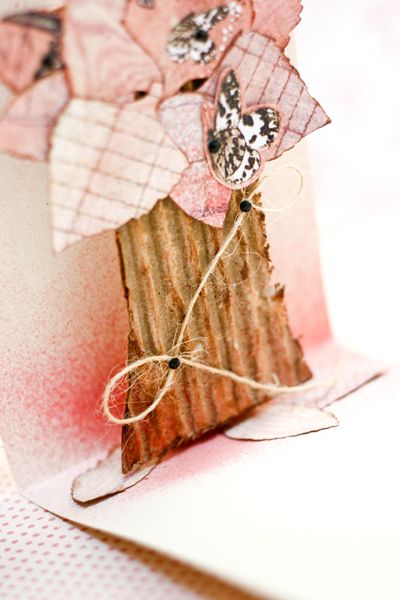
To create the tree, I used Zutter's Corrugated Board as a trunk. Distressed it with Clear Snap ink for a natural look. Once you are done, paste it to the pop-up base.
Photobucket
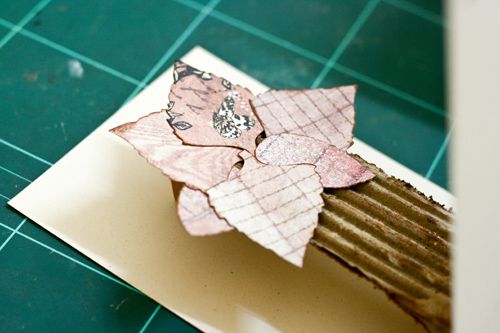
Here I used dies to create my leaves and one of the leaf die is from Donna's collection called Rose Creations. Layer all the leaves until you are happy :)
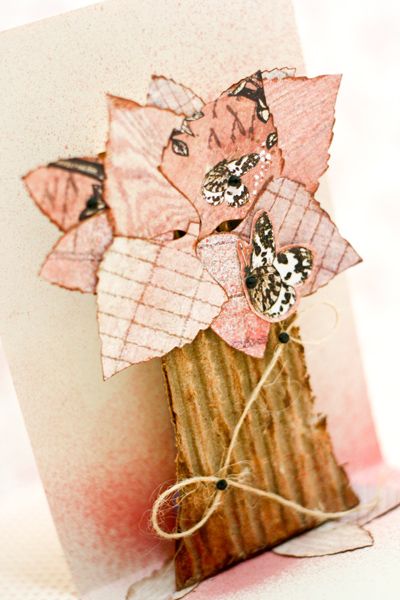
Now let me show you the completed card and also close up shots from all angles...
Photobucket
Photobucket
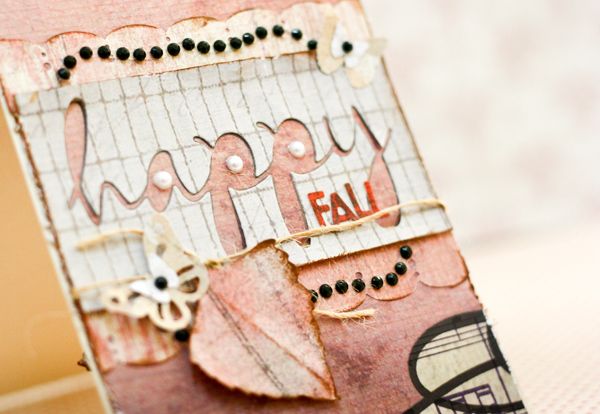
The exterior of the card
Photobucket
Photobucket
Photobucket

Photobucket
The interior of the card.
Hope you like this pop-up card and I really hope I did justice with the fall theme.
Products used:
Distrezz-It-All by Zutter
DSD Antiquities Collection for GCD Studios
DSD Smooch Spritz for Clear Snap
Rose Creations by Donna Salazar for Spellbinders
Want 2 Scrap Nestabling (Labels One Black Rhinestones) for Spellbinders
Bazzill cardstocks
Jute, leaf and happy die by Papertrey Ink
Photobucket
www.teacherjessy.blogspot.com

Friday, November 11, 2011

4 Projects in 4 Weeks Online Class

Are you ready to take your binding to the next level with some great project ideas for YOURSELF?  Oh, ok, you can make them as gifts too!  You know you're ready, so take on this class, that takes Bind-it-All basics one step further!
Class starts December 1, for 4 weeks ~ $25 
In this class, we make an Accordion Album, a Coffee Table Masterpiece using a Zutter Display-it-All, a Star Album BIA Style, and a Custom Zutter Spinner Album.

Class starts December 1, for 4 weeks ~ $25 ~ Read more and register here.

Class is all online, with videos, slideshows and downloadable PDF class notes.  You access lessons on your own time, at your own pace.  Get access to classroom forums and message boards where you can interact with the instructor and other students!  Appropriate for the original blue Bind-it-All or the pink V2.0.

Thursday, November 10, 2011

Bind-it-All Starter Kit - Perfect for the Holidays

There is a limited supply of this AMAZING Bind-it-All Starter Kit - AND there's a deal to go with it.  Pick 20% off  OR Free Shipping on this item through December 1.  But....limited, limited...limited supply, so hurry on over!

Get the coupon codes and shop here.

Wednesday, November 9, 2011

Handmade Holidays Blog Hop Winners!

Wow! Thank you for your overwhelming and enthusiastic response and participation in the Handmade Holidays Blog Hop.  We gained so much inspiration and excitement right along with you.

We want to congratulate the winner of the Distrezz-it-All:


In addition to all the "overall" drawing, Zutter also drew daily winners, which we are announcing here!
Congratulations to the winners of the Mini Scor-it-All and Envelope-it Template. 


If you visited the blogs of the participating Zutter Zisters, check their blogs to see if you "scored" a Zutter Spinner Album Kit!
Fleur Smith
Lea Sanders

Please email nan@binditall.com with your shipping address and congratulations!

Sunday, November 6, 2011

Handmade Holidays Blog Hop - Day 3 WELCOME!

It's Day 3 of the Handmade Holiday Blog Hop!   We are having a great time visiting all the blogs and just about exhausted (the good kind of pooped!) from all the ideas - our brains are about to burst from the need to craft!
 
Make sure you leave comments on all the blogs in the Hop, so you’ll be entered to win a prize pack from one of the participating manufacturer sponsors! Zutter will be awarding a Distrezz-it-All to one lucky participant!
PLUS we will draw extra winners from entries on the blogs of the Zutter Zisters who are part of this hop! So check out these ladies on their blog days for a chance for an extra fun-something!

Visit the list of blogs below - including this blog today! - and leave a comment. on each by Nov 7, 2011 at 11:59 PM PST.


Heart-felt gifts come in small packages and sometimes making nice gifts for a lot of people can be a challenge – not to mention time consuming.  Make small gifts special by tucking them into a handmade tag/gift card pocket.  Start with a 6”X6” piece of paper of your choice and score crossways at the 3” marks.  Then create a score from corner to corner from two of the previous scores.  Fold that flap up to form the bottom of the tag pocket.  Place the folded flap against the scoring ruler and score approx. ½” from both sides and fold in to form the pocket flaps.  Adhere the flaps down.  You have a cute little pocket!  You can create your own tags, but why not make it easy and Smooch Spritz some shipping tags from the office supply store.  Add sentiments to these and glue dot a gift card to the tag!  Voila!   

Trim all the 6”X6” pieces you need with the Zutter Dreamkuts and score a bunch with your Scor-it-All in front of the TV.  You can have a batch done in no time flat.  Personalize the pockets for your lucky gift recipients.
Tune in to Nan’s blog on tomorrow to see how she incorporates these pockets and tags into another Zutter-fied homemade project!

If you have read this far, then you now know that we have a special-double-secret giveaway just for this blog and the die hards who have read all the way through! Leave a comment here and be part of a random drawing for a Scor-it-All Mini Scoring Board and Envelope Template!  We will draw a random name from all comments left on Wednesday, November 9!  Domestic U.S. entries only. 


Saturday, November 5, 2011

Handmade Holidays Blog Hop - Day 2 WELCOME!

Welcome to Day 2 of the Handmade Holiday Blog Hop!   We are pleased as punch to be part of this event.  This is day 2, but you have plenty of time to hop on in, visit over 60 blogs that are overflowing with holiday crafting inspiration!
For every comment you leave on the blogs in the Hop, you’ll be entered to win a prize pack from one of the participating manufacturer sponsors!  Zutter will be awarding a Distrezz-it-All to one lucky participant!
PLUS we will draw extra winners from entries on the blogs of the Zutter Zisters who are part of this hop! So check out these ladies on their blog days for a chance for an extra fun-something!
Nan Paturzo - Zutter - Sunday Nov 6
Visit the list of blogs below - including this blog today! - and leave a comment. on each by Nov 7, 2011 at 11:59 PM PST. Each day we will be sharing a brand new list of blogs with brand new projects for you to explore, be inspired by, and create from!


 Use the Scor-it-All Envelope Template on your choice of paper.  You can either trace with a cutting blade on a mat, or trace with a pencil and trim with scissors. Follow the score lines marked on the template and score and fold.  Use adhesive on the bottom flap edges and fold to seal the sides.  When using one sheet of 12”X12” paper, you can make one envelope and one card – the card will measure 4 ½” wide by 11” long, and fold longways.  When using lots of different, coordinating papers, you can mix and match the cards to envelopes and vice versa!  Use ClearSnap inks and chalks to edge the papers, and embellish as you wish.  We like simple stickers and pieces of plain cardstock for writing sentiments and notes.
 

If you have read this far, then you now know that we have a special-double-secret giveaway just for this blog and the die hards who have read all the way through! Leave a comment here and be part of a random drawing for a Scor-it-All Mini Scoring Board and Envelope Template!  We will draw a random name from all comments left on Wednesday, November 9!  Domestic U.S. entries only.  Happy Scoring!


And....Happy Homemade Hopping!


Friday, November 4, 2011

Handmade Holidays Blog Hop - Day 1 WELCOME!

Zutter and Bind-it-All are excited to be part of the Handmade Holiday Blog Hop!  Welcome! We are thrilled to be among these wonderful designers and manufacturers -  to share ideas to create homemade, heart-felt crafts this holiday season. This three-day Hop includes over 60 stops with inspiration brimming from every corner. Explore thoughtful gifts and decor you can make for the holidays, all bundled together on one big wonderful Hop!
To sweeten things up, we’re offering a chance at a gift for you! For every comment you leave on the blogs in the Hop, you’ll be entered to win a prize pack from one of the participating manufacturer sponsors!

Zutter will be awarding a Distrezz-it-All to one lucky participant!
PLUS we will draw extra winners from entries on the blogs of the Zutter Zisters who are part of this hop!   So check out these ladies on their blog days for a chance for an extra fun-something!
Lea Sanders - Zutter - Tomorrow Nov 5
Nan Paturzo - Zutter - Sunday Nov 6

Visit the list of blogs below - including this blog today! - and leave a comment.   on each by Nov 7, 2011 at 11:59 PM PST. Each day we will be sharing a brand new list of blogs with brand new projects for you to explore, be inspired by, and create from!


Visit and leave a comment on each of the above blogs by Nov 7, 2011 at 11:59 PM PST

Let’s start off the handmade fun with these fun décor pieces.  These are super easy to make and can be designed for any occasion.  We used the large Scor-it-All scoring board to create pleated folds on 4”X8” patterned paper.  Make your crafting easy and start with some pre-cut 8”X 8” paper.  The nice thing about paper pads like this is that you don’t have to fret about finding coordinating papers and colors. They all go together! By the way, I am using my "old school" Scor-it-All - which simply means, before they were made pink!  The current Scor-it-All boards are pink to match the Bind-it-All and Dreamkuts!  I am sort of true to my long time tools!  ;)
For each “rosette” we used four 4”X 8” strips, scored accordion style at ½” increments.  What does accordion style mean?  It means make a score, then flip the paper over and score at the next ½” increment.  That way the folds will flip over in the opposite direction with each fold.  Use a strong, fast drying liquid adhesive and adhere the ends together, then flip the whole strip around in a circular fashion (when the adhesive is nice and dry).  You’ll want to have a circle (or in this case, a scalloped circle) on hand to adhere to the top of the rosette to keep it from popping up.  Then use some relatively lightweight, but firm “paper weights” to hold it down while it dries!  We like to let ours dry for a good long time, and then finish the embellishing. 
Note, you can punch the edges of the paper before you score to add a nice trim to the rosette.  Or, try the Zutter Distrezz-it-all  for a nice ruffled look.  Use ClearSnap chalk or ink to add definition to the edges, and embellish away!  We adhered our rosettes to thin dowels and used them for a holiday centerpiece.  You can make them smaller or bigger, depending on your mood – but always use the Scor-it-All for clean, crisp, professional scores and folds!


Tune in to Nan’s blog on Sunday to see how she incorporates a smaller version of these rosettes into another Zutter-fied homemade project! 
If you have read this far, then you now know that we have a special-double-secret giveaway just for this blog and the die hards who have read all the way through! Leave a comment here and be part of a random drawing for a Scor-it-All Mini Scoring Board and Envelope Template!  We will draw a random name from all comments left on Wednesday, November 9!  Domestic U.S. entries only.  Happy Scoring!


Come back tomorrow for more ideas with the Zutter Scor-it-All and other Zutter tools!  Happy hopping!